USER MANUAL · v1.1 · ENGLISH
Scale Monitor
Operating instructions and configuration
1. Introduction
Welcome to Scale Monitor and thank you for choosing it. In this manual you will learn how Scale Monitor will transforms your scale into the most powerful scale on planet.
In case you will have questions or need additional assistance please feel free to reach out to our support - https://scale-monitor.com/support/
A lot of useful information can be found on our official forum https://forum.scale-monitor.com and also there is a lot of video tutorials published on our official YouTube channel https://youtube.com/@ScaleMonitor
2. Registration
In order to use Scale Monitor you must first register. You can do that by our authorised partners registration’s link or by visiting https://register.scale-monitor.com
All you need to register is email address.
3. How to add scale
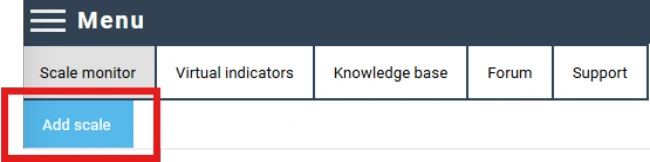
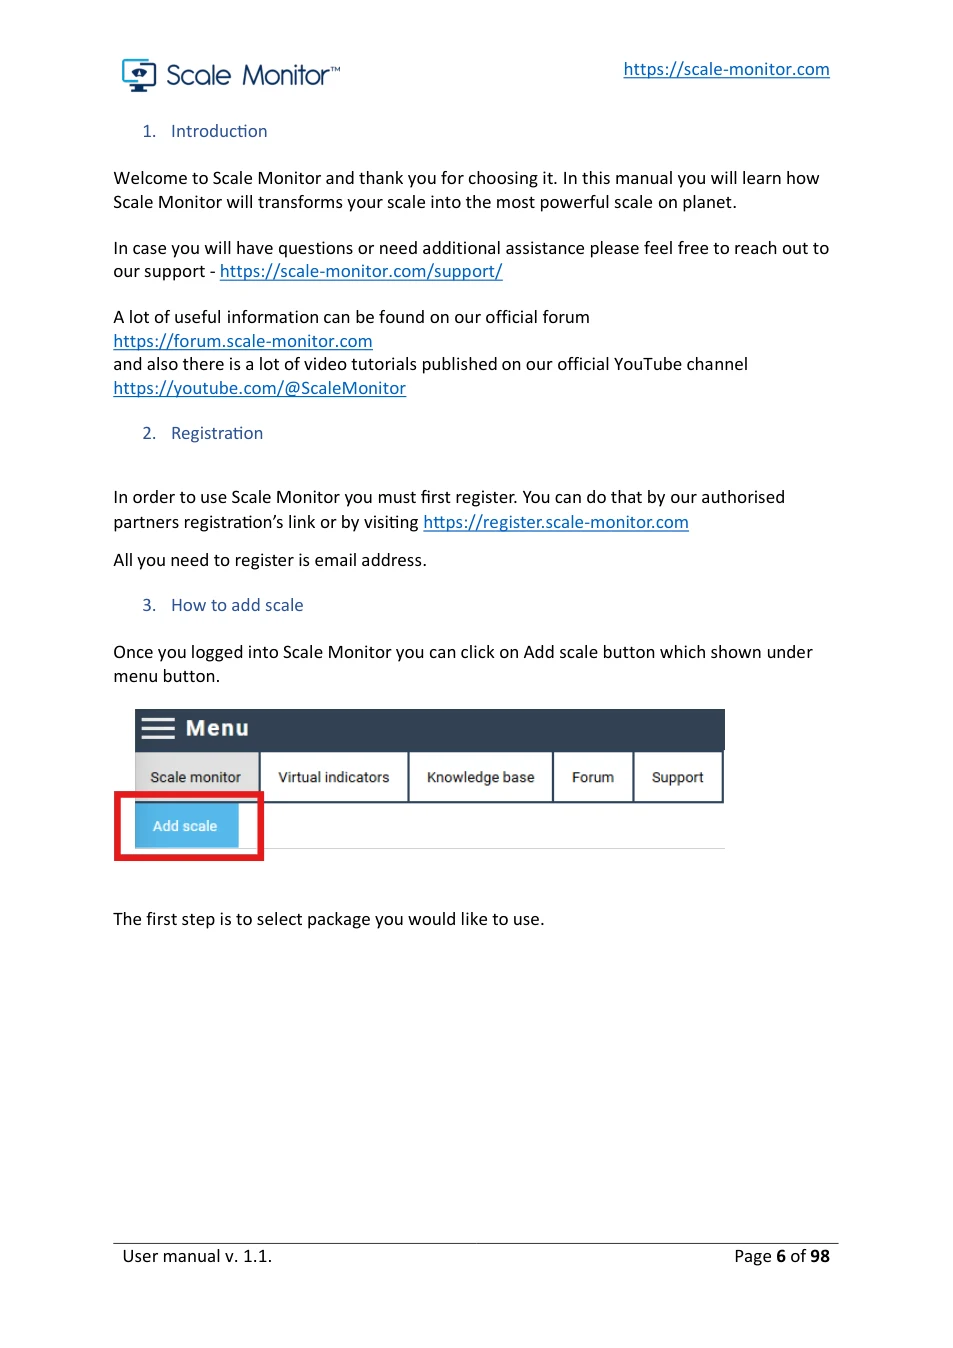
Once you logged into Scale Monitor you can click on Add scale button which shown under menu button.
The first step is to select package you would like to use.
View original page 6 — diagrams and layout
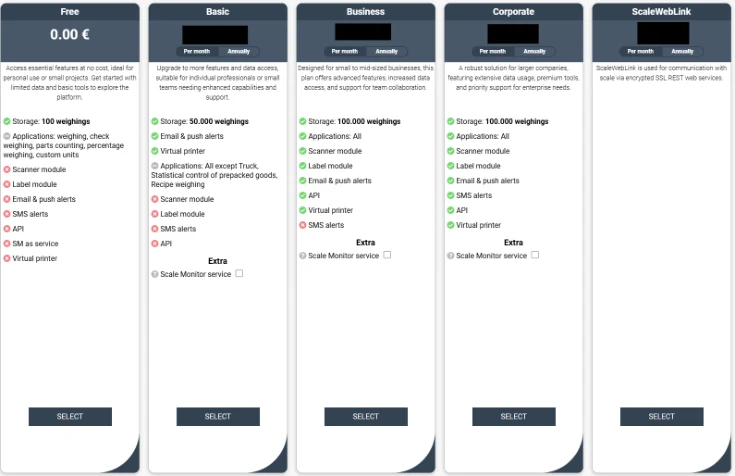
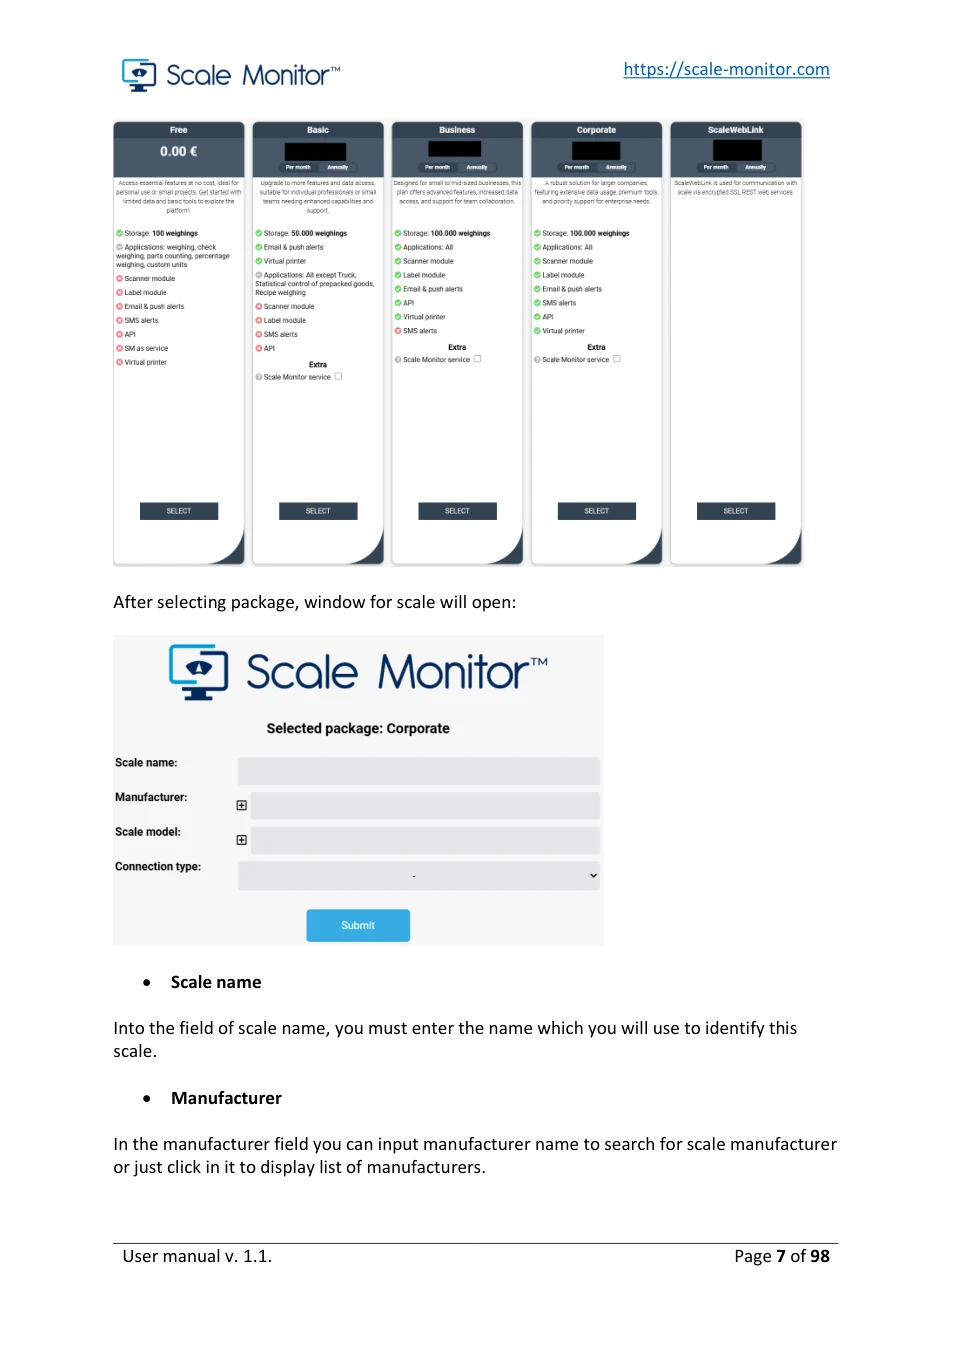
After selecting package, window for scale will open:
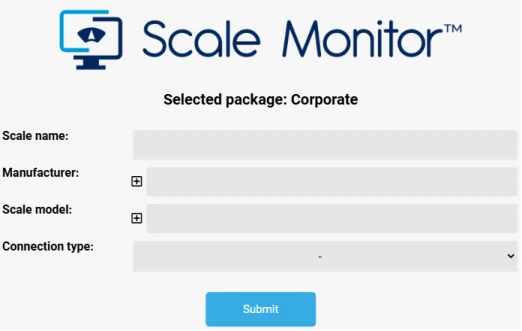
- Scale name
Into the field of scale name, you must enter the name which you will use to identify this scale.
- Manufacturer
In the manufacturer field you can input manufacturer name to search for scale manufacturer or just click in it to display list of manufacturers.
View original page 7 — diagrams and layout
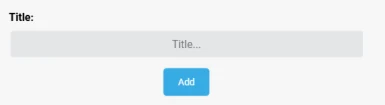
In case the manufacturer of your scale is not on the list you can click + button and add new manufacturer (in that case please follow procedure how to create protocol). Window to add manufacturer will open where you must enter name of the manufacturer.
- Scale model
Into field scale model you can enter model of the scale. If model exist you can choose it from the list and this means that all data regarding scale capacity, readout, number of decimals etc. are preset.
In case model does not exist, you can create it by clicking + button and a window to add new model will open up:
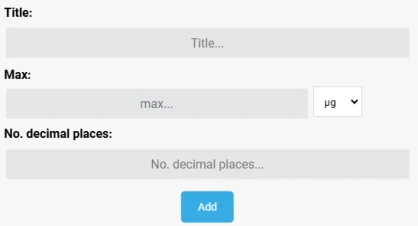
- Connection type
Under connection type you can choose between:
- CloudScaleLink module
- Bluetooth
- USB/RS-232
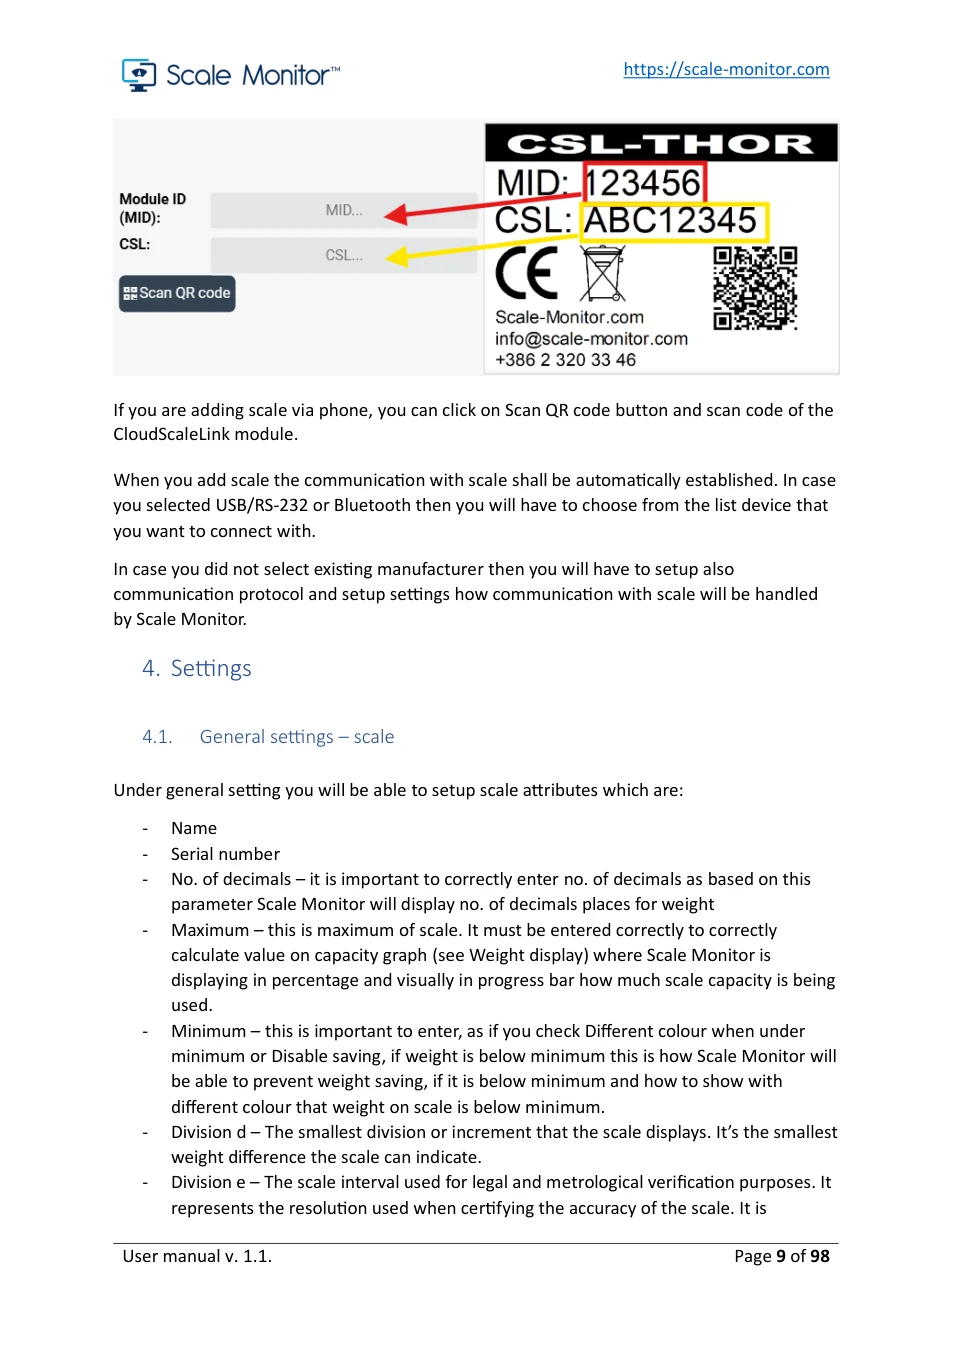
If you selected CloudScaleLink module you will have to enter MID - module ID which is six character long and CSL which is basically pin of the module.
Both are printed on the label of the module:
View original page 8 — diagrams and layout
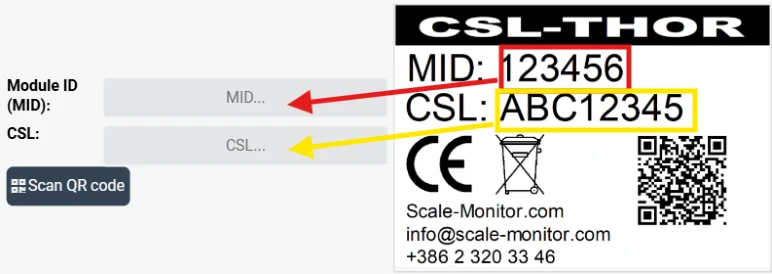
If you are adding scale via phone, you can click on Scan QR code button and scan code of the CloudScaleLink module.
When you add scale the communication with scale shall be automatically established. In case you selected USB/RS-232 or Bluetooth then you will have to choose from the list device that you want to connect with.
In case you did not select existing manufacturer then you will have to setup also communication protocol and setup settings how communication with scale will be handled by Scale Monitor.
4. Settings
4.1. General settings – scale Under general setting you will be able to setup scale attributes which are:
- Name - Serial number - No. of decimals – it is important to correctly enter no. of decimals as based on this parameter Scale Monitor will display no. of decimals places for weight - Maximum – this is maximum of scale. It must be entered correctly to correctly calculate value on capacity graph (see Weight display) where Scale Monitor is displaying in percentage and visually in progress bar how much scale capacity is being used. - Minimum – this is important to enter, as if you check Different colour when under minimum or Disable saving, if weight is below minimum this is how Scale Monitor will be able to prevent weight saving, if it is below minimum and how to show with different colour that weight on scale is below minimum. - Division d – The smallest division or increment that the scale displays. It’s the smallest weight difference the scale can indicate. - Division e – The scale interval used for legal and metrological verification purposes. It represents the resolution used when certifying the accuracy of the scale. It is
View original page 9 — diagrams and layout
important to enter, if scale has different d and e and you want to display d with different colour by checking Different colour for division e. - Range/Interval 1/2/3 – if your scale is multi range or multi-interval you can enter capacity of each range and related division d and e.
4.2. General settings – automatic saving
In this menu you can setup automatic weight saving based on different conditions.
By the default the condition is set to Do not save but you can change it to the:
- Save on interval. - Save every weighing.
If you select save on interval, you must enter time interval which is entered in seconds and every n seconds weighing will be saved. This type is useful when Scale Monitor continuously communicates with scale, and you want to save weighing every n seconds.
If you select save every weighing every received weight will be saved. This type of saving is useful when the scale does not continuously communicate with Scale Monitor but instead for instance operator press Print button on scale to send weighing to Scale Monitor.
Beside main condition you can also include other conditions that must be met to save weighing. These conditions are:
- Require weight change – if you enable this condition, you must enter minimal weight threshold – every time that weight does change for minimal weight threshold the weighing will be saved. If weight change is below threshold weighing will not be saved. - Require return to zero – this condition means that scale must be unloaded before new weighing will be saved. You can specify zero range which is basically threshold under which weight must come to release new saving. - Save weighing in zero range – this condition enables that Scale Monitor will also save weighing’s, if scale shows for instance 0 kg or is within zero range. - Require scale to be stable – this condition will save only weighing’s with stable weight.
You will find also additional conditions for automatic savings under applications settings. For instance, in check weighing application, you can enable condition to automatically save only weighing’s that are inside tolerance.
View original page 10 — diagrams and layout
4.3. General settings – advanced settings
4.3.1. Require user login Under advanced settings you can enable if user must login to use Scale Monitor. If you disable this requirement, it means that anyone with URL of this scale or QR code will be able to use it. Otherwise, the user will have to provide valid credentials to use Scale Monitor.
Please note that, if user does not need to login, then Scale Monitor will not be able to save operator data such as first name and surname together with saved measurement data.
4.3.2. Fixed unit Some scales do not send unit in their communication protocol. For these scales you must set fixed unit. Such example are Ravas pallet truck scales which do not send unit together with weighing data.
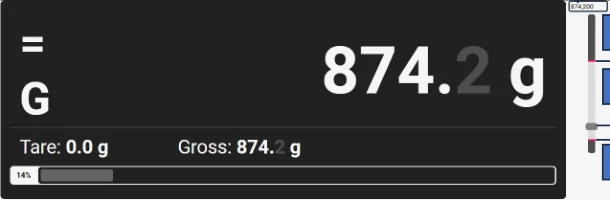
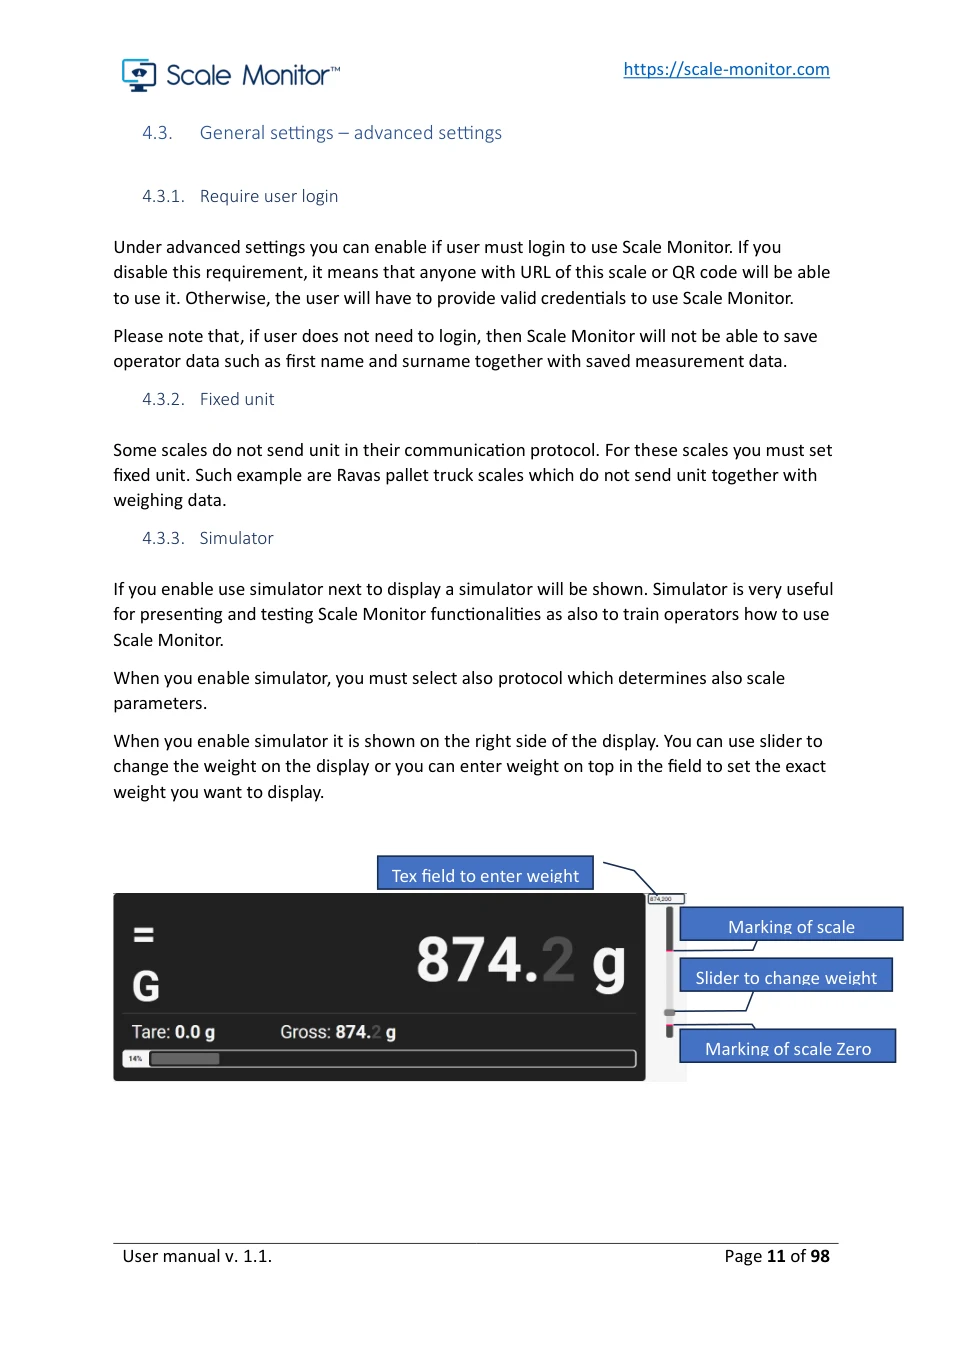
4.3.3. Simulator If you enable use simulator next to display a simulator will be shown. Simulator is very useful for presenting and testing Scale Monitor functionalities as also to train operators how to use Scale Monitor.
When you enable simulator, you must select also protocol which determines also scale parameters.
When you enable simulator it is shown on the right side of the display. You can use slider to change the weight on the display or you can enter weight on top in the field to set the exact weight you want to display.
Tex field to enter weight
Marking of scale
Slider to change weight
Marking of scale Zero
View original page 11 — diagrams and layout
4.3.4. Conversion units
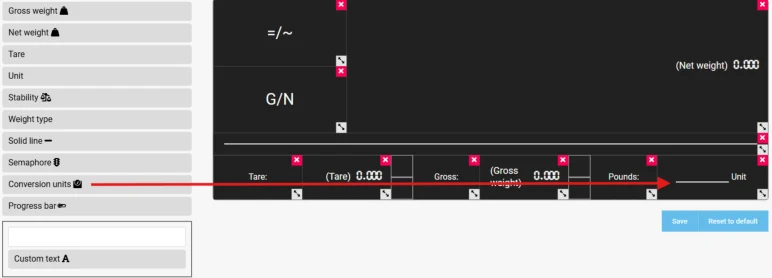
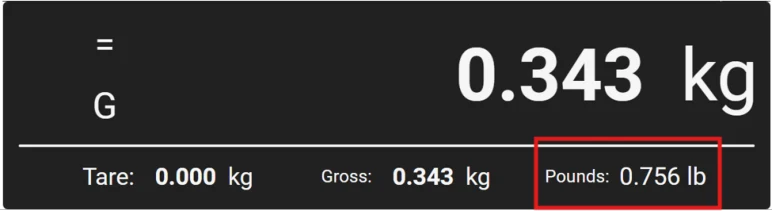
You can add different conversion units so, if you want to use for instance pounds (lb) instead of kilograms (kg) you can add new unit by entering its name and enter conversion factor. Weight will be multiplied by this factor and calculated value will be displayed in this unit.

To display converted weight, you must add it on the virtual indicator on the display:
The result is converted unit displayed on the display.
4.4. Connection
In connection menu you can setup how Scale Monitor establishes connection with scale.
There are three options:
1. CloudScaleLink 2. RS-232 / USB 3. Bluetooth
At the time there can be only one type of connection chosen. This means that you can either connect scale via CloudS caleLink, USB or Bluetooth.
View original page 12 — diagrams and layout
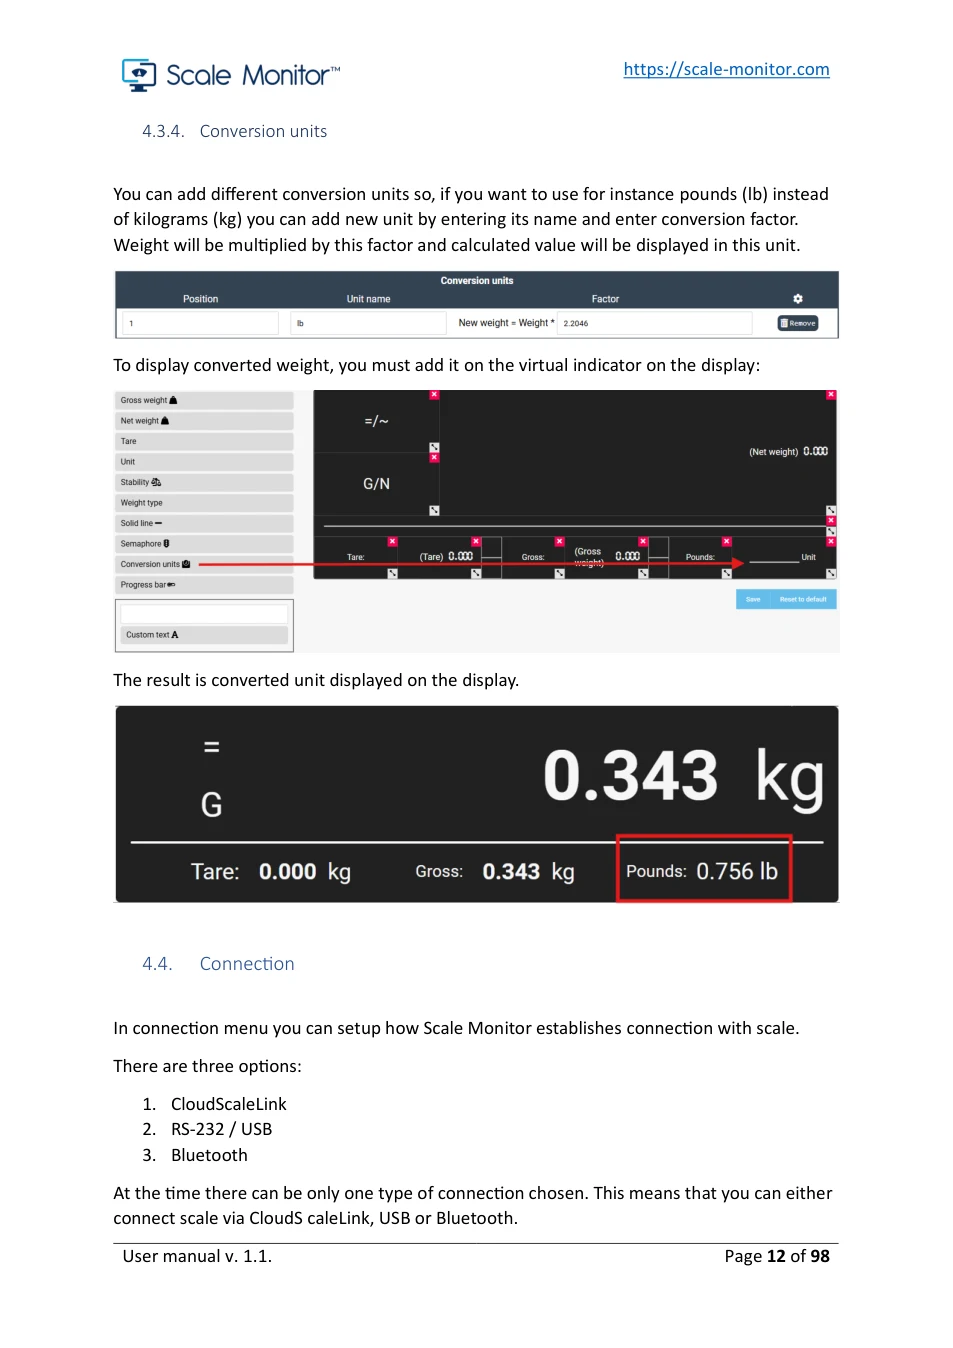

To choose connection you must check default under the connection you want to use. The checked connection is also marked with green bar under the connection name.
3.4.1. CloudScaleLink connection
If you use CloudScaleLink module you must enter module id (MID) and PIN (CSL). Both are printed on the label of CloudScaleLink module:
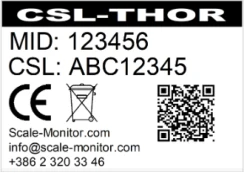
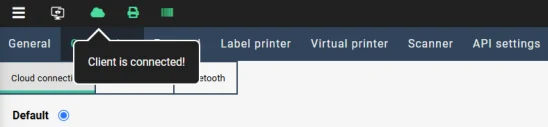
Once you enter correct MID and CSL Scale Monitor will connect to cloud and try to establish connection with the scale. Status of connection is displayed in top bar with cloud icon:
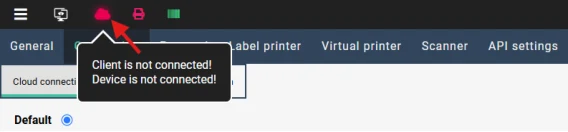
If the cloud icon is red that means, there is an error in connection. When you click on the icon you will see error description.
Client is not connected – this error occurs for two different reasons:
- Either you do not have internet connection and therefore Scale Monitor cannot establish connection with cloud - Second reason can be that MID and or CSL are not entered or are not valid.
Device is not connected – this error happens when the scale is not connected to cloud. This can be because scale is turned off or it does not have internet connection.
If you entered valid credentials and you and scale have internet connection, you will see green cloud which means you are connected to cloud and also scale is connected to Scale Monitor.
View original page 13 — diagrams and layout
3.4.2. How to connect CloudScaleLink
If you are connecting CloudScaleLink module THOR (ethernet) all you need to do is to insert ethernet cable into the ethernet socket.
If you are connecting CloudScaleLink module ODIN (WIFI) you must connect it for the first time via Bluetooth connection. You can setup WIFI parameters via an online application reachable via https://apps.scale-monitor.com/btQuickConfiguration.html
You can find complete manual on how to setup and configure CloudScaleLink modules published on apps website https://apps.scale-monitor.com and also https://scale- monitor.com/manuals-and-documentation/
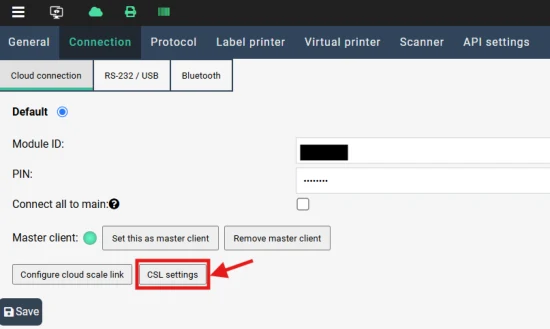
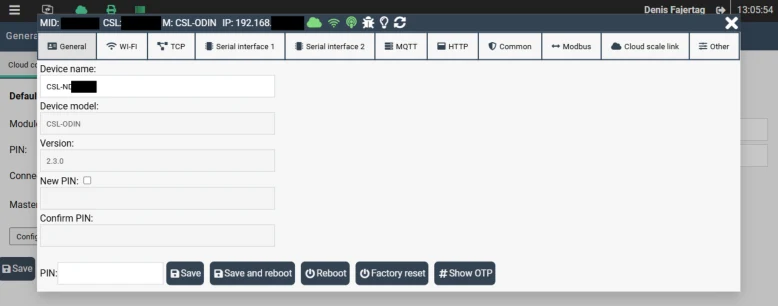
After you connected CloudScaleLink module to the internet you can configure it through Scale Monitor by clicking on button CSL settings which is available in the CloudScaleLink settings.
View original page 14 — diagrams and layout
You can also find video tutorials published on our official YouTube channel in dedicated playlist CloudScaleLink:
https://youtube.com/playlist?list=PL- xyT3s4PhzRSHVFRP4TcDhZNgg7JLtcQ&si=g7wC56nRwqd5kEHM
or visiting our official dedicated forum for CloudScaleLink configuration:
https://forum.scale-monitor.com/forumdisplay.php?fid=7
3.4.3. USB/RS-232 connection
If you check default under USB/RS-232 connection every time you will open Scale Monitor you will be asked, if you want to connect to RS-232 port? This question is a must as web browsers for security reasons requires your action to confirm access to your physically attached devices.
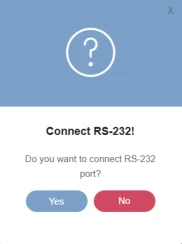
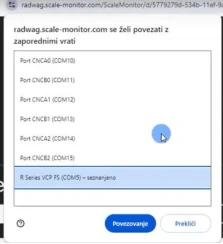
To connect with scale, you must click yes and select from the list serial port over which you want to connect with scale.
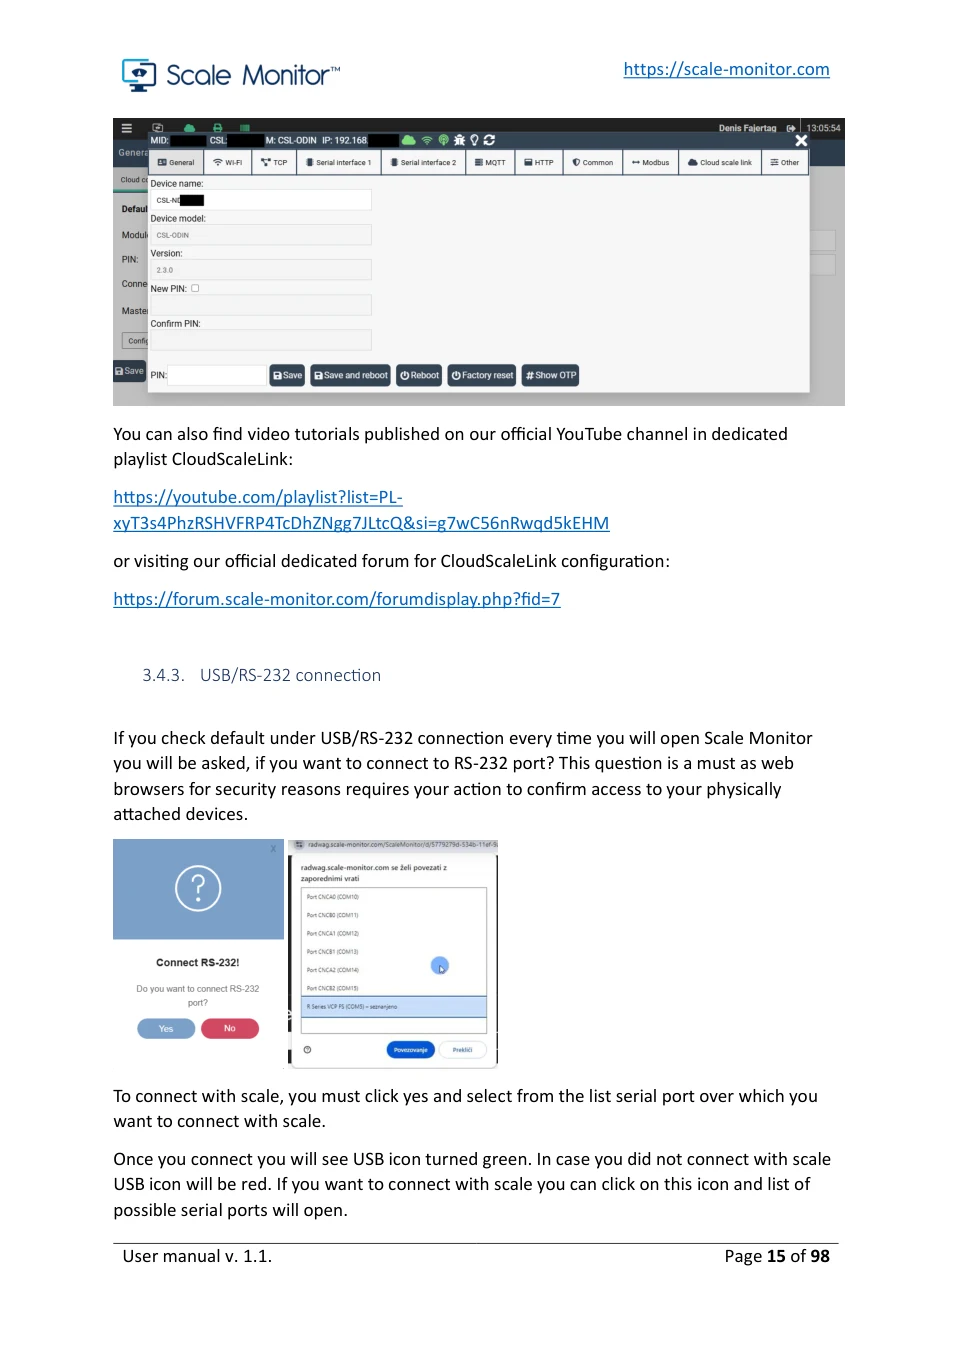
Once you connect you will see USB icon turned green. In case you did not connect with scale USB icon will be red. If you want to connect with scale you can click on this icon and list of possible serial ports will open.
View original page 15 — diagrams and layout

Serial port connection requires you to properly setup the following parameters:
- Speed – baud rate from 300 to 115200 bps. - Parity – none, even, odd - Stop bits – 1 or 2 - Data bits – 7 or 8
You can always find out which parameters are correct for your scale by looking at scale manual. Usually, manufacturers use by default the following settings:
Baud rate: 9600 bps Parity: none Stop bits: 1 Data bits: 8
These parameters are therefore preselected for serial port connection.
When you connection with serial port will be established you will see green USB icon in top bar.

You can see also video tutorial how to connect scale via USB published on YouTube: https://youtu.be/bAqjKM2FxKc
3.4.4. Bluetooth connection
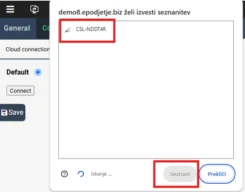
To setup Bluetooth connection you must check default under Bluetooth connection and click on button connect.
After that window with devices nearby will open and from the list you must choose device you want to connect with:
View original page 16 — diagrams and layout
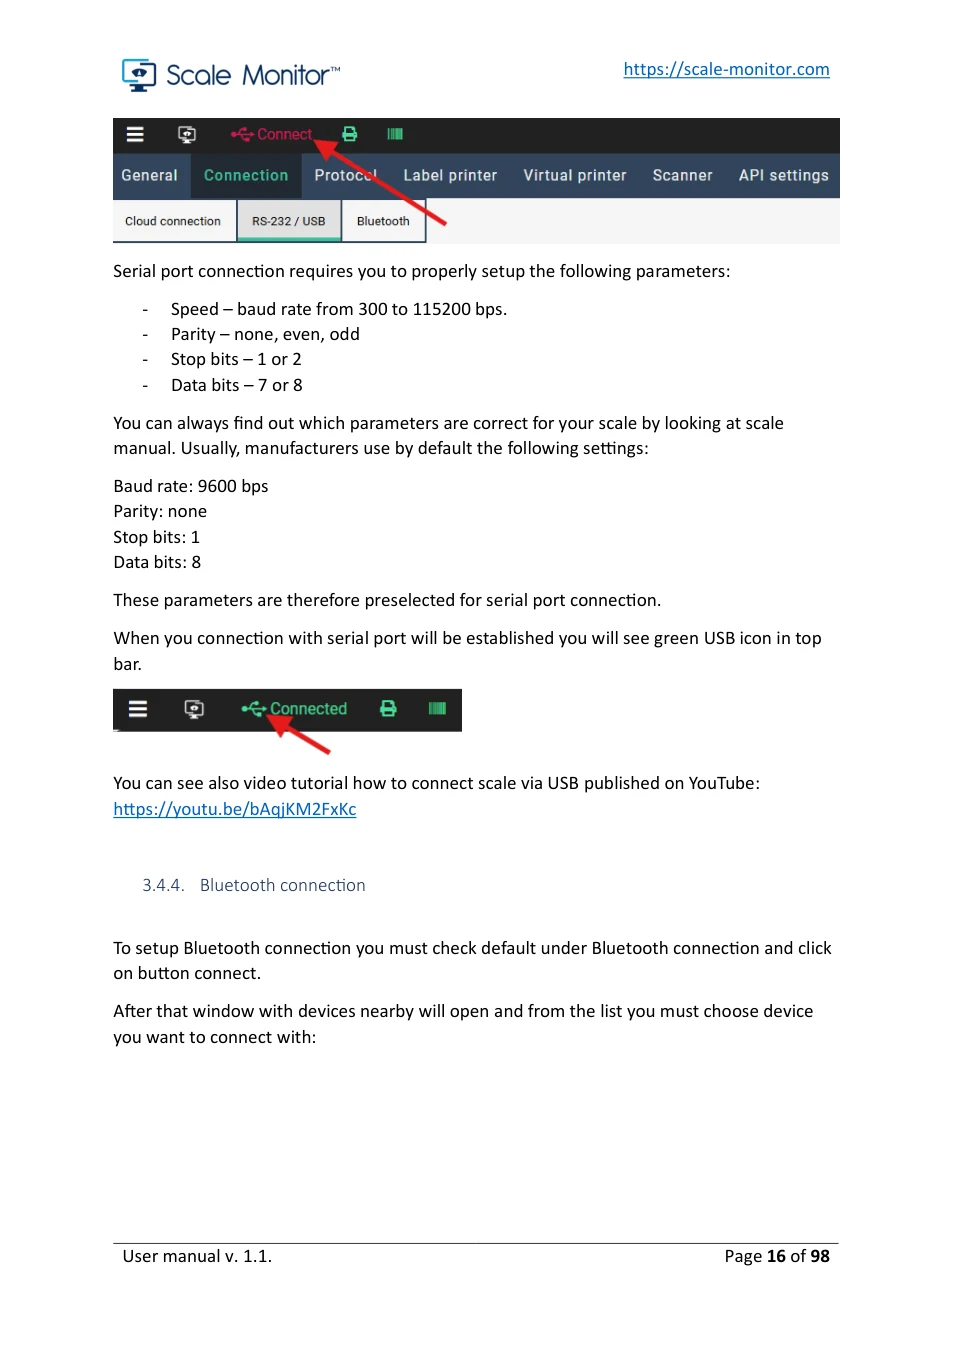
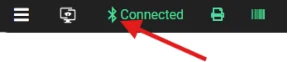
Once connection with Bluetooth is established the Bluetooth icon will turn into green:
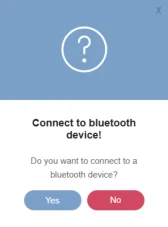
Every time you will open Scale Monitor and connection is set too Bluetooth you will be asked to grant permission to web browser to connect to your device via Bluetooth.
3.5. Protocol
Protocol is basically language that is defined by scale manufacturer how to communicate with a scale. Unfortunately, there is no standard for scale communication therefore every scale manufacturer usually makes communication protocol by himself which results in different protocols amongst different scales.
Standardization of communication protocols in scale is not an easy task as every scale has unique features and functionalities therefore making a standardization impossible.
Scale Monitor resolves this problem by enabling you to select protocol amongst predefined protocols or create a new one when needed.
Protocol in Scale Monitor is basically an algorithm that tells how to communicate with a scale.
Scale Monitor provides predefined protocols for many different manufacturers which are:
- Mettler Toledo - Ohaus
View original page 17 — diagrams and layout
- Dini Argeo - Radwag - Kern&Sohn
Scale Monitor is not limited to only those scale manufactures, but these were the fully supported ones in the time of writing this manual where over 6000 different scale models were supported. New protocols are always being added therefore number of supported scales will always increase. All the scales that you can choose from the list have everything setup for you, so you do not have to do any additional configuration. The current list of supported scales is available here: https://scale-monitor.com/supported-scales
In case you scale is not on the list of supported scales this does not mean you scale can not be used together with Scale Monitor. This means that you must create a protocol for your scale. Usually scale manufacturers provide full description of commands and answers about communication protocol in the scale manual.
If you need any assistance on how to setup communication protocol, you can always also contact our support – https://scale-monitor.com/support and we will setup protocol you need for you.
In that case please always provide the following information:
- Scale manufacturer - Scale model - Manual - Type of connection
With protocols Scale Monitor will always be able to support your current and future scale which means you will never have to worry about if Scale Monitor will work also with your new scale.
3.5.1. General settings of protocol
In general, menu of protocol you can setup following parameters:
- Terminator – this is string terminator which means how a command sent to scale or received answer from scale is terminated. Usually, all the scales have terminator set to CRLF which mean CR-carriage return and LF-linefeed. This are ASCII 13 and ASCII 10 characters. - Protocol – is the protocol that Scale Monitor will use for communication with scale. - Version – from time to time it happens that scale manufacturer changes communication protocol therefore we have implemented version to keep up with new protocols being implemented by scale manufacturers. If scale manufacturers implement new command, it will be added in new versions. Also, if scale manufacturers changes command or answer this will also be added in new versions.
View original page 18 — diagrams and layout
This how Scale Monitor can keep working existing scale and support new ones with new versions of protocols. - Default format – this basically format/command that will be used once Scale Monitor receives data from scale. You must set default format when you use scale in the way that scale send data automatically for instance upon stability or when you press print button. - Send on connect – here you can specify a command to scale once Scale Monitor establishes connection with scale.
3.5.2. Continuous mode
Continuous mode means that Scale Monitor is continuously asking scale about data. This is the preferred method of communication. Whenever you select scale model from the list (this means we have preset all parameters for scale) continuous communication will be used.
In continuous mode we have following parameters:
- Command – this is the command that Scale Monitor will be sending to scale continuously. - Start on – you can select whether Scale Monitor starts sending to scale continuously once connection with a scale is established or by button. In case of button, you must add to virtual indicator button and set button type to Enable/disable continuous mode. - Wait for response – this is how long Scale Monitor shall wait for scale response. Typical response time from scale is around 150 ms. Sometimes scale is performing another job, or it is a bit slower therefore we advise you to setup response time between 2000 and 5000 milliseconds. - Wait before sending command – Scale Monitor by default once receives answer from scale send new command. If you want to slow down communication with scale, you can add delay by entering value different then 0 into this field. If you enter for instance 100 this means that when Scale Monitor receives answer from scale it will wait another 100 milliseconds before sending new command.
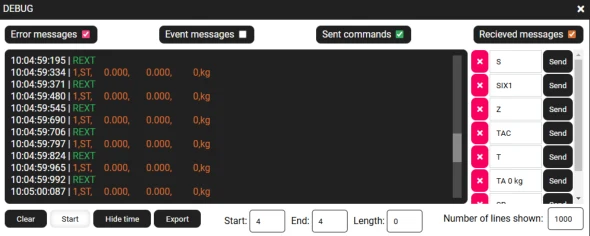
Example of continuous communication with Dini Argeo scale where request command for weight REXT is used.
View original page 19 — diagrams and layout
3.5.3. Service mode
Service mode is specially designed program that runs in cloud. This means that Scale Monitor does not need to be opened in browser on some device to communicate with scale and collect data.
This is especially useful for automatic scales such as checkweighers if you want to collect and store data in cloud or for instance daily collect data from scale at specified time intervals for instance to monitor weight in silo.
Service mode is also needed for self-service weighing system such as truck scale in with self- service support where driver execute weighing with his phone by scanning QR code of the scale.
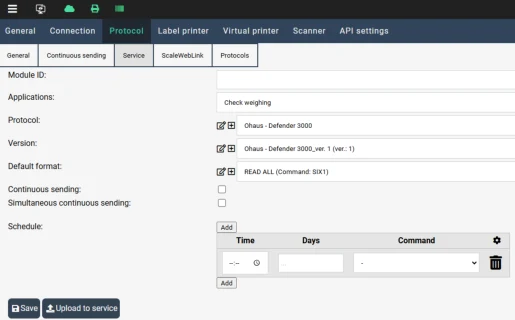
In the service mode you must always specify module ID (MID) which will be used by the service.
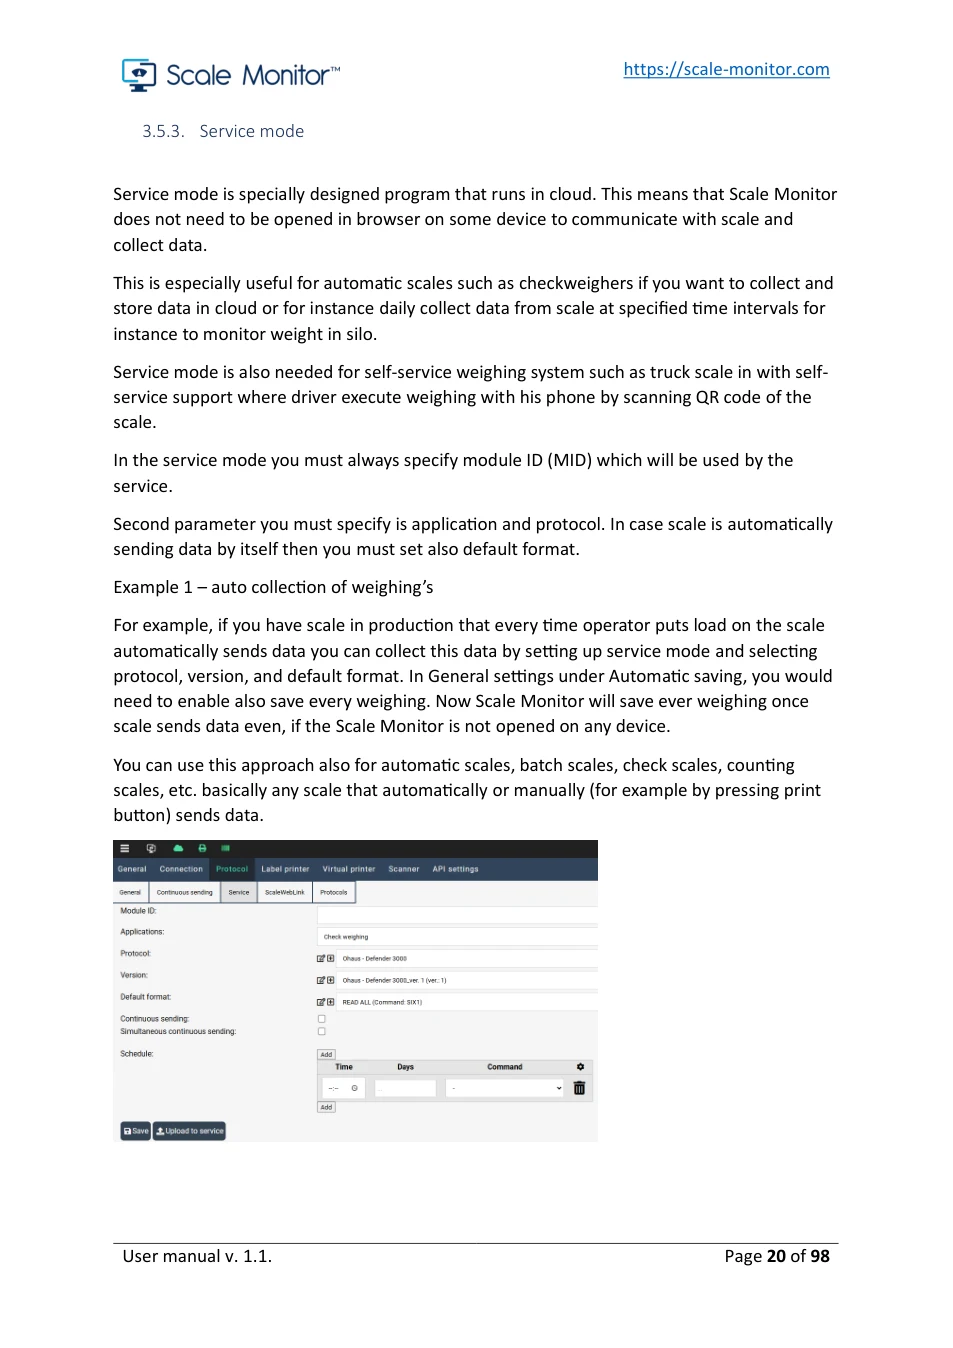
Second parameter you must specify is application and protocol. In case scale is automatically sending data by itself then you must set also default format.
Example 1 – auto collection of weighing’s
For example, if you have scale in production that every time operator puts load on the scale automatically sends data you can collect this data by setting up service mode and selecting protocol, version, and default format. In General settings under Automatic saving, you would need to enable also save every weighing. Now Scale Monitor will save ever weighing once scale sends data even, if the Scale Monitor is not opened on any device.
You can use this approach also for automatic scales, batch scales, check scales, counting scales, etc. basically any scale that automatically or manually (for example by pressing print button) sends data.
View original page 20 — diagrams and layout
Example 2 – time interval
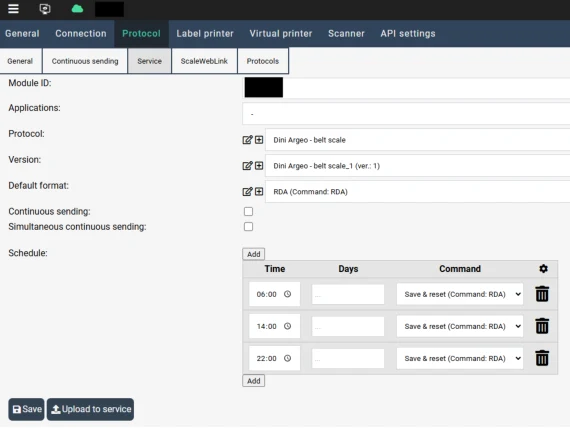
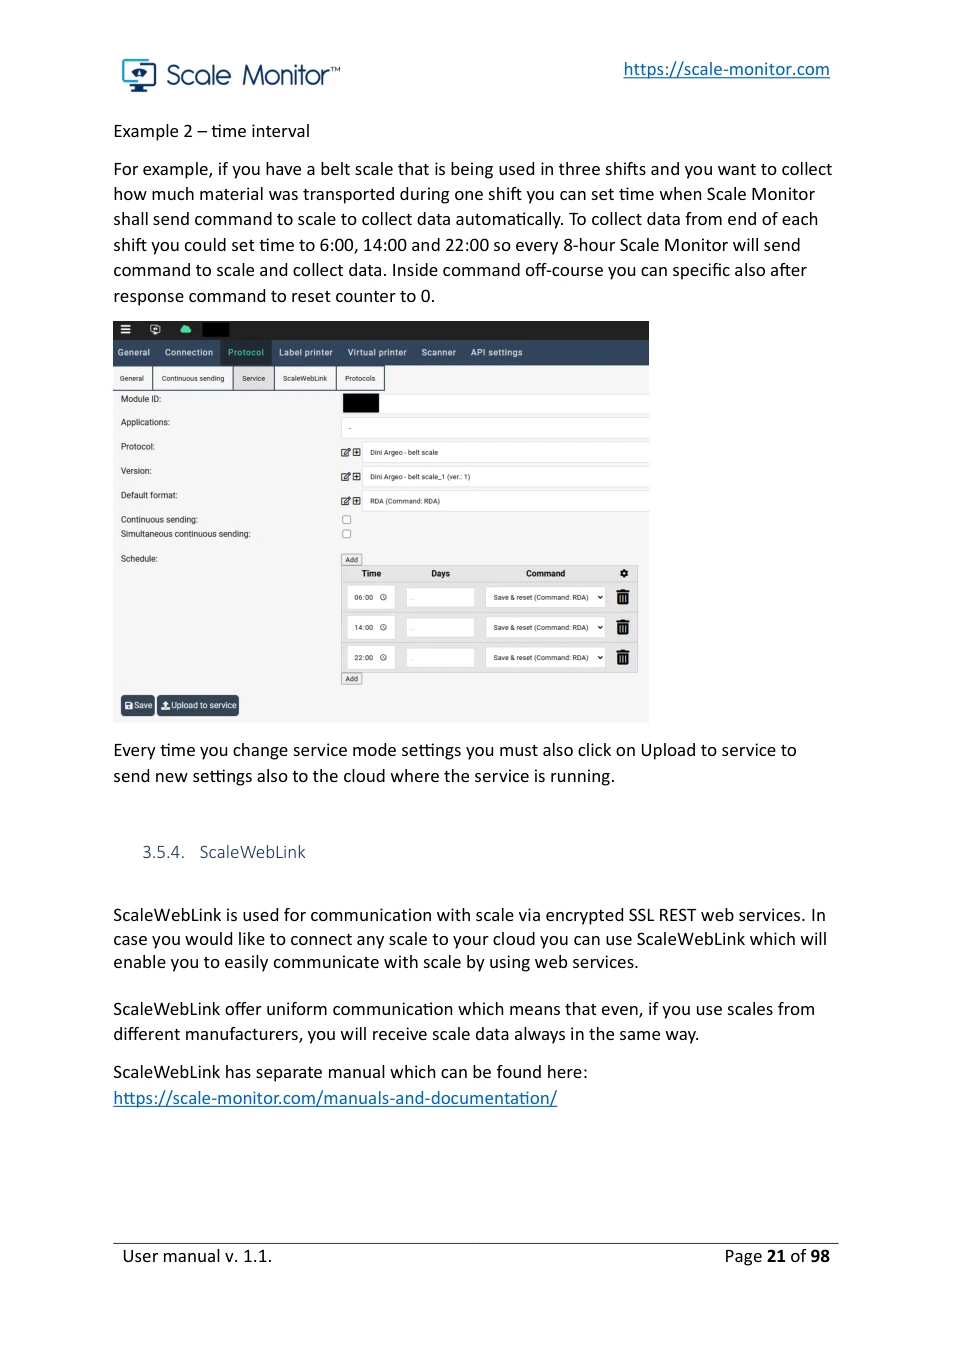
For example, if you have a belt scale that is being used in three shifts and you want to collect how much material was transported during one shift you can set time when Scale Monitor shall send command to scale to collect data automatically. To collect data from end of each shift you could set time to 6:00, 14:00 and 22:00 so every 8-hour Scale Monitor will send command to scale and collect data. Inside command off-course you can specific also after response command to reset counter to 0.
Every time you change service mode settings you must also click on Upload to service to send new settings also to the cloud where the service is running.
3.5.4. ScaleWebLink
ScaleWebLink is used for communication with scale via encrypted SSL REST web services. In case you would like to connect any scale to your cloud you can use ScaleWebLink which will enable you to easily communicate with scale by using web services. ScaleWebLink offer uniform communication which means that even, if you use scales from different manufacturers, you will receive scale data always in the same way.
ScaleWebLink has separate manual which can be found here: https://scale-monitor.com/manuals-and-documentation/
View original page 21 — diagrams and layout
3.5.5. How to manage and create new protocols
Under Protocols menu you will be able to see and manage protocols.
Protocol is basically algorithm that tell Scale Monitor how to parse data that comes from scale.
Protocol is composed of at least one item. Item can be simple extraction algorithm or command with expected response.
Inside item you can set:
- Name of the item inside protocol. - Command – this is command that will be sent to scale for instance in continuous mode or when pressing button if this command will be selected. - Division type – this basically tell Scale Monitor how to extract data. You have two possibilities:
o Position – if position is selected this means that data coming from scale havefixed length and on specified places there are certain data. In this case you will
need to provide start and end of each value inside received data.
o Divider – if divider is selected this means that data coming from scale consistvalues which are separated in array with divider. In this case you will have to enter also index under the algorithm. - Remove characters – sometimes scale send data which you want to remove from received string. In that case you enter characters you would like to remove into this field. - Replace characters – in case you want to replace some characters with different characters you can enter characters in the form A=B which means that every A will be replaced with B. - Save response as weighing – if you check this option every time you will send command to scale, and Scale Monitor will receive response this response will be saved as new weighing.
We strongly suggest that when you want to create new protocol you use built in debugger which will enable you to see what the response is coming from scale to create or manage protocol.
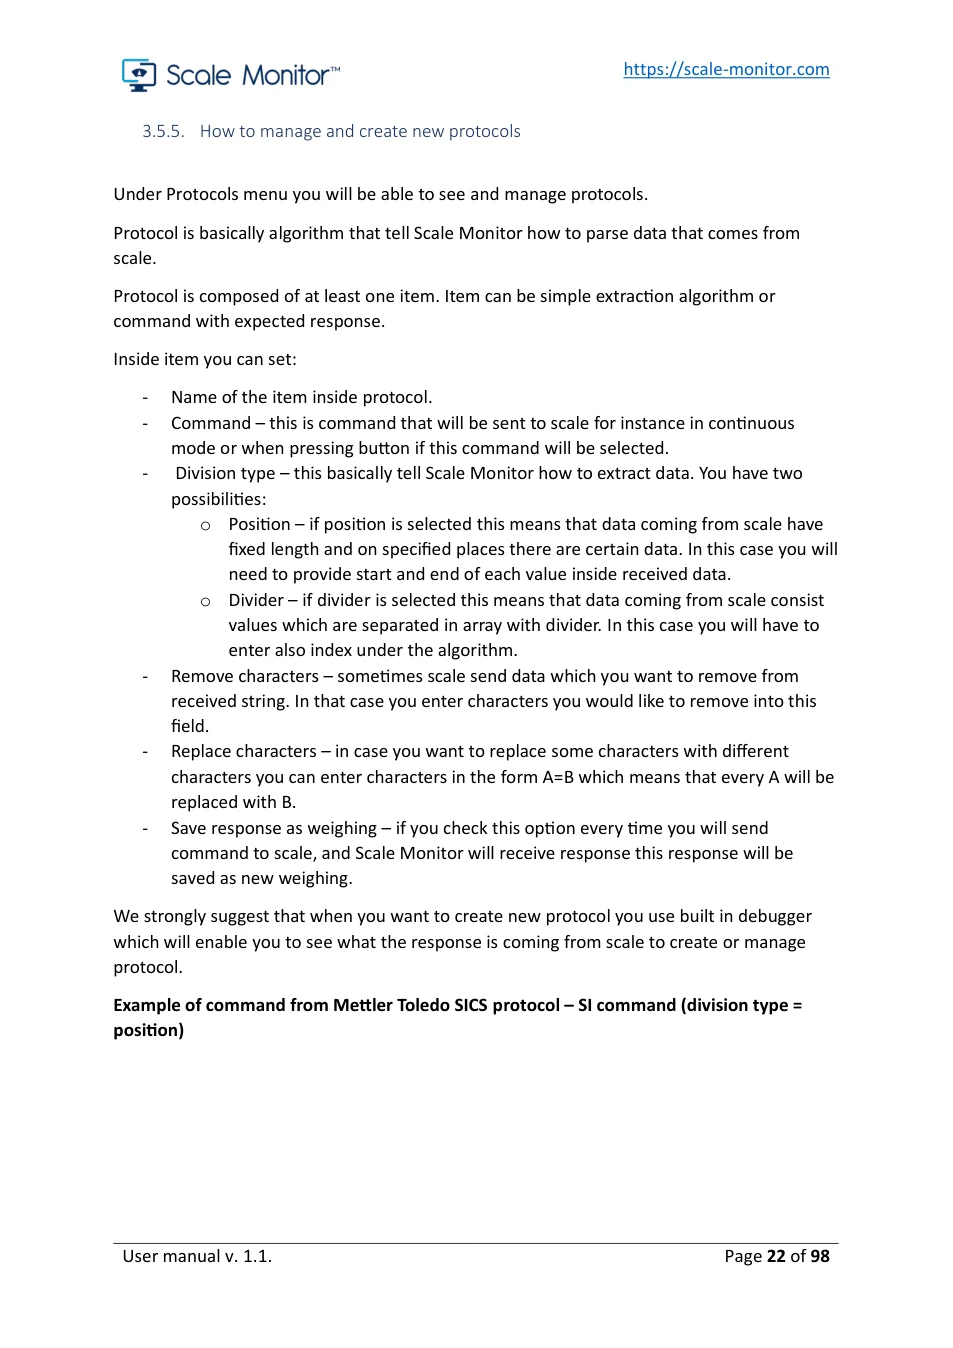
Example of command from Mettler Toledo SICS protocol – SI command (division type = position)
View original page 22 — diagrams and layout
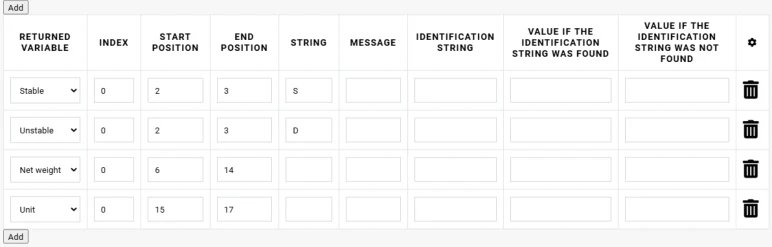
This is a simple protocol with type position.
To recognize stability of scale Scale Monitor will extract from received scale response from position 2-3 if string is S. If yes this means that the weight is stable. If string is D this means that weight is unstable.
Net weight will be extracted from position 6-14 and unit will be extracted from position 15 to 17.
This is a simple algorithm that tells Scale Monitor how to recognize and extract data coming from scale.
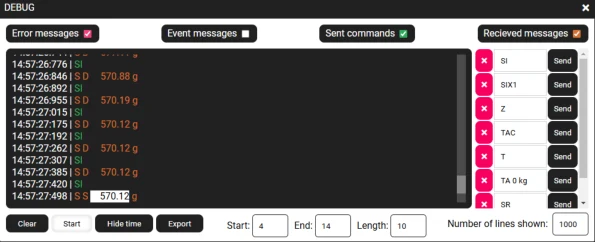
Protocol in debugger:
Example of command from Dini Argeo – REXT command (division type = divider)
Command REXT sent to scale gives response marked in orange below.
REXT 1,ST, 0.000, 0.000, 0,kg
View original page 23 — diagrams and layout
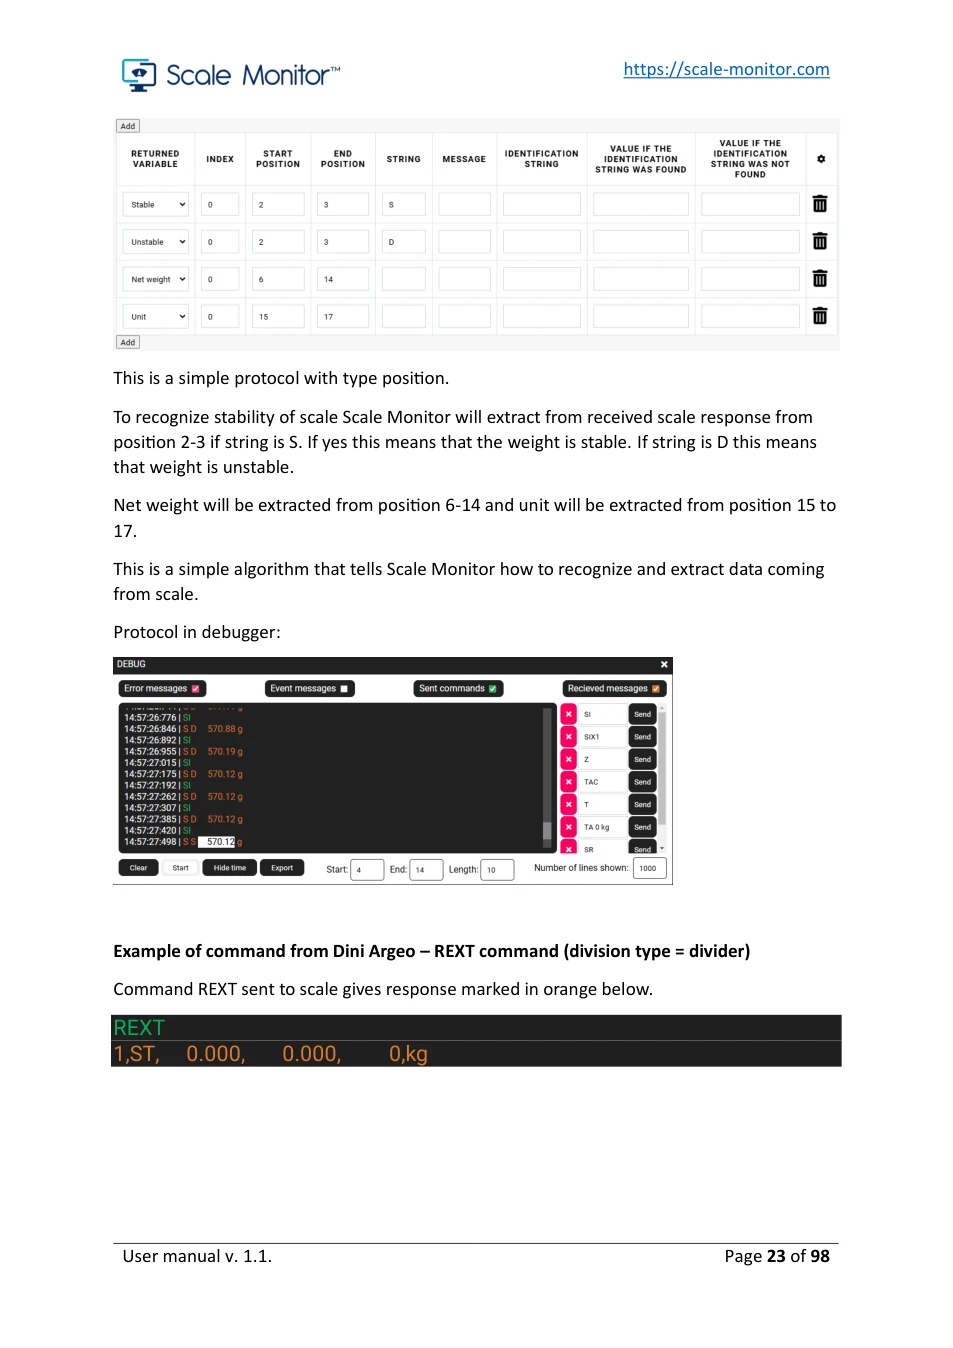
In the protocol above we see that data are separated by column (,) therefore we setup division type to divider and enter column as divider.
You can see that second value represents weight stability – ST means stable, while US means unstable and OL means overload. Third value represent net weight, while fourth value represent tare and the last value represent unit.
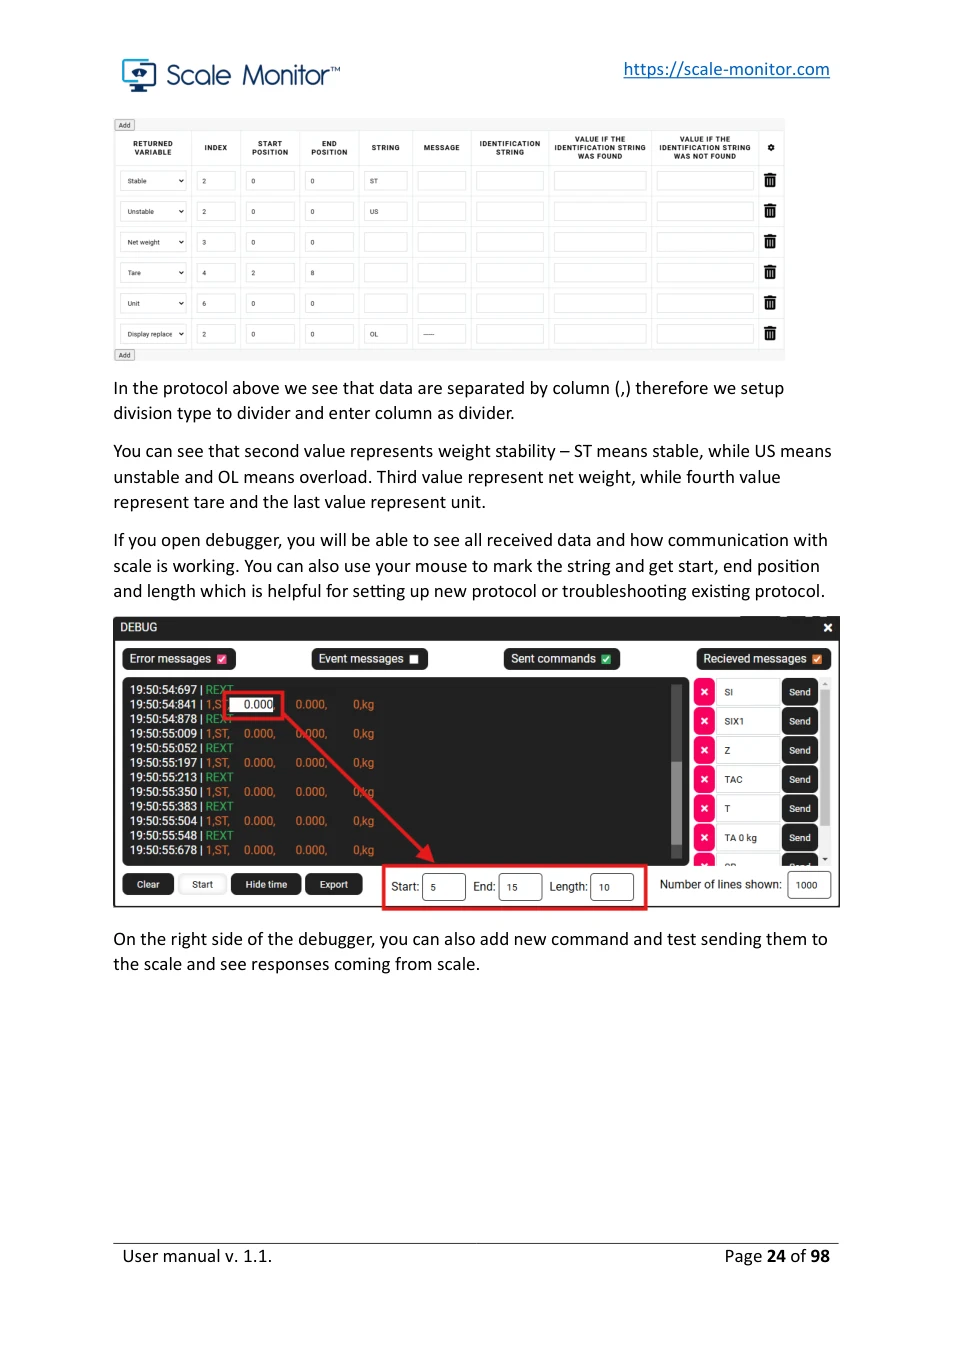
If you open debugger, you will be able to see all received data and how communication with scale is working. You can also use your mouse to mark the string and get start, end position and length which is helpful for setting up new protocol or troubleshooting existing protocol.
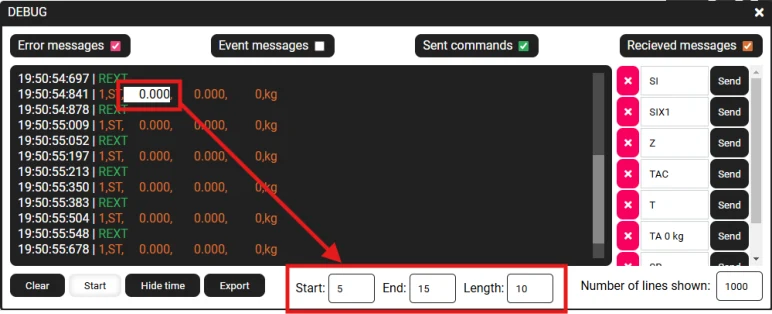
On the right side of the debugger, you can also add new command and test sending them to the scale and see responses coming from scale.
View original page 24 — diagrams and layout
4. Label printing
Scale Monitor simplifies label printing from any scale connected to Scale Monitor. With its built-in label designer, creating and printing labels is straightforward, even for beginners.
4.1. Supported printers Scale Monitor supports printers with ZPL (Zebra Programming Language), which includes all Zebra printers and many other brands.
To connect scale and printer to Scale Monitor it is enough to have only one CloudScaleLink module.
How to connect printer to Scale Monitor depends on type of printer connection you have. You can connect RS-232 printer or printer that is connected to your local network via Ethernet cable or WIFI.
4.2. How to connect RS-232 label printer to Scale Monitor
To connect CloudScaleLink module over RS-232 to Scale Monitor you must setup serial port 2 on the CloudScaleLink module.
In serial port 2 you must set proper baudrate, data bits and parity – we advise you to use 115200 bps especially if you will be printing labels with photos as this will significantly speed up label printing.
Serial port 2 must have Enabled set to MQTT.
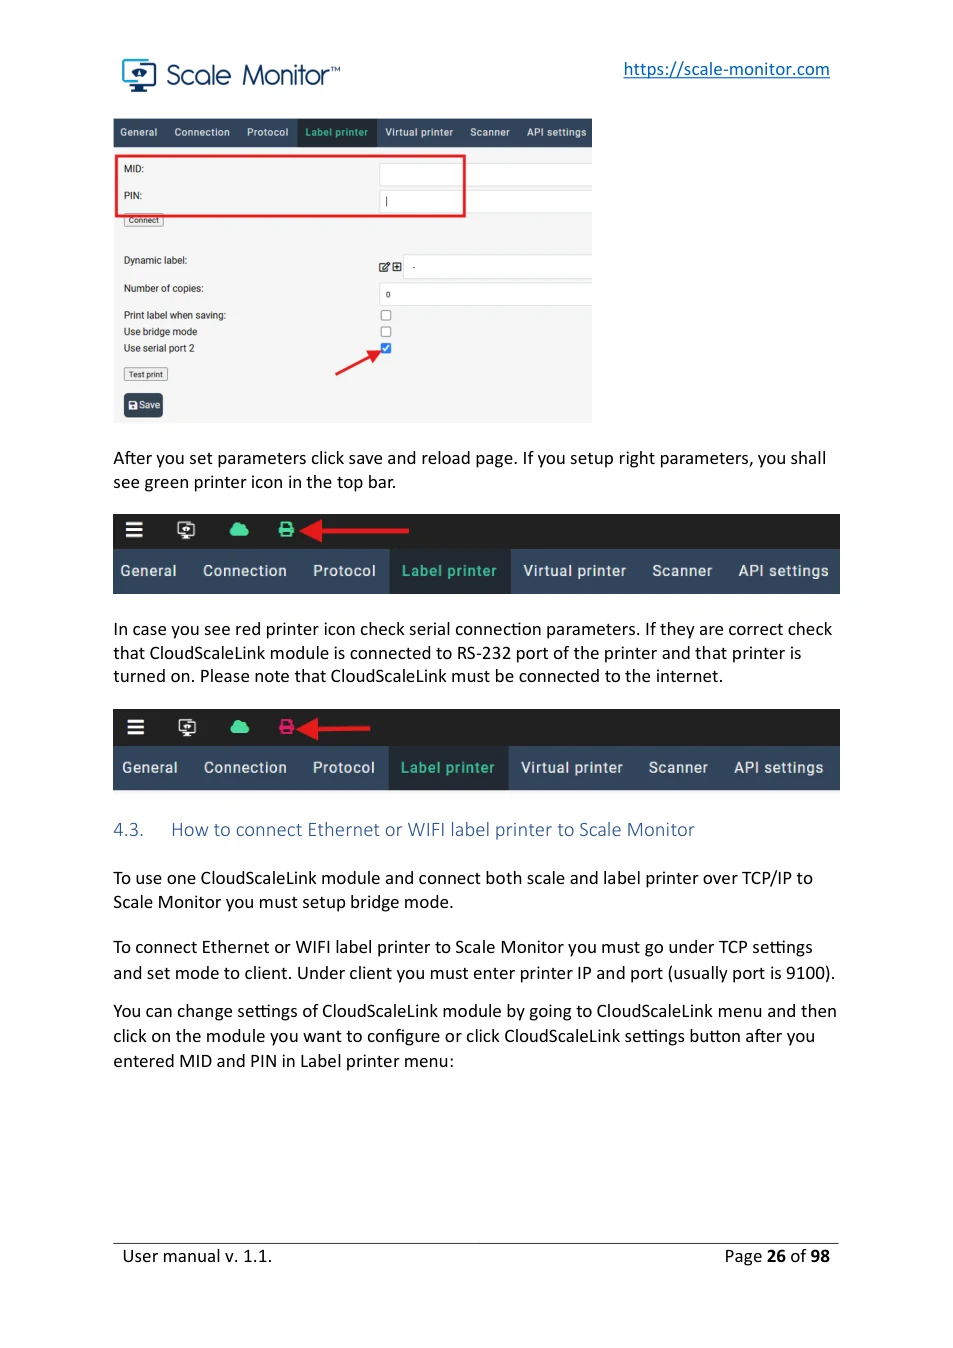
You can change settings of CloudScaleLink module by going to CloudScaleLink menu and then click on the module you want to configure or click CloudScaleLink settings button after you entered MID and PIN in Label printer menu:
That Scale Monitor will use serial port 2 you must go into Settings->Label printer tick option Use serial port 2 .
When you use the same CloudScaleLink module for scale and label printer you must enter same MID and PIN also under label printer. MID and PIN can be found on the label of the module.
View original page 25 — diagrams and layout
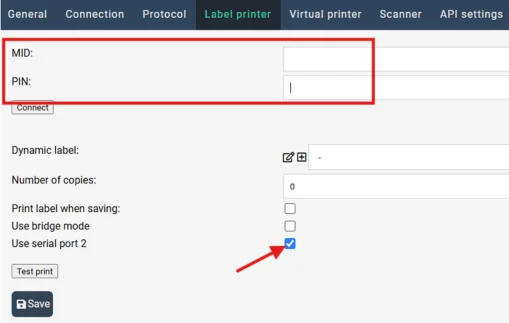
After you set parameters click save and reload page. If you setup right parameters, you shall see green printer icon in the top bar.

In case you see red printer icon check serial connection parameters. If they are correct check that CloudScaleLink module is connected to RS-232 port of the printer and that printer is turned on. Please note that CloudScaleLink must be connected to the internet.

4.3. How to connect Ethernet or WIFI label printer to Scale Monitor
To use one CloudScaleLink module and connect both scale and label printer over TCP/IP to Scale Monitor you must setup bridge mode.
To connect Ethernet or WIFI label printer to Scale Monitor you must go under TCP settings and set mode to client. Under client you must enter printer IP and port (usually port is 9100).
You can change settings of CloudScaleLink module by going to CloudScaleLink menu and then click on the module you want to configure or click CloudScaleLink settings button after you entered MID and PIN in Label printer menu:
View original page 26 — diagrams and layout
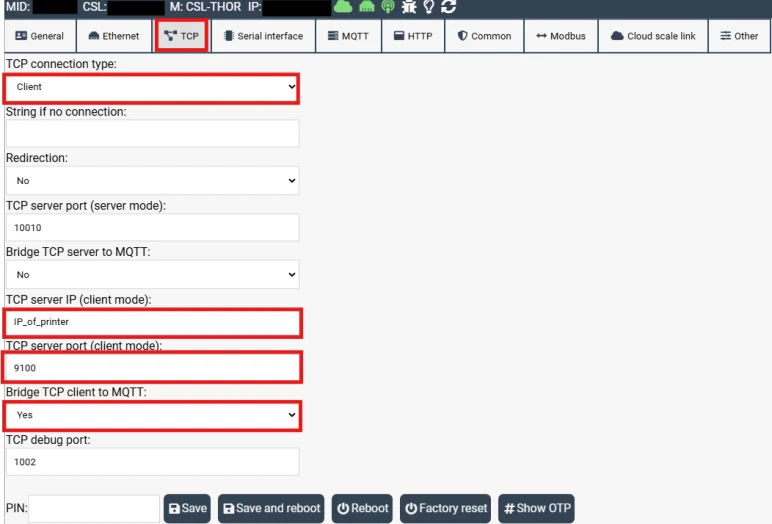
After you setup parameters you must click on Save and reboot button to apply changes on CloudScaleLink module.
Inside Scale Monitor you must under Settings->Label printer tick option Use bridge mode .
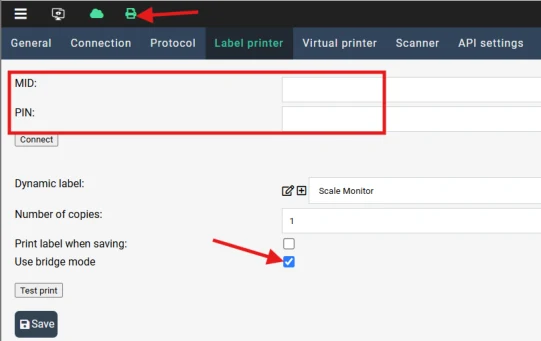
When you use the same CloudScaleLink module for scale and label printer you must enter same MID and PIN also under label printer. MID and PIN can be found on the label of the module.
View original page 27 — diagrams and layout
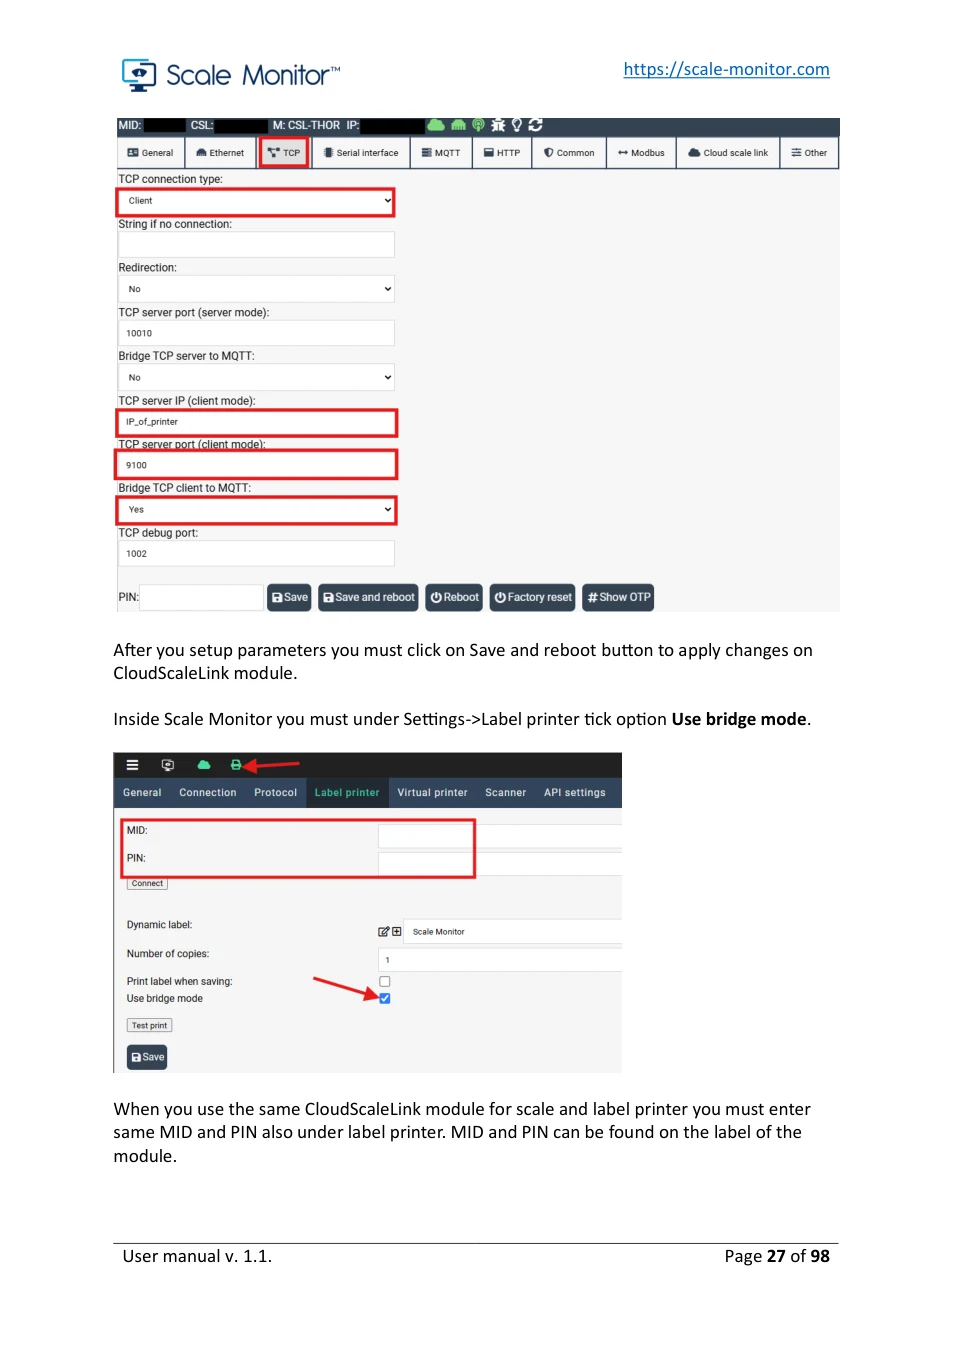
After you set parameters click save and reload page. If you setup right parameters, you shall see green printer icon in the top bar.

If you see red icon, it means printer is not connected. In that case check IP and port of the printer. Please note that printer and CloudScaleLink module must be in same network. If IP and port are entered correctly check that printer is turned on and it is connected to the network.
Please note that CloudScaleLink must be connected to the internet.
4.4. Adding and editing labels
In Scale Monitor you can create unlimited number of labels. To add new label simply click on + button in front of labels list.
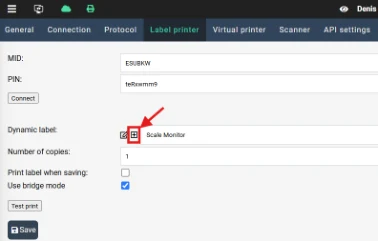
New window will open and the only required parameter is to enter name of the label. After entering label name click on Save button and new label will be created.
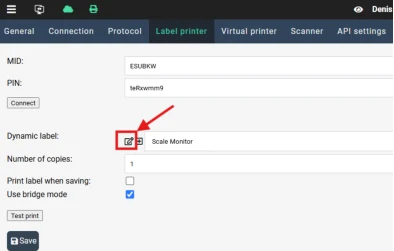
If you want to edit existing label first select from the list label you want to edit and then click on the pencil in front of label selector.
View original page 28 — diagrams and layout
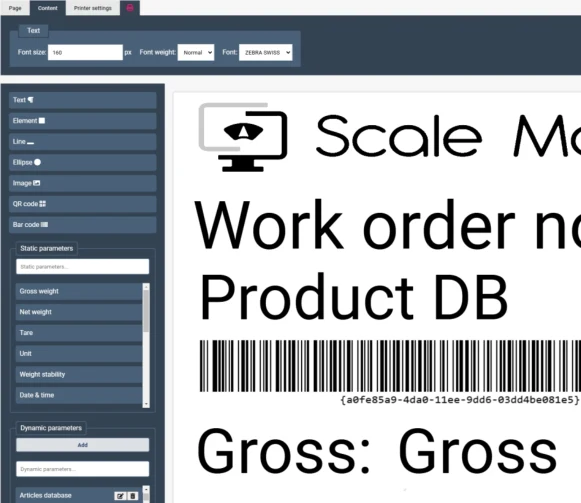
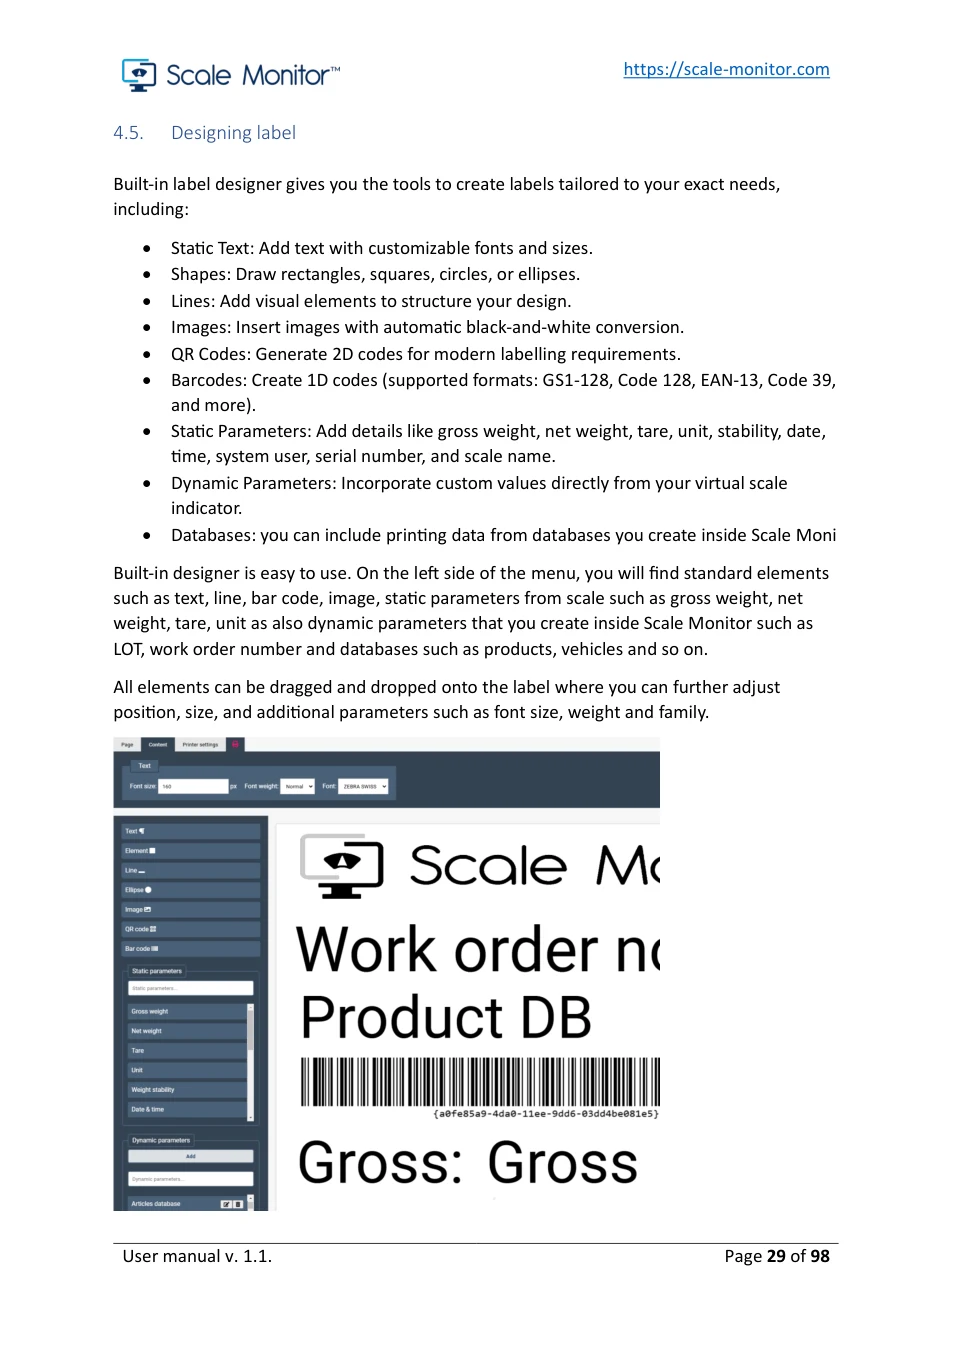
4.5. Designing label Built-in label designer gives you the tools to create labels tailored to your exact needs, including:
- Static Text: Add text with customizable fonts and sizes. • Shapes: Draw rectangles, squares, circles, or ellipses. • Lines: Add visual elements to structure your design. • Images: Insert images with automatic black-and-white conversion. • QR Codes: Generate 2D codes for modern labelling requirements. • Barcodes: Create 1D codes (supported formats: GS1-128, Code 128, EAN-13, Code 39, and more). • Static Parameters: Add details like gross weight, net weight, tare, unit, stability, date, time, system user, serial number, and scale name. • Dynamic Parameters: Incorporate custom values directly from your virtual scale indicator. • Databases: you can include printing data from databases you create inside Scale Moni
Built-in designer is easy to use. On the left side of the menu, you will find standard elements such as text, line, bar code, image, static parameters from scale such as gross weight, net weight, tare, unit as also dynamic parameters that you create inside Scale Monitor such as LOT, work order number and databases such as products, vehicles and so on.
All elements can be dragged and dropped onto the label where you can further adjust position, size, and additional parameters such as font size, weight and family.
View original page 29 — diagrams and layout
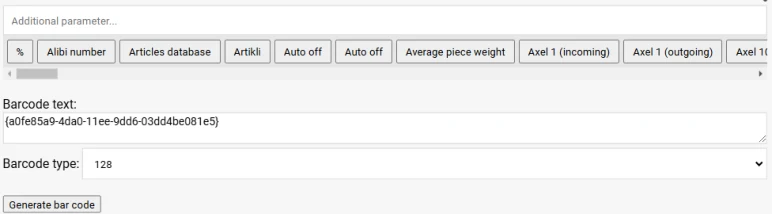
Some elements such as barcode offer additional parameters. To edit those parameters, you can double click on element to open additional settings window.
4.6. Label setup
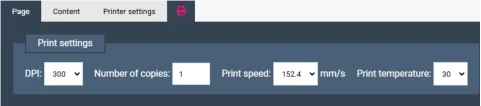
In Scale Monitor there is no limit in terms of different labels. You can use multiple labels even if each label has different dimensions. You can set for every label also different printer settings such as speed of printing, resolution of printer, print temperature etc.. All these settings are stored for each label. You can customize the following label and printer settings:
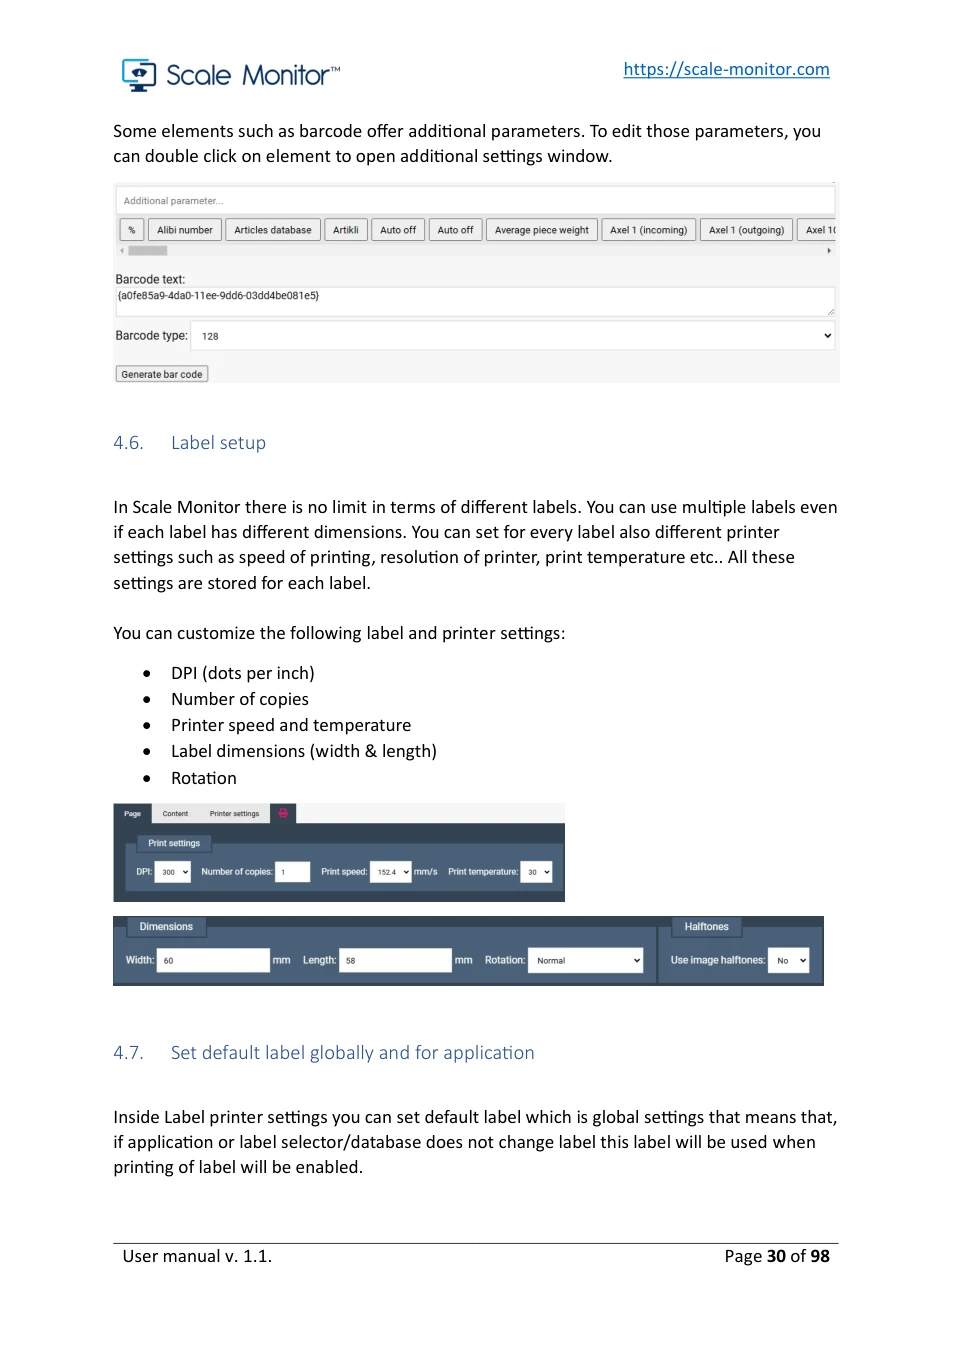
- DPI (dots per inch) • Number of copies • Printer speed and temperature • Label dimensions (width & length) • Rotation

4.7. Set default label globally and for application
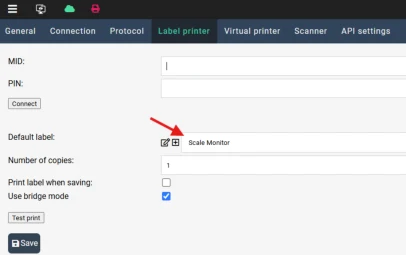
Inside Label printer settings you can set default label which is global settings that means that, if application or label selector/database does not change label this label will be used when printing of label will be enabled.
View original page 30 — diagrams and layout
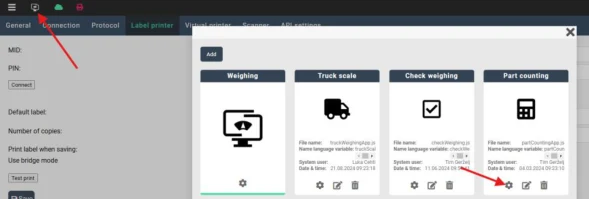
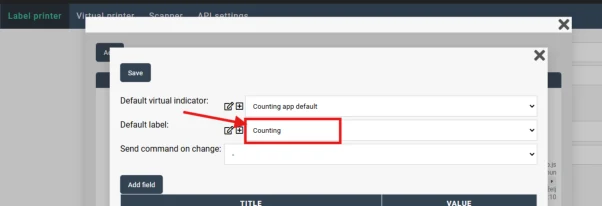
You can set different default label inside setting of each application. First click on Applications and then on the application where you want to change default label click on gear icon and change label.
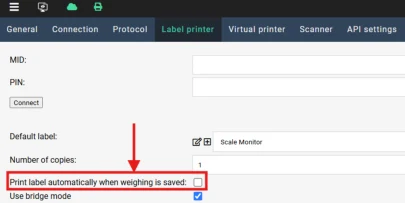
4.8. Automatic label printing If you want to automatically print label each time new weighing is saved you must enable option “Print label automatically when weighing is saved”.
View original page 31 — diagrams and layout
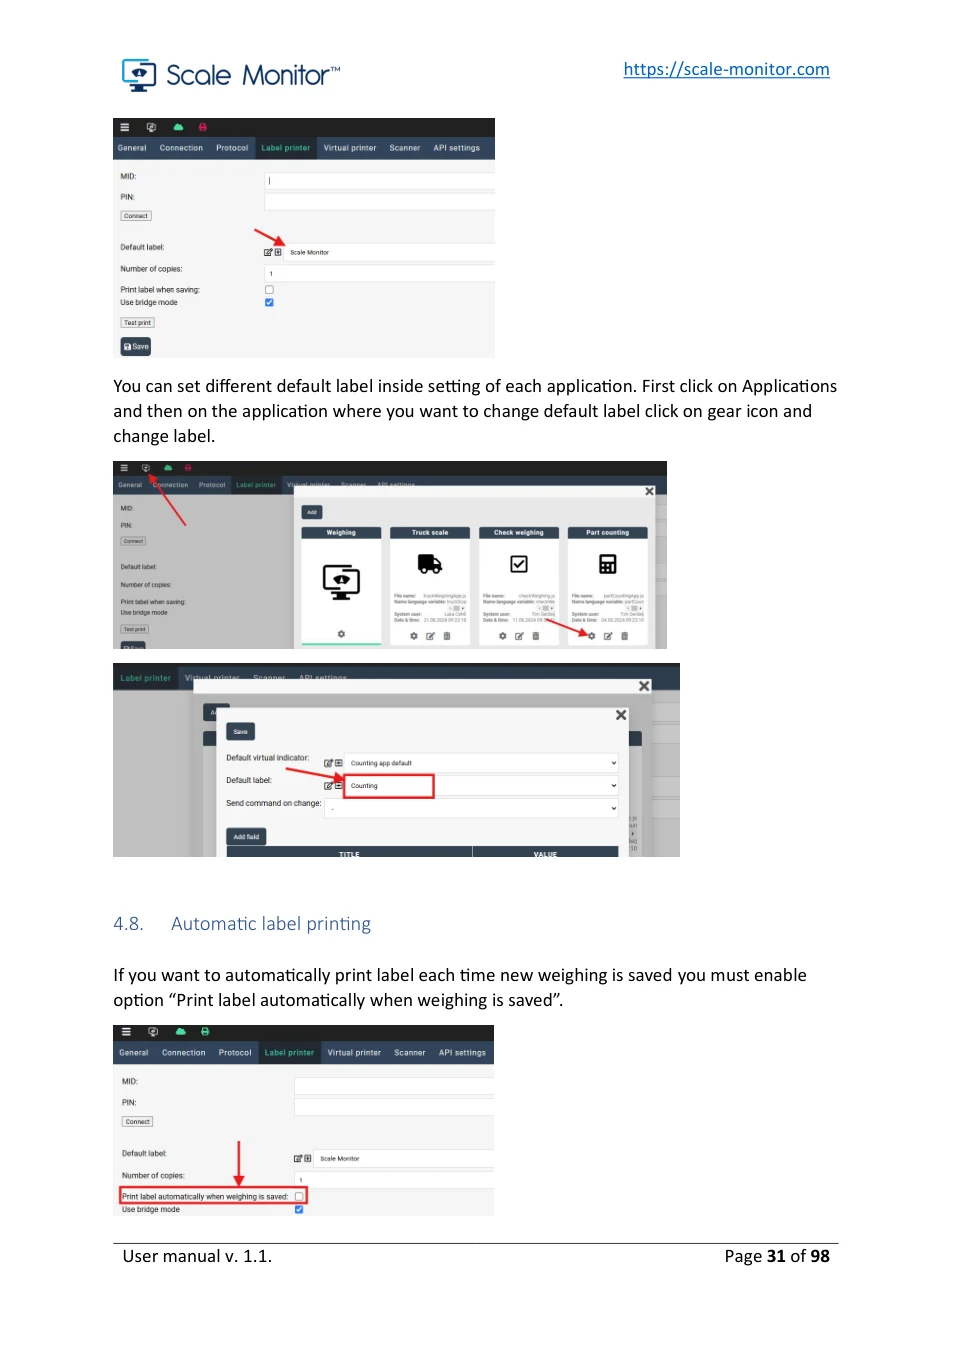
If you want to print every time two or more labels you can set number of copies.
4.9. Reprinting label
Each time a weighing is saved, and label is printed out the label is saved together with weighing. In case you need to reprint label, you can click on printer icon inside the table of weighing’s:

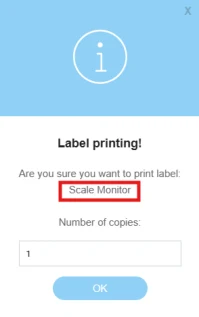
A pop-up window will open asking for number of labels to be printed. In the window it will show also name of the label that was used for printing when weighing was saved.
4.10. Label selector
You can add to virtual indicator label selector. Label selector enables you to easily change label you would like to be printed when weighing will be saved. If your process require often changes of label, we advise you to add label selector on virtual indicator.
Please note that changing label on virtual scale indicator does not change application or global default label.
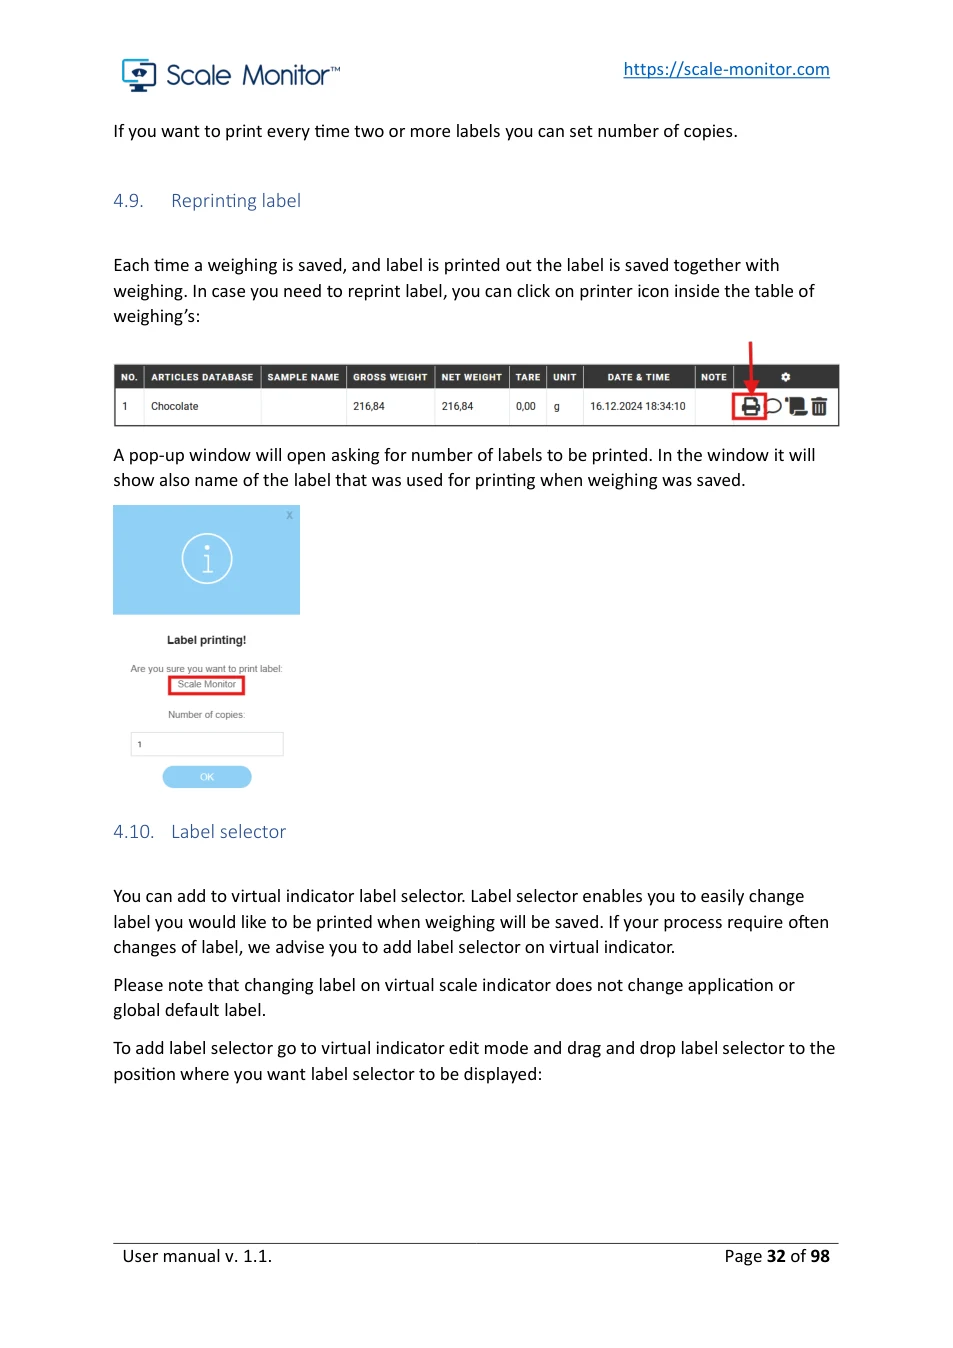
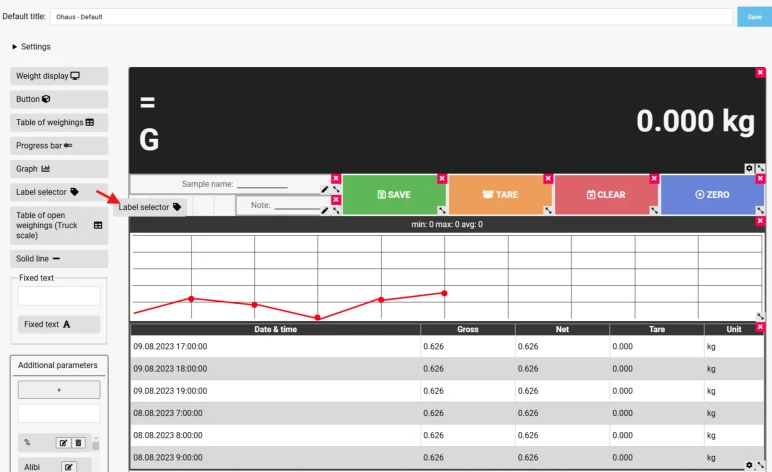
To add label selector go to virtual indicator edit mode and drag and drop label selector to the position where you want label selector to be displayed:
View original page 32 — diagrams and layout
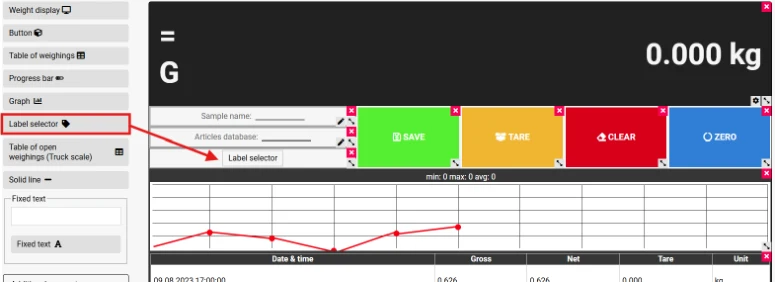
After saving virtual indicator label selector will appear:
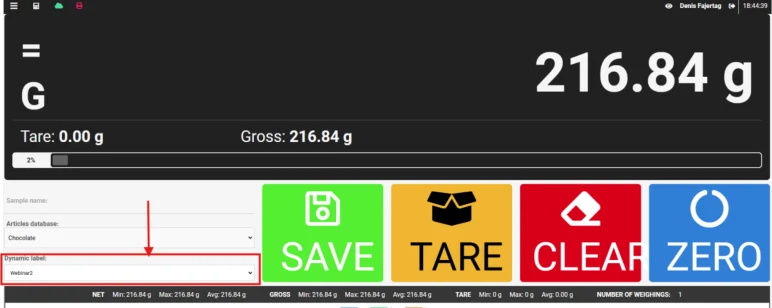
Where you will be able to change label quickly and easily, you want to print.
4.11. Linking label inside database
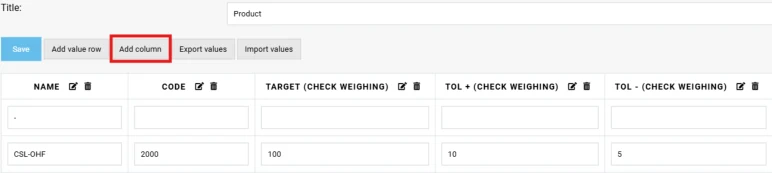
You can link label to each item in the database you create. For example, if you have product database and want that with product also label is changed all you need to do is to add column and set type of label:
View original page 33 — diagrams and layout
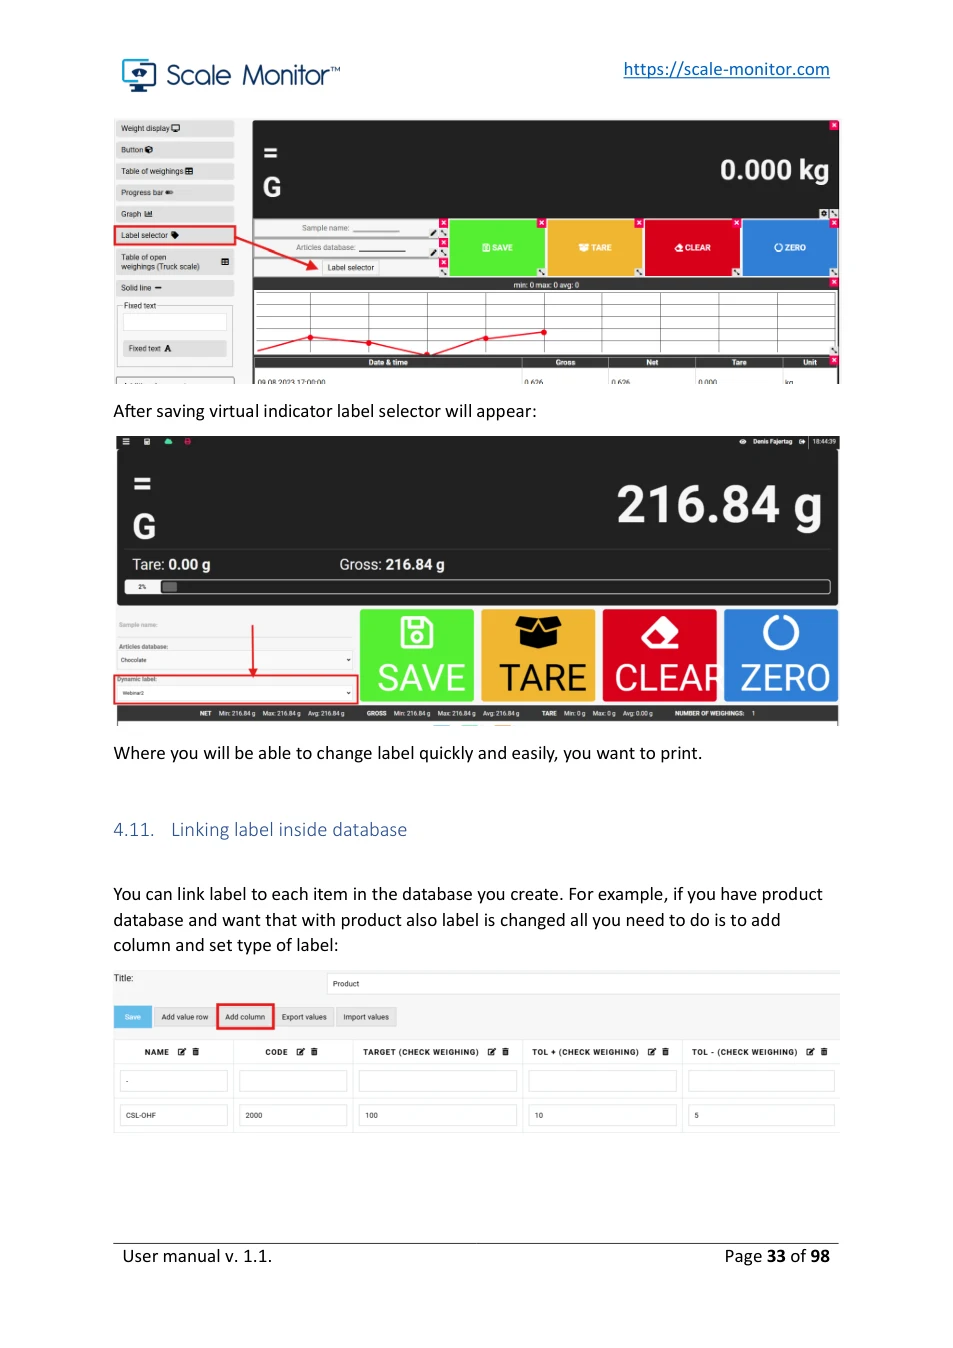
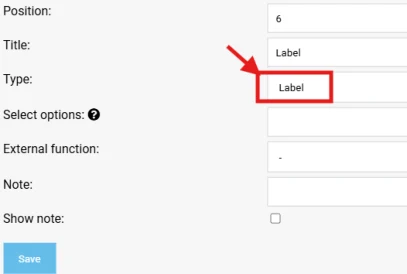
After adding column of type label you will be able to set label for each item in database.
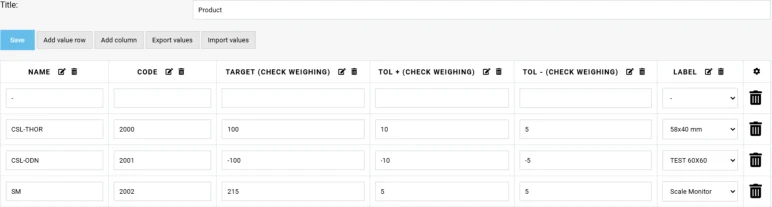
When you change product label will be changed to the label set in database.
4.12. Printer status
In top bar you will always see printer status. Green icon means everything is okay. If red icon appears you can click on it and in the message box, you will see error description.
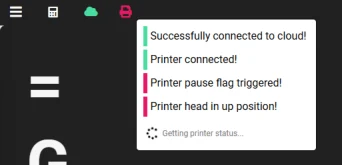
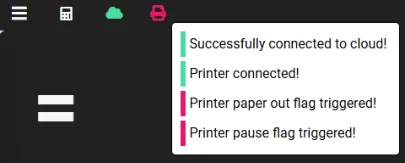
Errors can be of different types such as printer head opened, printer in pause, out of paper etc..
When printer is in error state label printing is not possible. To continue printing you must resolve issue first. For details about troubleshooting label printer see printer manual.
View original page 34 — diagrams and layout
5. Virtual printer
A virtual printer is a software-based solution that emulates the functionality of a physical printer. It captures data from a device, such as a scale or moisture analyzer, and processes it digitally, eliminating the need for traditional paper printouts. The virtual printer enables seamless data extraction, storage, and integration with other systems, such as databases or ERP platforms, via APIs or simple manual weighing data export to Excel.
Video tutorial how to setup virtual printer is published on our official YouTube channel:
https://youtu.be/si_HbchtQ74
5.1. Setup virtual printer with static report
First you must connect scale with CloudScaleLink module.
To setup virtual printer go to menu and click on Virtual printer icon. In the menu you must enter module ID (MID) and PIN, both are printed on the label of the CloudScaleLink module.
After entering MID and PIN press save button and then click on On/off button in order to activate virtual printer.
In top bar you shall see green cloud icon.

If it is red this means either you did not enter correctly MID and PIN or CloudScaleLink is not connected to internet.
When you will press On/off button the button will turn green:
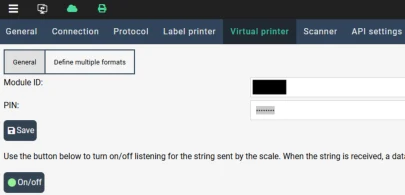
Now virtual printer is started and will listen for data. Press print button on your scale and a window with data received from scale shall automatically open:
View original page 35 — diagrams and layout
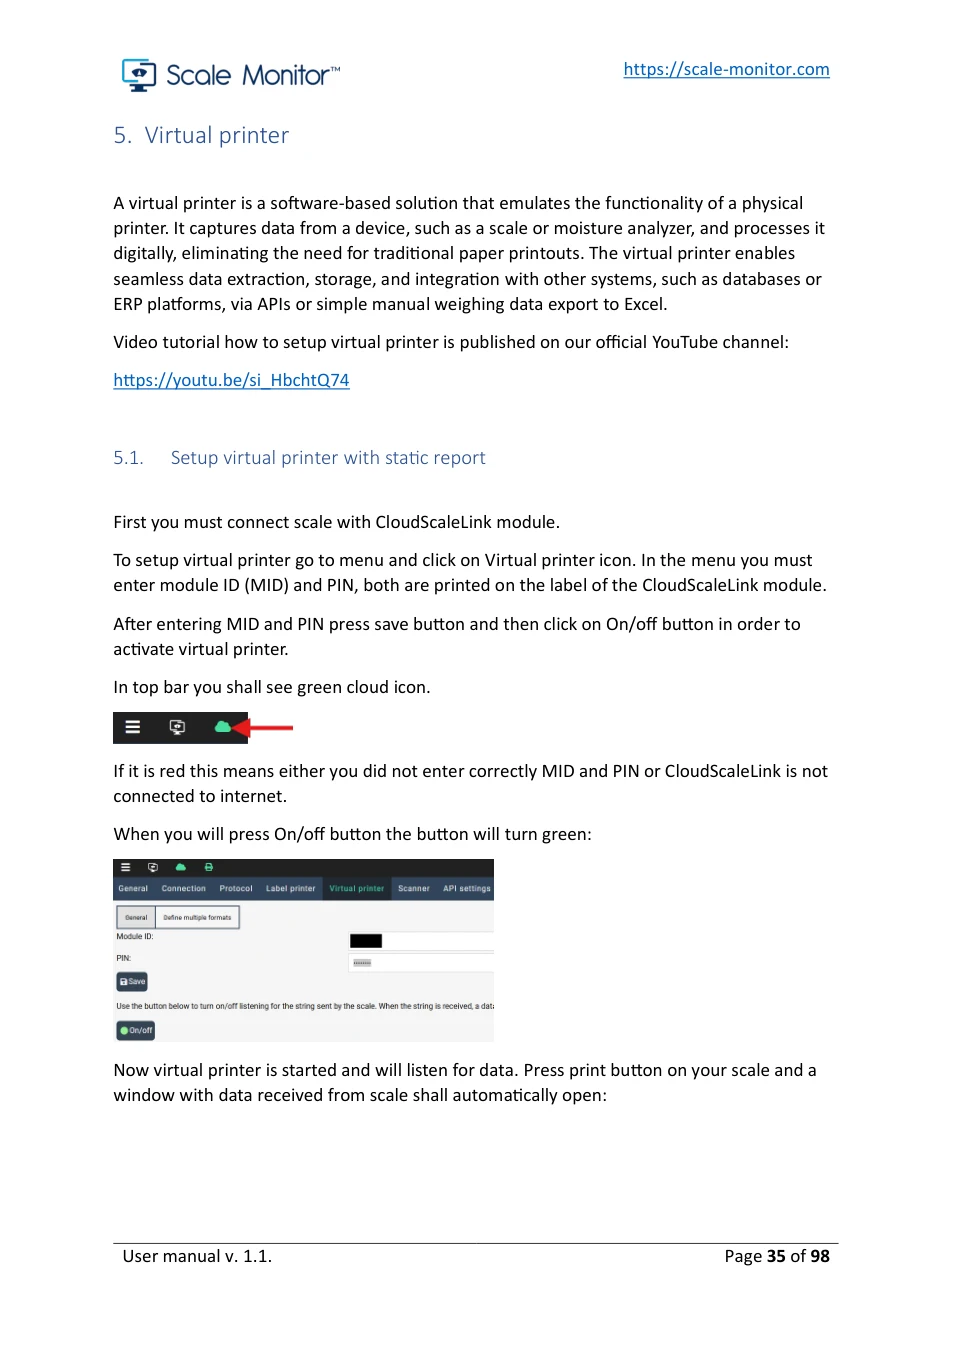
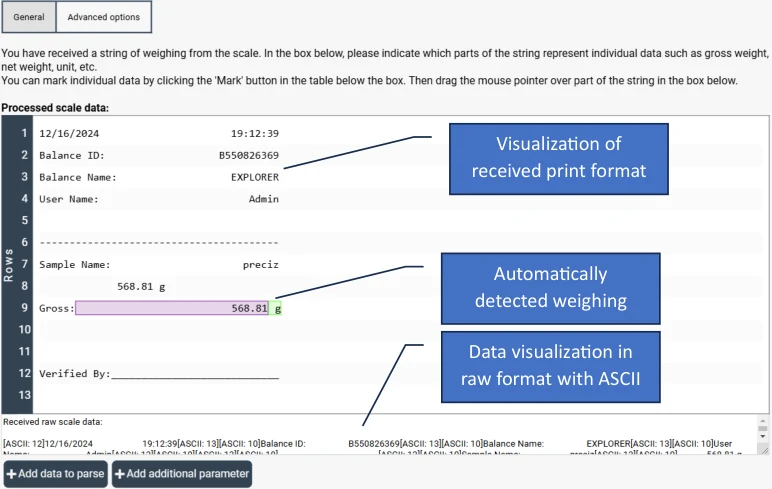
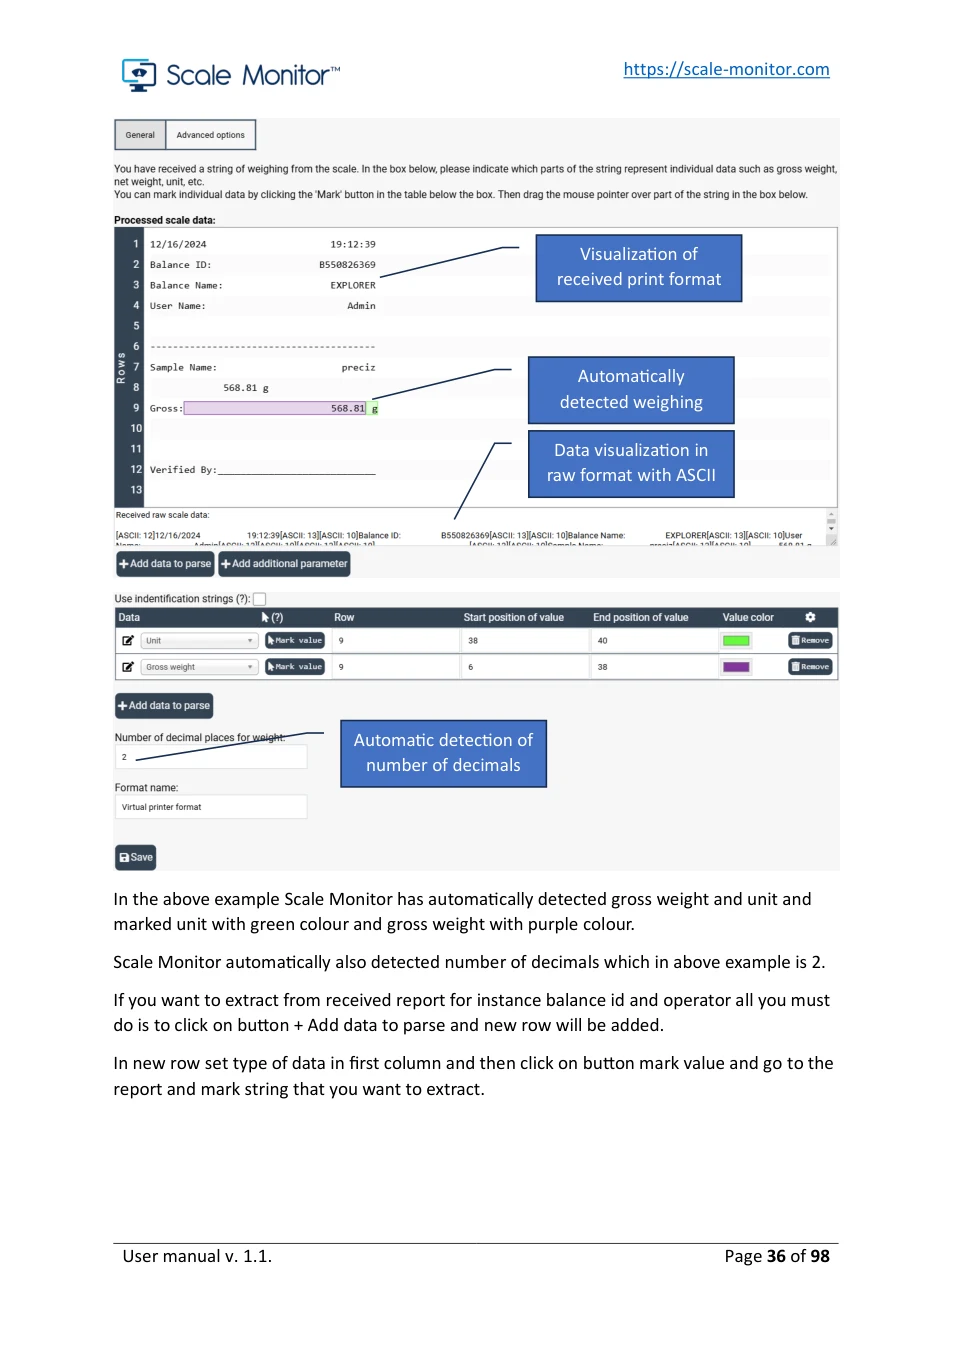
Visualization of received print format
Automatically detected weighing
Data visualization in raw format with ASCII
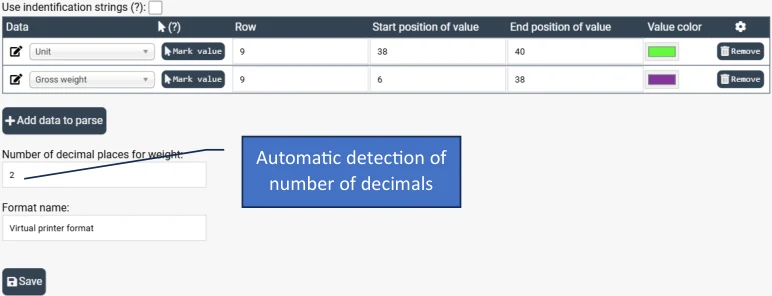
Automatic detection of
number of decimals
In the above example Scale Monitor has automatically detected gross weight and unit and marked unit with green colour and gross weight with purple colour.
Scale Monitor automatically also detected number of decimals which in above example is 2.
If you want to extract from received report for instance balance id and operator all you must do is to click on button + Add data to parse and new row will be added.
In new row set type of data in first column and then click on button mark value and go to the report and mark string that you want to extract.
View original page 36 — diagrams and layout
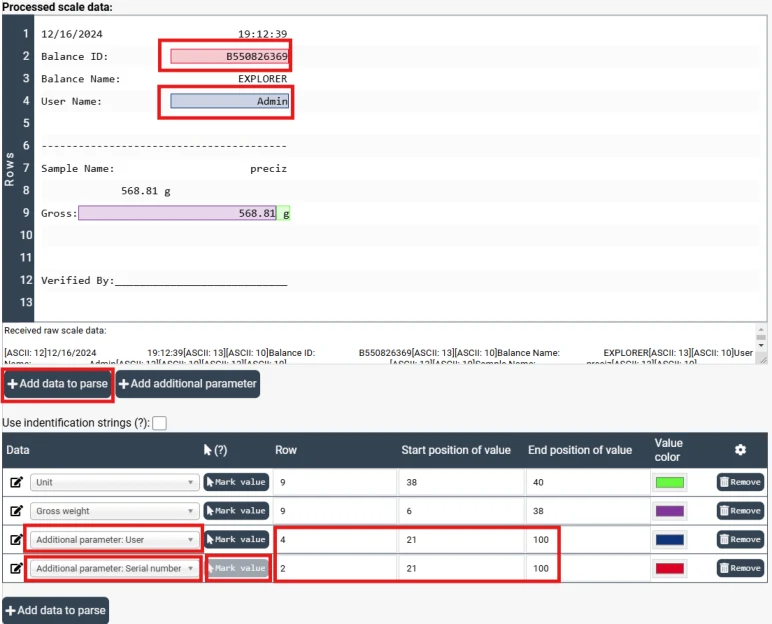
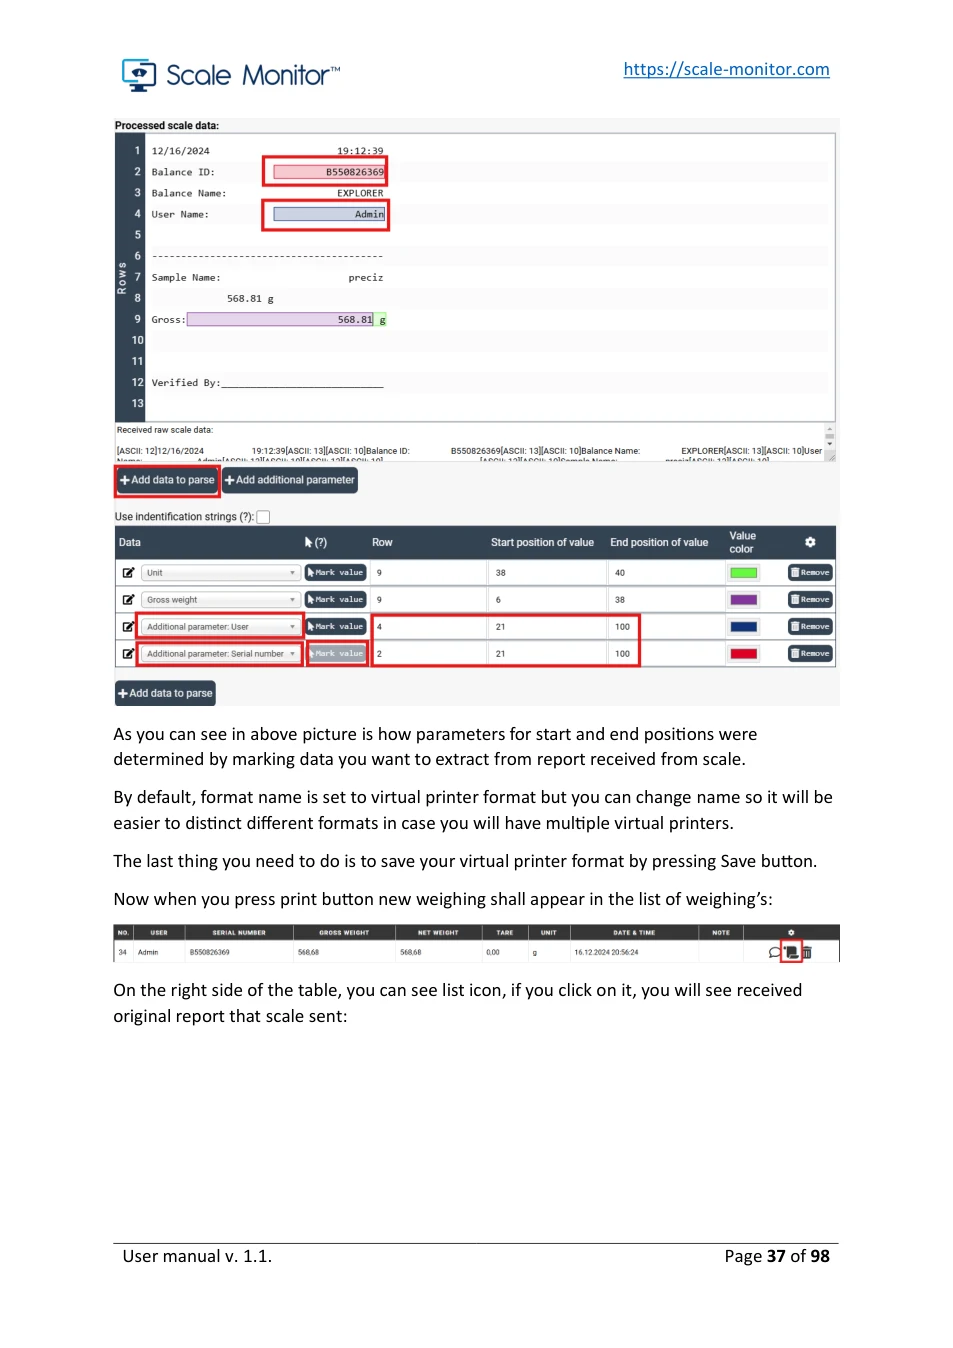
As you can see in above picture is how parameters for start and end positions were determined by marking data you want to extract from report received from scale.
By default, format name is set to virtual printer format but you can change name so it will be easier to distinct different formats in case you will have multiple virtual printers.
The last thing you need to do is to save your virtual printer format by pressing Save button.
Now when you press print button new weighing shall appear in the list of weighing’s:

On the right side of the table, you can see list icon, if you click on it, you will see received original report that scale sent:
View original page 37 — diagrams and layout
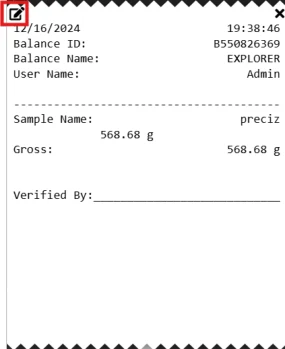
Original report is always saved together with weighing data.
If you want to customize report, you can click on pencil in the left corner of the report visualization.
5.2. Virtual printer configuration with dynamic report
Some scale might send reports with dynamic content. For example:
Report with company name:
| Row no. | Report sample 2 | Report sample 2 |
|---|---|---|
| 1 | Gross: 1.345 kg | Company: Scale Monitor |
| 2 | Net: 1.345 kg | Gross: 1.345 kg |
| 3 | Tare: 0.000 kg | Net: 1.345 kg |
| 4 | Tare: 0.000 kg |
As you can see in above table in the second report sample in first row there is company name so gross, net and tare weight have been shifted one row down. In case you setup static report this will cause a problem for Scale Monitor as it will extract for instance from line one gross weight and in the second report sample there is company name instead of gross weight.
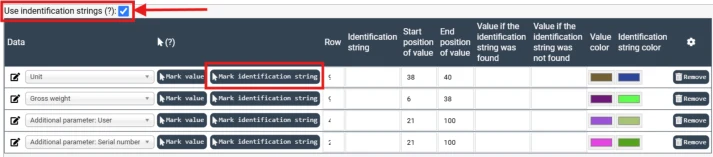
In that cases we must check option use identification strings:
View original page 38 — diagrams and layout
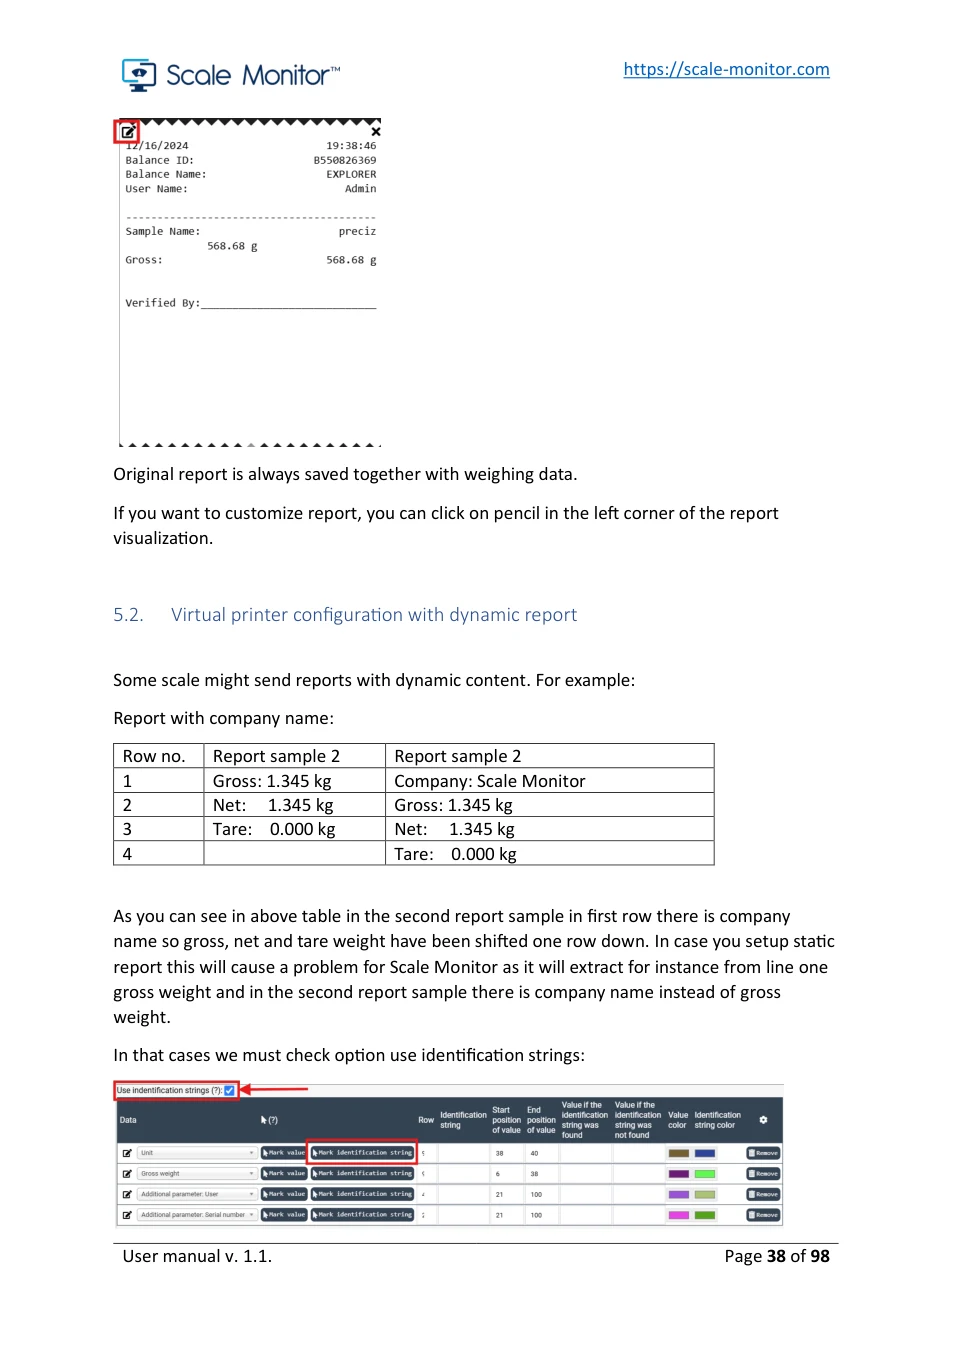
Now additional button Mark identification string will appear.
To reconfigure format in the example of static format we must now first mark identification string and after that value:
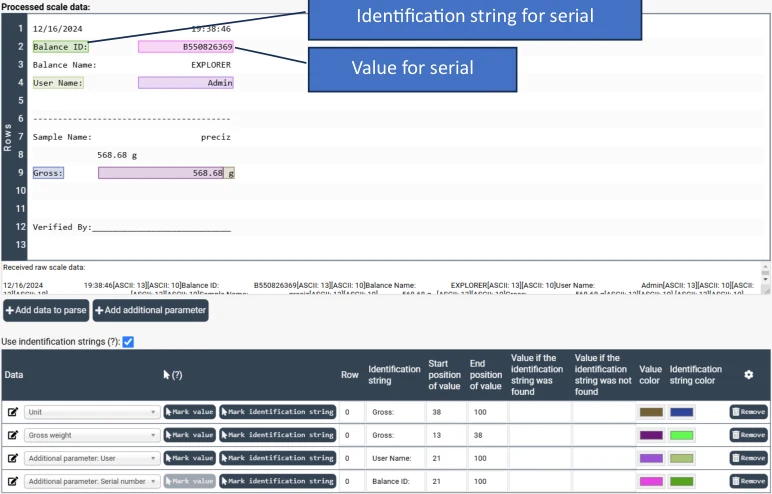
Identification string for serial
Value for serial
As you can see on picture above row number is now everywhere 0 and identification string column now contains string that Scale Monitor will look for to identify which data is in this row and from where to start and where to end to extract data from report.
With dynamic reports even if data are sent in random order Scale Monitor will still be able to detect and extract values you need.
5.3. Multiple formats
Defining multiple formats allows the program to automatically detect the correct format for data processing based on the strings found in the data received form the scale.
For example, if we have two different formats one for used in weighing and another used for counting then all we must do is to add two rows in table of multiple formats:
View original page 39 — diagrams and layout
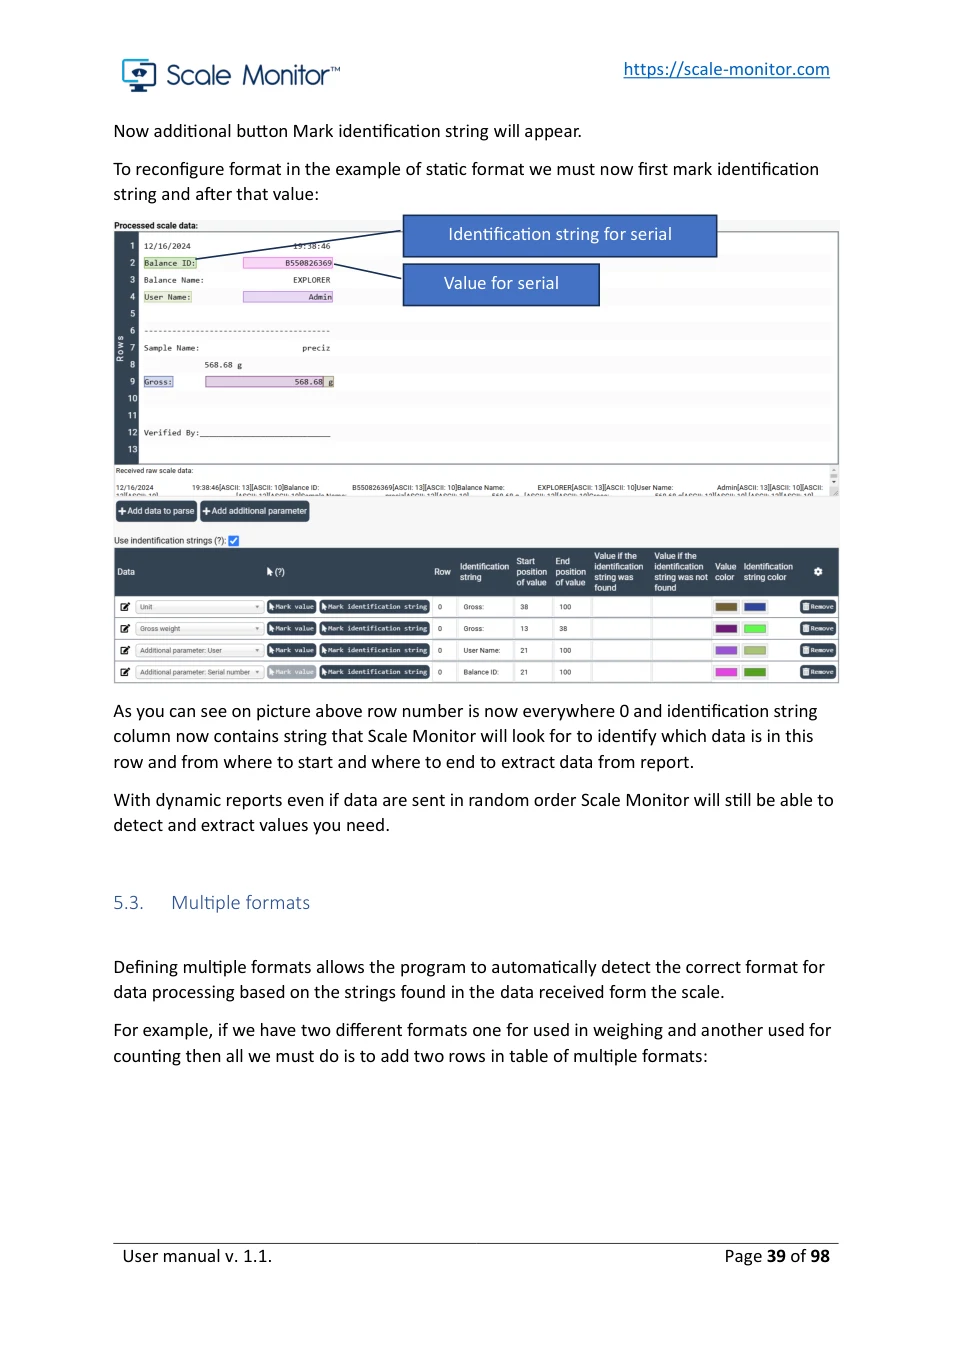
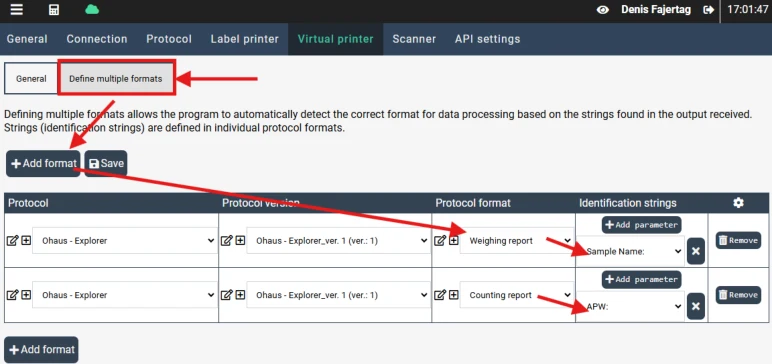
Then you select format and parameter from format which will define that once this Scale Monitor identifies this parameter it will use selected format.
In example above Scale Monitor will use Weighing report format for extracting report data, if it will find Sample name: inside report send from scale and Counting report if it will find APW: string inside report send from scale.
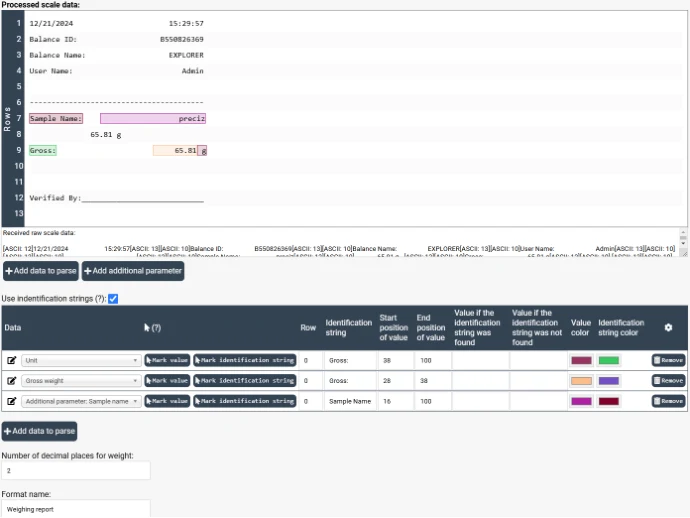
Weighing report which extract sample name and gross weight:
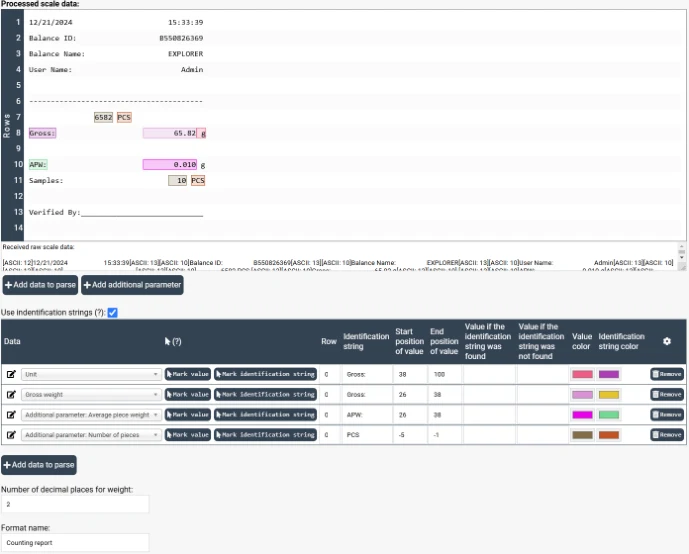
Counting report which extract number of pieces, average piece weight and gross weight.
View original page 40 — diagrams and layout
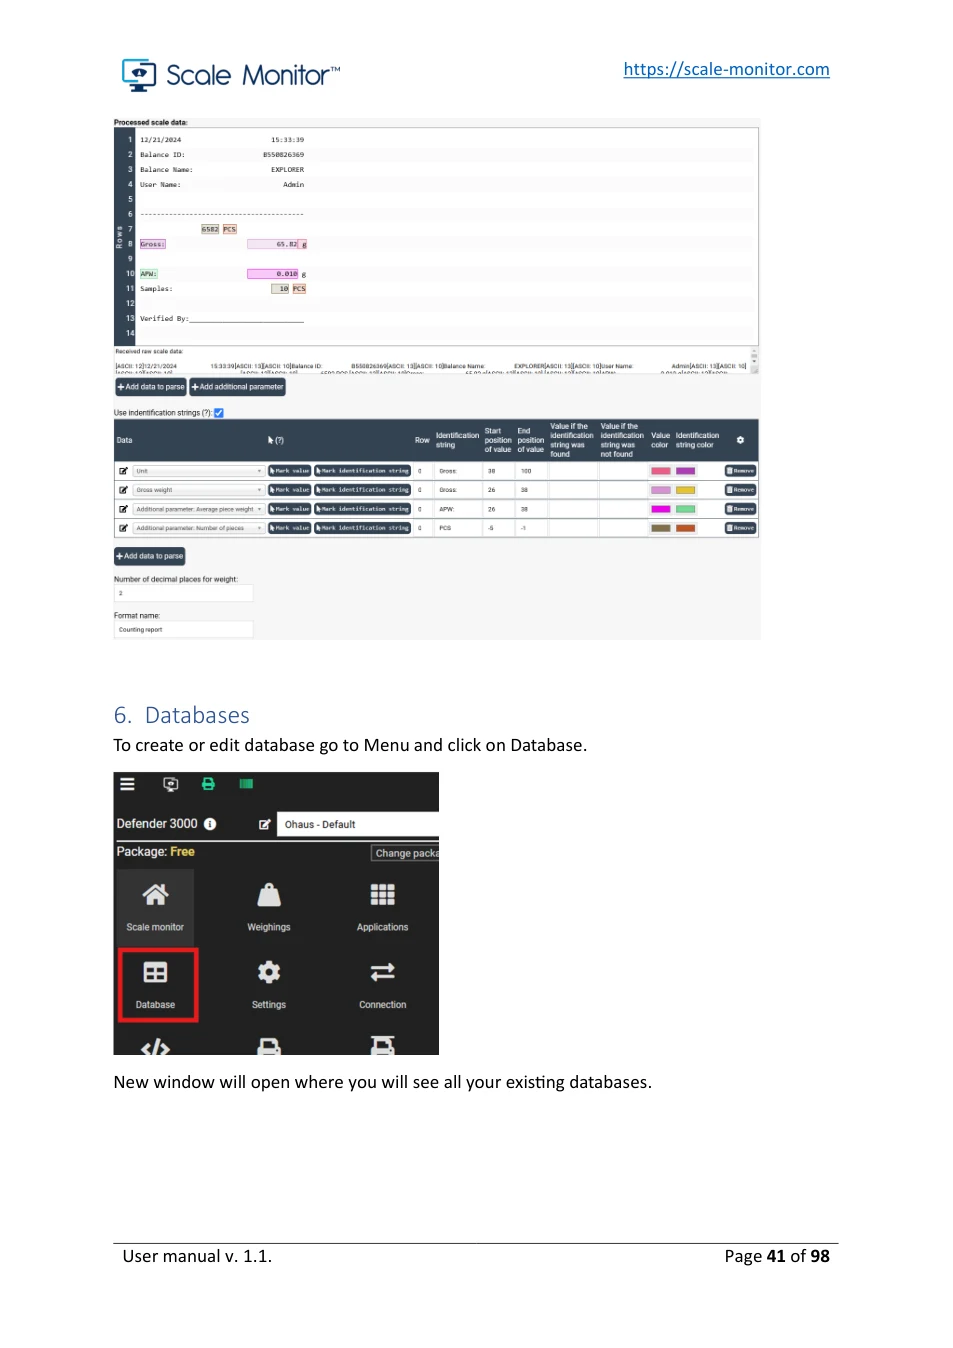
6. Databases To create or edit database go to Menu and click on Database.
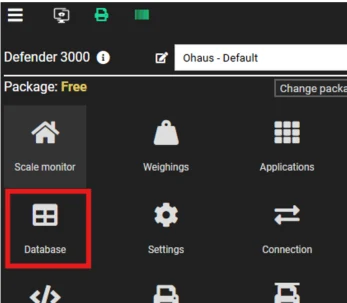
New window will open where you will see all your existing databases.
View original page 41 — diagrams and layout
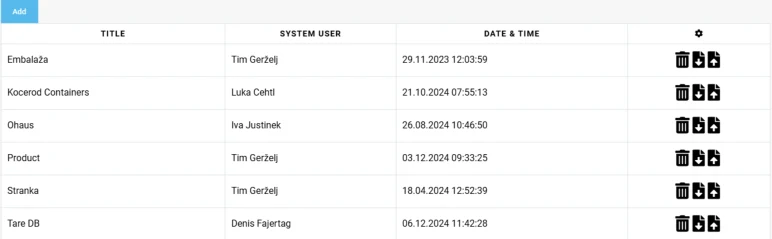
If you want to add new database, you must click on Add button. If you want to change existing database, you can click on the database you want to edit.
Please note that databases are like parameters global which mean, if you have 20 scales in Scale Monitor you can use the same database on all 20 scales. When you change item in database this change will reflect on all scales inside Scale Monitor.
If you need to have different databases on different scale, you can create multiple databases in that case you can use one database on let’s say 5 scales and another database on other 15 scales.
6.1. Add new database To create new database, click on Add button and new window will open.
Enter database Title and click Save button to create new database.
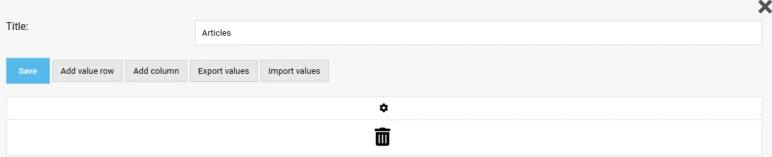
Database structure is created with columns and rows. Columns represent database attribute and rows represents items in database.
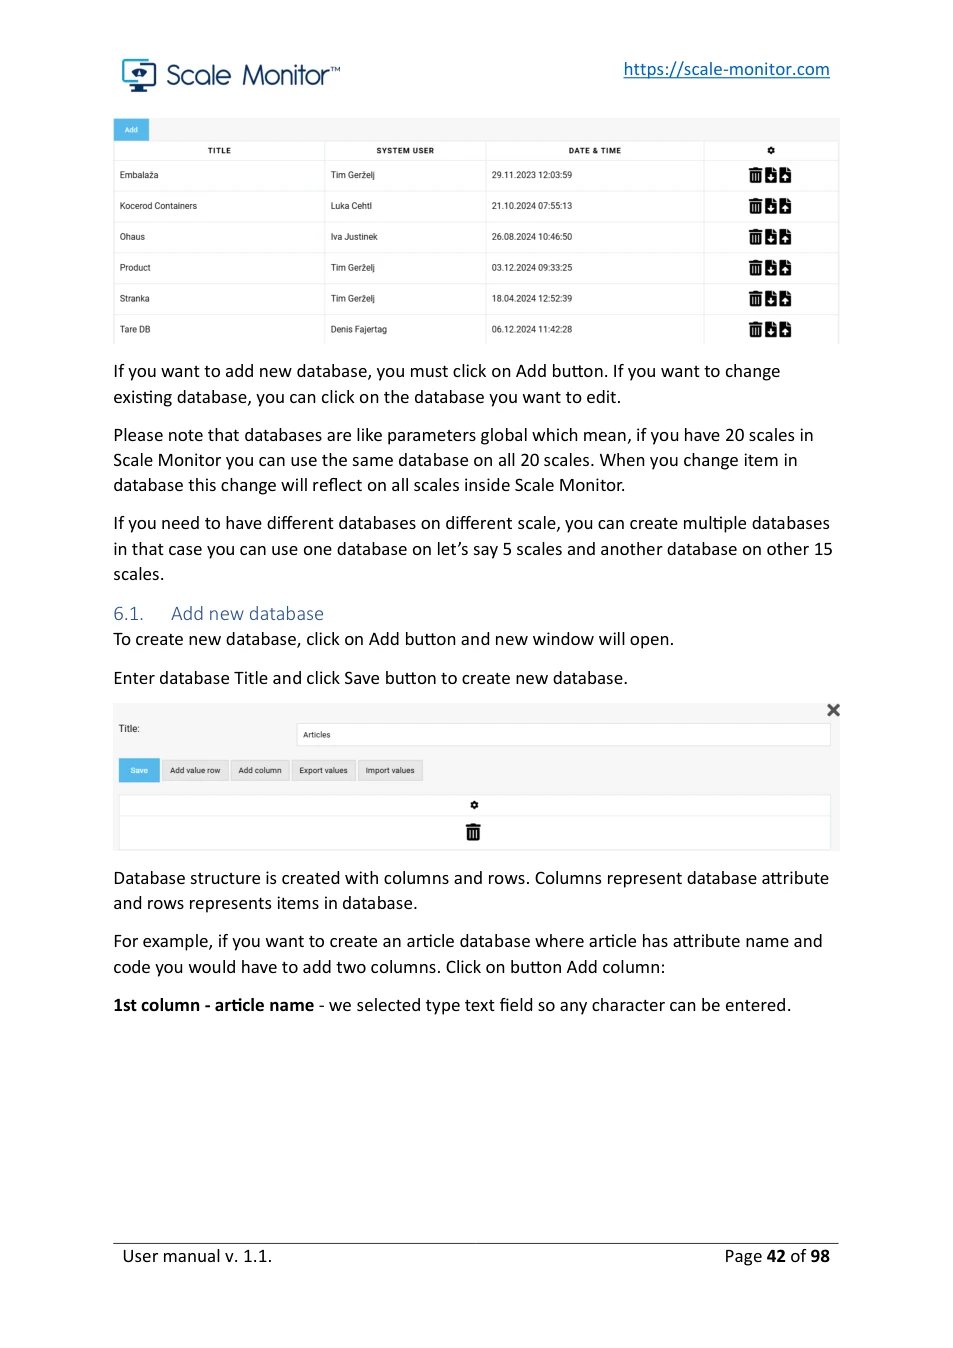
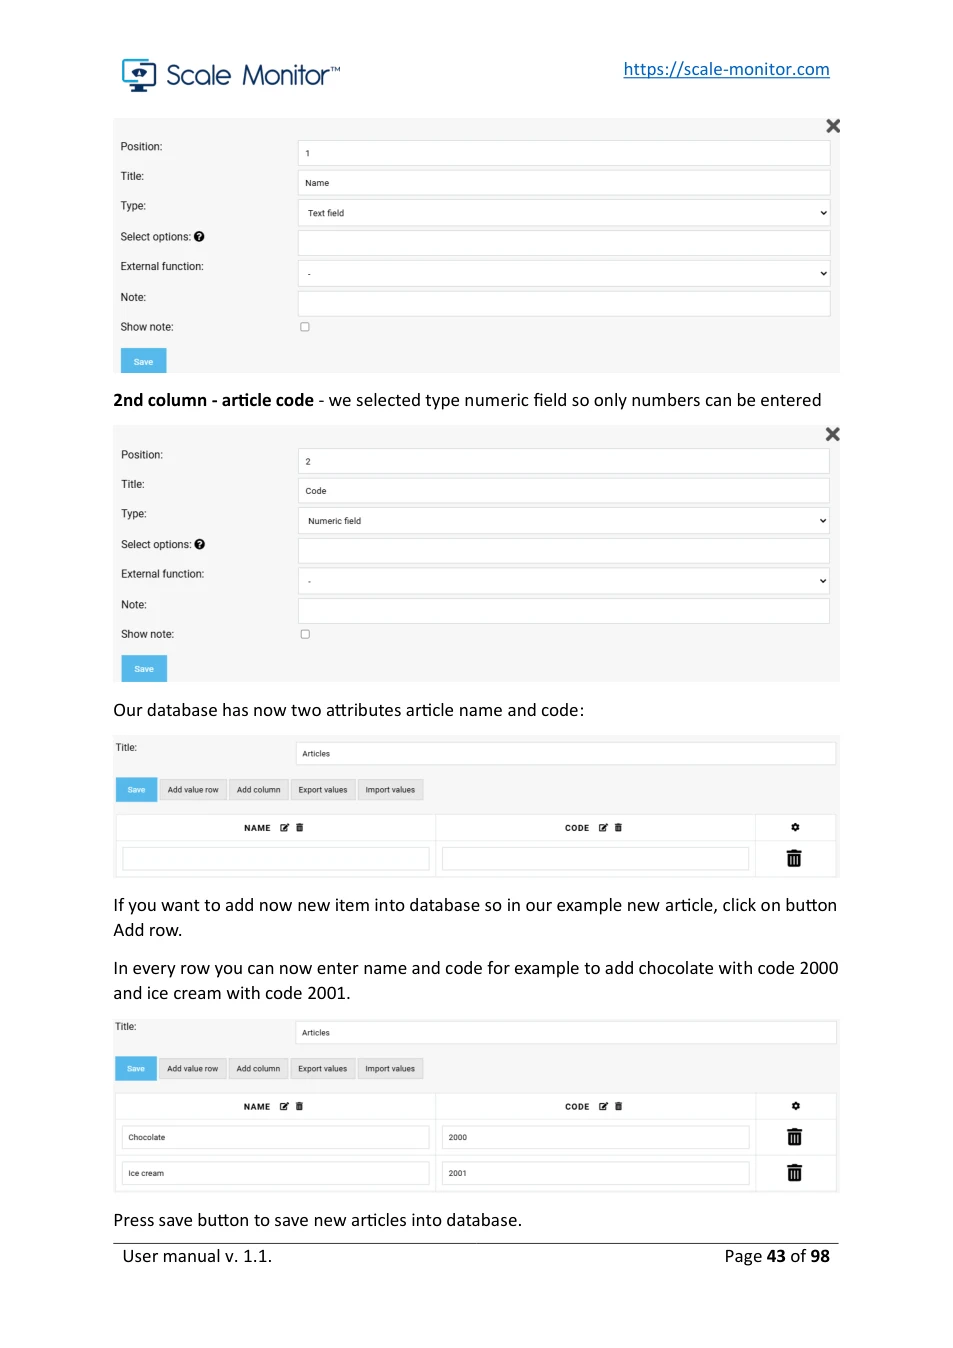
For example, if you want to create an article database where article has attribute name and code you would have to add two columns. Click on button Add column:
1st column - article name - we selected type text field so any character can be entered.
View original page 42 — diagrams and layout
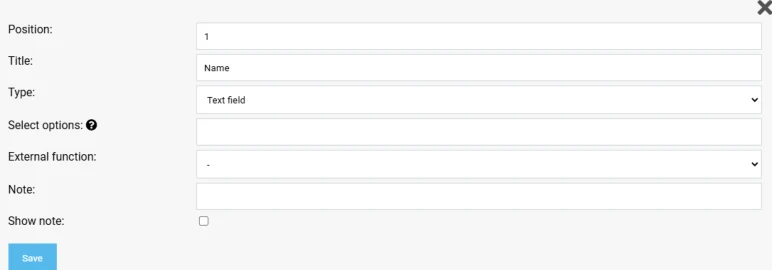
2nd column - article code - we selected type numeric field so only numbers can be entered
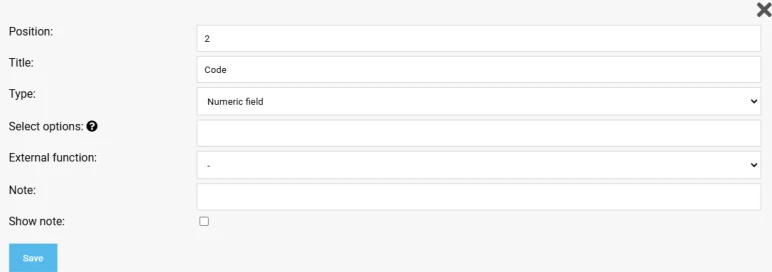
Our database has now two attributes article name and code:

If you want to add now new item into database so in our example new article, click on button Add row.
In every row you can now enter name and code for example to add chocolate with code 2000 and ice cream with code 2001.
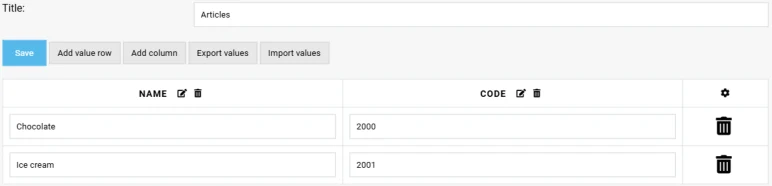
Press save button to save new articles into database.
View original page 43 — diagrams and layout
6.2. Export and import database from Excel
If you have your database saved in Excel, you can easily import this database into Scale Monitor. To import new database, you must create database first.
To import database, click on the Import button and select file from which you want to import database:

A new window will open where you will be able to select which columns shall be imported from Excel. Scale Monitor will automatically detect columns which have the same name as attributes in database. Name of the columns shall be in the first row.
If you select to import a non-existing attribute so a column that exists in the Excel but there is no attribute in database Scale Monitor will automatically create new attribute in database.
If you want Scale Monitor, if item already exists, so that it is not duplicated when importing you must select Do not duplicate option and select attribute which Scale Monitor must use to check if item already exists. If you check option update existing (you must also check option, do not duplicate to use this functionality) Scale Monitor will update any existing item with new values if this item already exists in database.
If you want to export database, you must click button Export and database will be exported into Excel.
6.3. Add database on virtual indicator
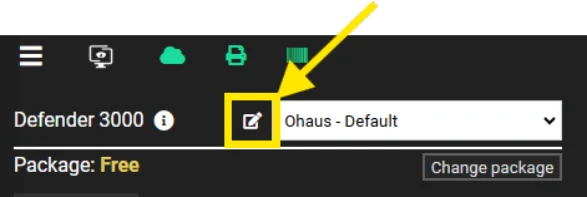
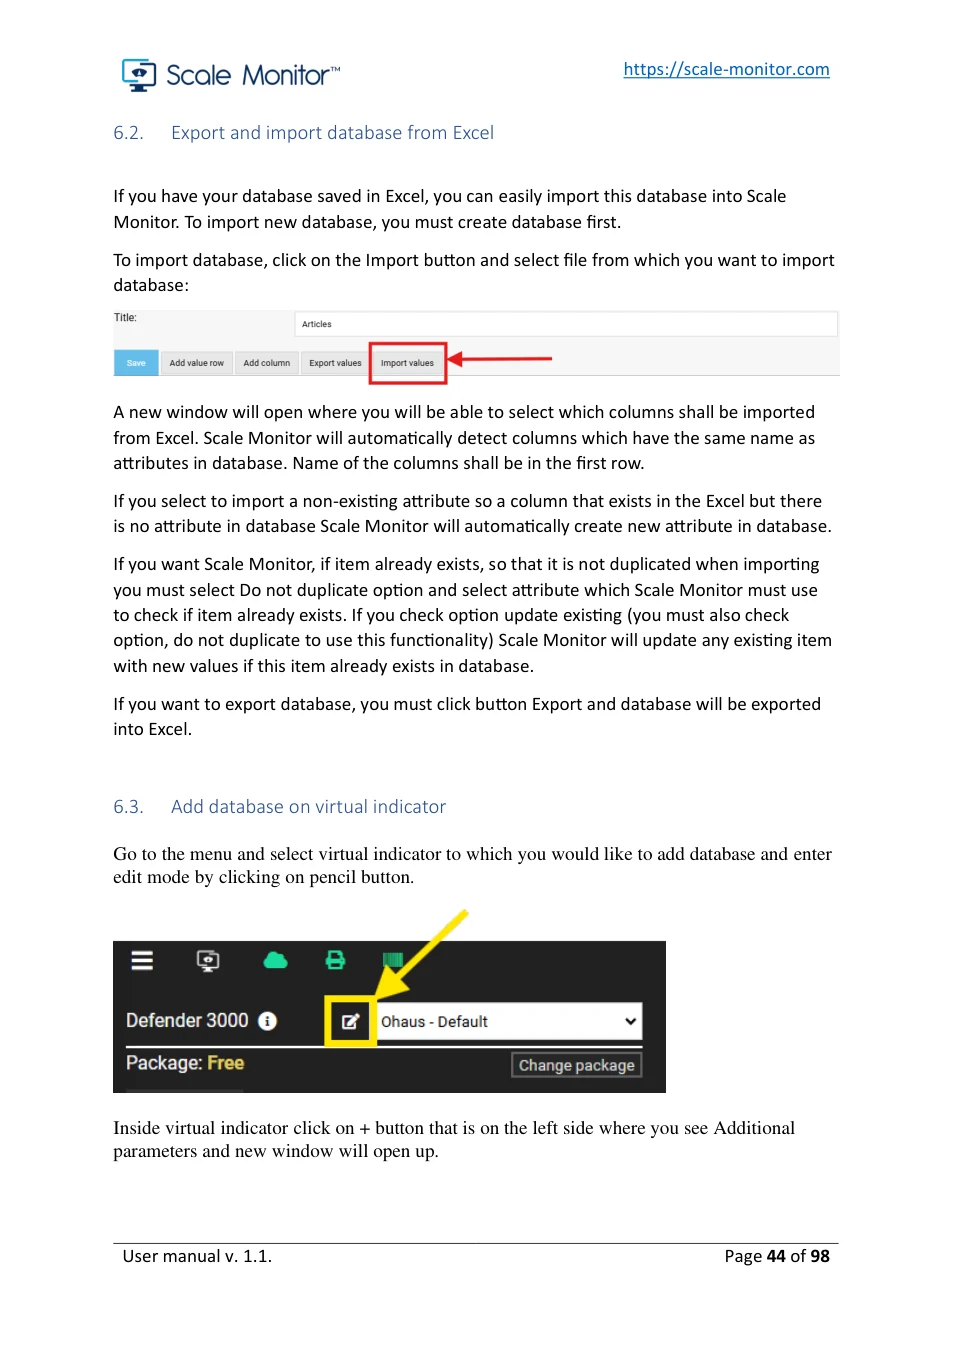
Go to the menu and select virtual indicator to which you would like to add database and enter edit mode by clicking on pencil button.
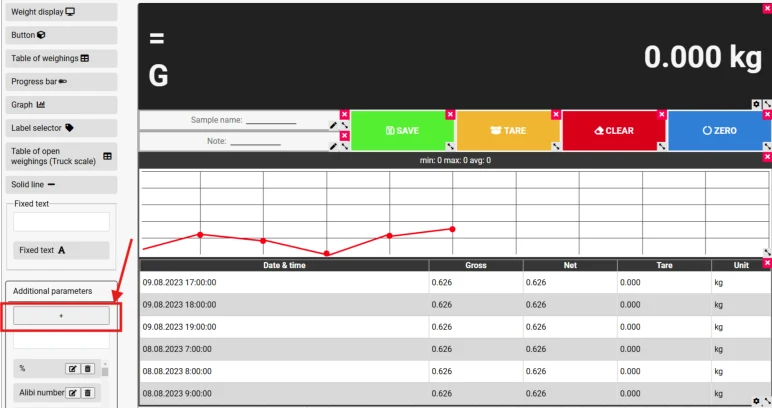
Inside virtual indicator click on + button that is on the left side where you see Additional parameters and new window will open up.
View original page 44 — diagrams and layout
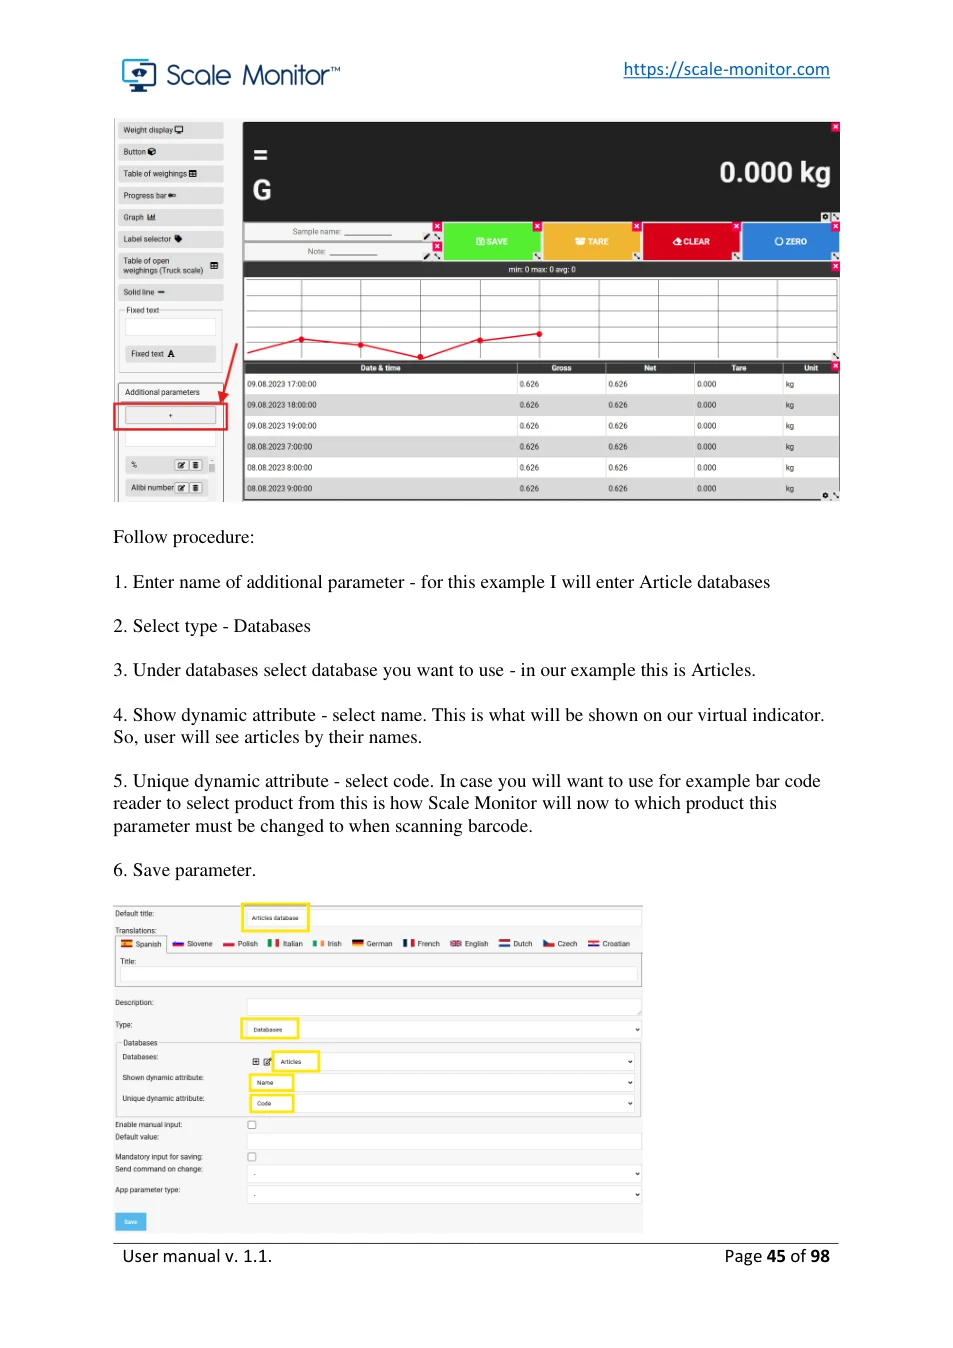
Follow procedure:
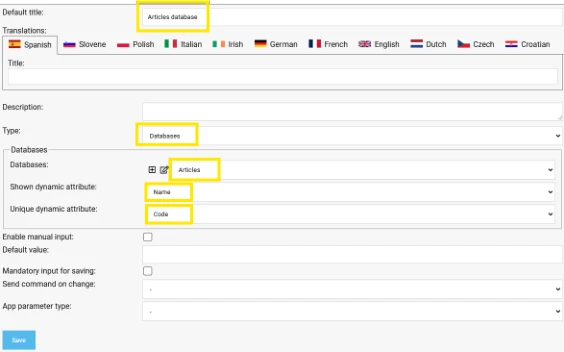
1. Enter name of additional parameter - for this example I will enter Article databases
2. Select type - Databases
3. Under databases select database you want to use - in our example this is Articles.
4. Show dynamic attribute - select name. This is what will be shown on our virtual indicator. So, user will see articles by their names.
5. Unique dynamic attribute - select code. In case you will want to use for example bar code reader to select product from this is how Scale Monitor will now to which product this parameter must be changed to when scanning barcode.
6. Save parameter.
View original page 45 — diagrams and layout
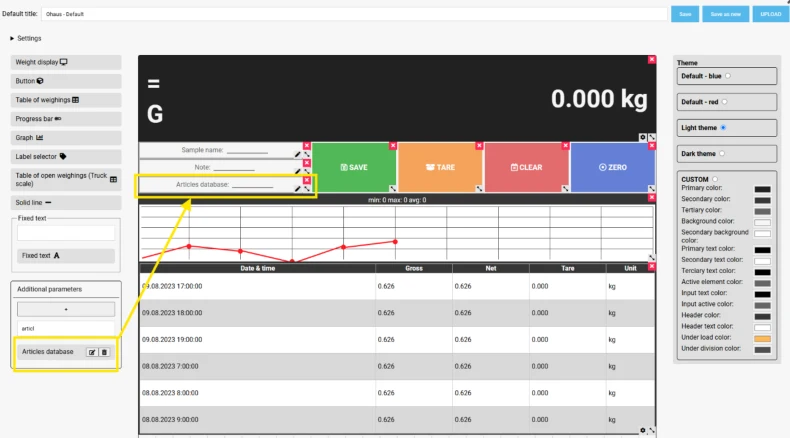
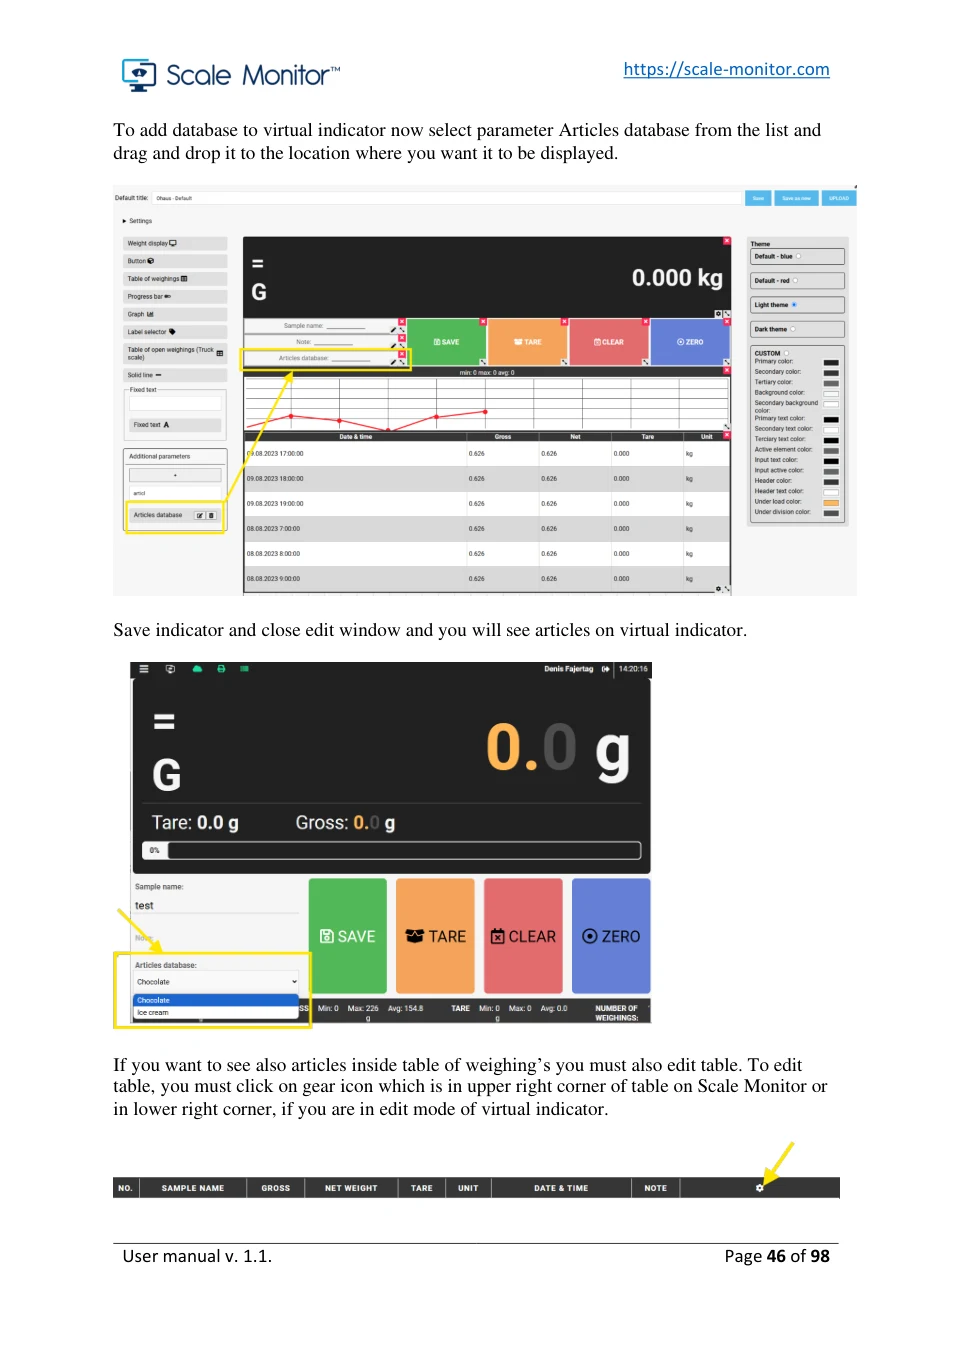
To add database to virtual indicator now select parameter Articles database from the list and drag and drop it to the location where you want it to be displayed.
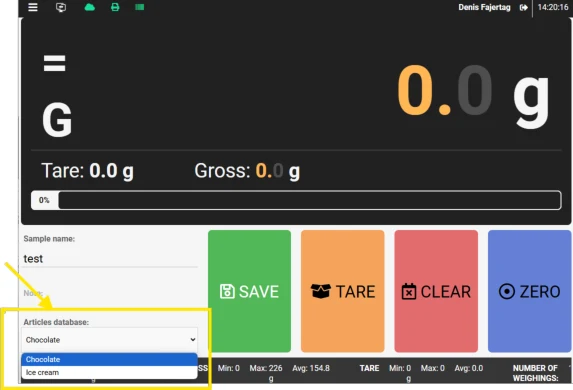
Save indicator and close edit window and you will see articles on virtual indicator.
If you want to see also articles inside table of weighing’s you must also edit table. To edit table, you must click on gear icon which is in upper right corner of table on Scale Monitor or in lower right corner, if you are in edit mode of virtual indicator.

View original page 46 — diagrams and layout

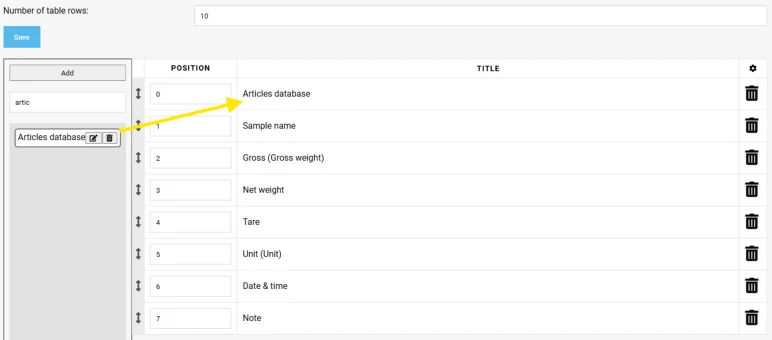
Edit window will open. Search for parameter Article database and drag and drop it to the table.
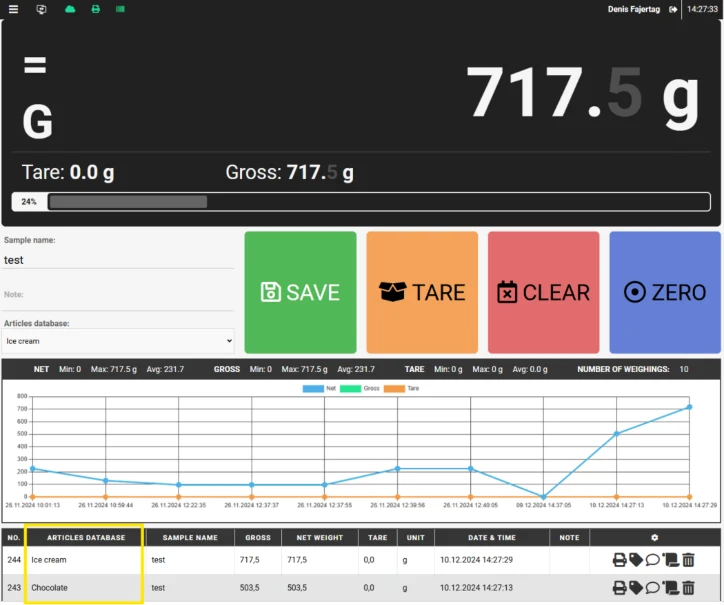
Now when you save weighing inside table of weighing you will also see article that was selected when weighing was saved.
View original page 47 — diagrams and layout
6.4. External functions
Any database field can be set to use an external function, in most cases these will set the value of parameters like tolerances and targets.
Example:
In this example we set the target for Check weighing application on a products database:
1. The field for our target is created like described in the Add new database paragraph.
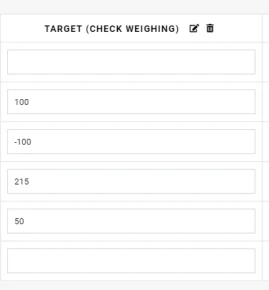
2. in the field settings we set the "External function" field to "Target (Check weighing)" this will set the target field of the check weighing application to the value entered in this field.
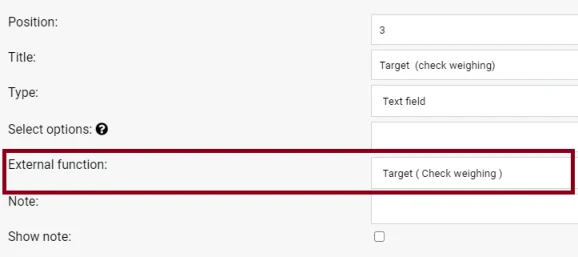
After using the same process to set the upper and lower tolerance we are done.
When selecting a product from this database the target and tolerance values set for this product will automatically be entered into their fields.
View original page 48 — diagrams and layout

Certain manufacturers will also allow you to send the target and tolerance to the scale, one example of this is the Ohaus Defender 3000.
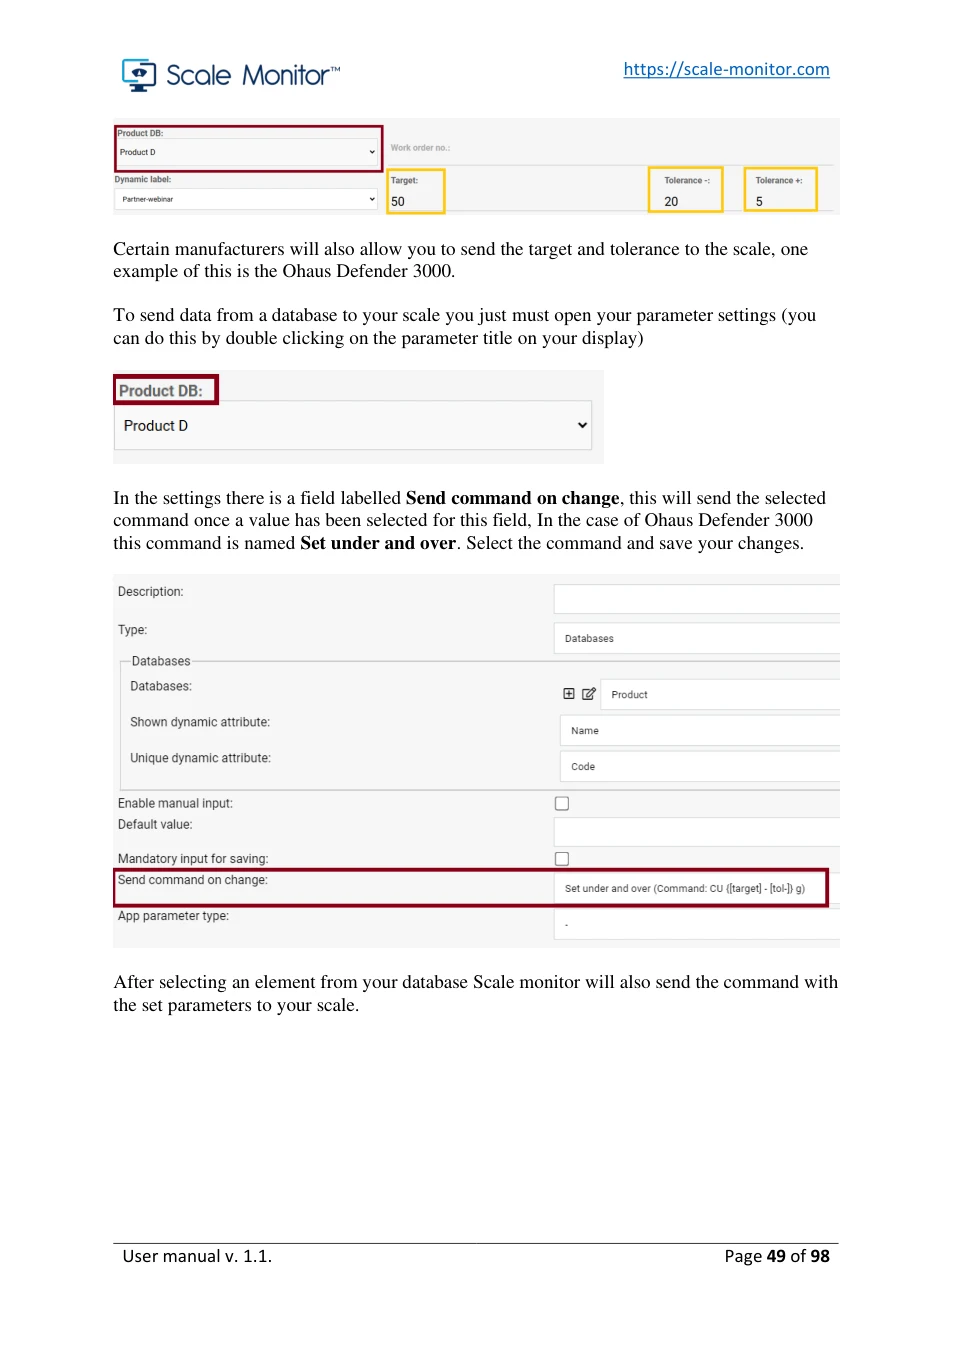
To send data from a database to your scale you just must open your parameter settings (you can do this by double clicking on the parameter title on your display)

In the settings there is a field labelled Send command on change , this will send the selected command once a value has been selected for this field, In the case of Ohaus Defender 3000 this command is named Set under and over . Select the command and save your changes.
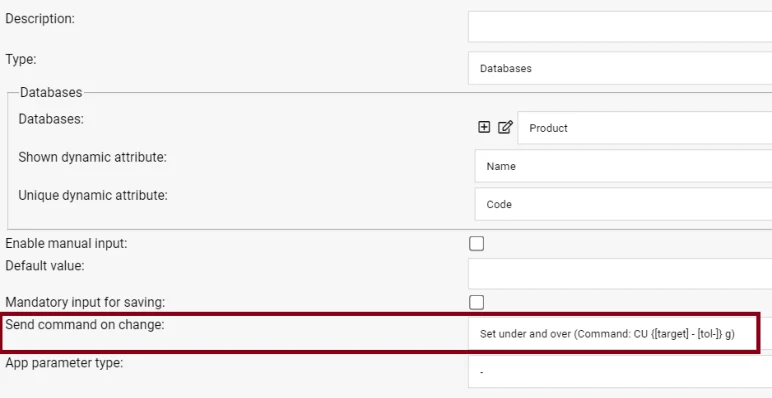
After selecting an element from your database Scale monitor will also send the command with the set parameters to your scale.
View original page 49 — diagrams and layout
7. Scanner
Scanner module enables you to use barcode scanner to copy data into Scale Monitor or to choose an item from database.
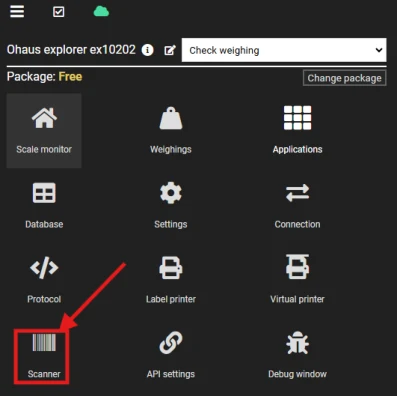
To use scanner, you must enable it and configure scanner actions in scanner menu. To enter scanner menu, click on Scanner button in menu.
In the menu click on enable scanner and barcode icon will appear in top bar.
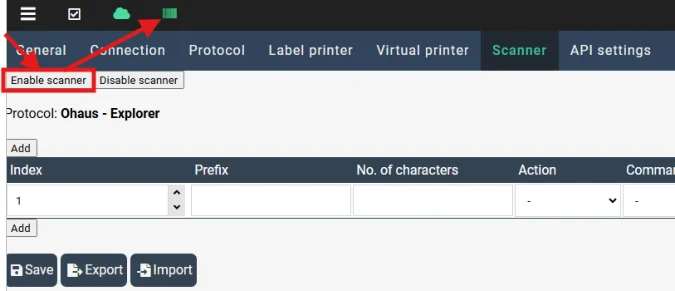
If you want to disable scanner, click on disable scanner and also barcode icon will disappear from the top bar.
View original page 50 — diagrams and layout
7.1. Scanner actions
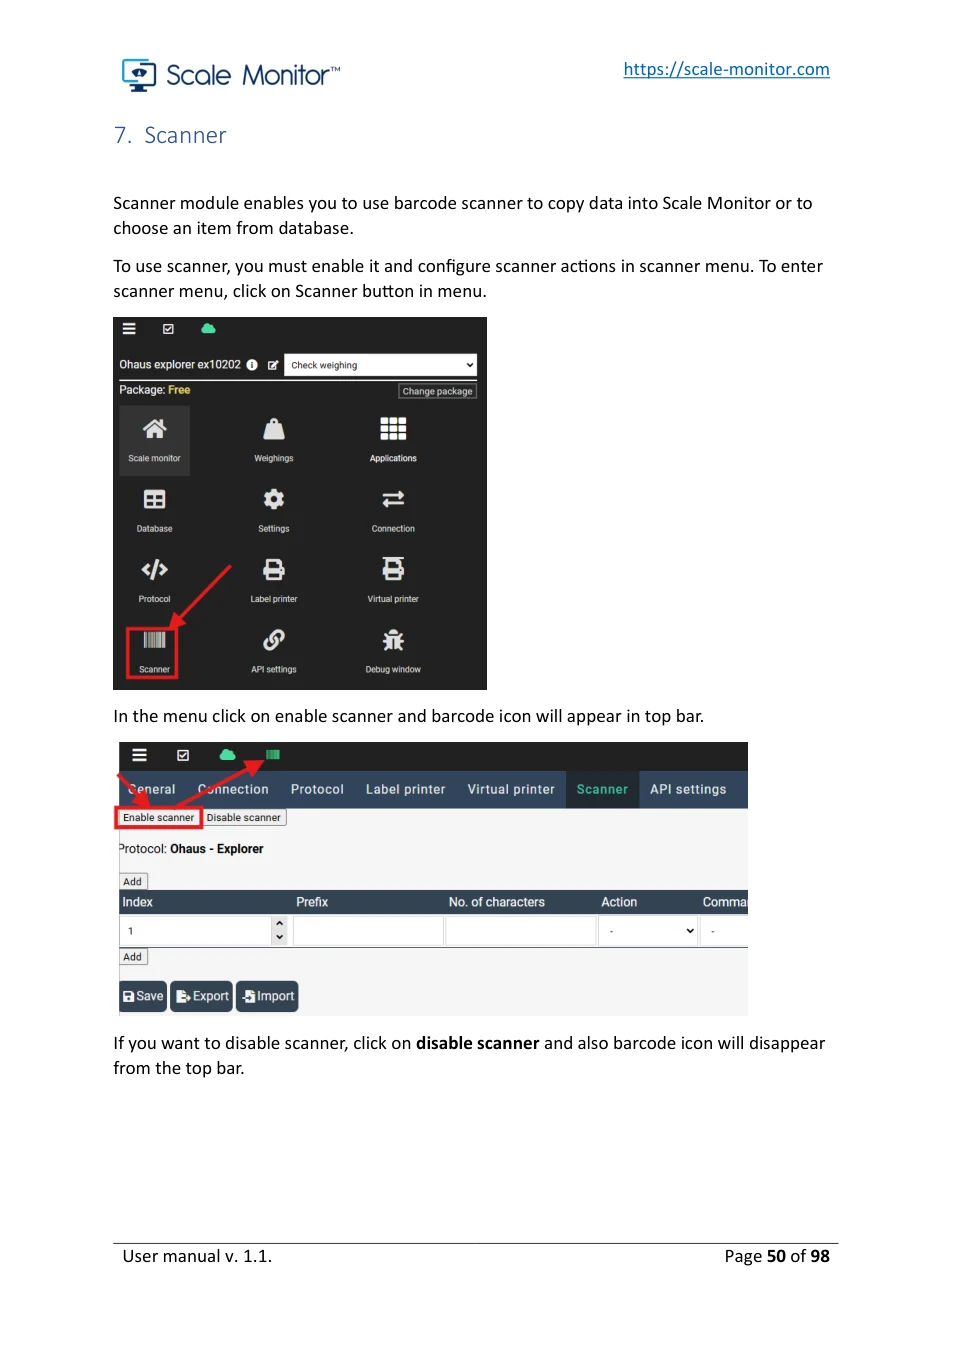
An action tells Scale Monitor what to do when barcode is read. Scale Monitor support three different actions:
1. Command action – this mean that once a barcode is read Scale Monitor will send a command to the scale. 2. Write to field – this action will write read barcode data into the selected field. 3. Database – this action can be used to quickly select an item from database.
If you define multiple actions, then you must also specify criteria’s which tell Scale Monitor how to distinguish different barcode and select proper action to execute when barcode is read.
We have possibilities to setup three different criteria to identify an action:
1. Prefix – the action will be used if the first part of the scanned code matches the prefix. 2. Number of characters - this action will be used if the number of characters matches the number of characters in the scanned code. 3. Default - If both the prefix and number of characters is empty the action will be used if no other action matches the scanned code.
7.2. Prefix criteria
Prefix criteria can be used when the begging of barcode has fixed text.
For example, if we have the following barcodes:
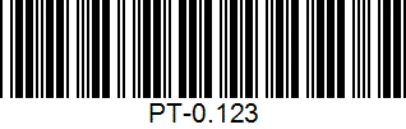
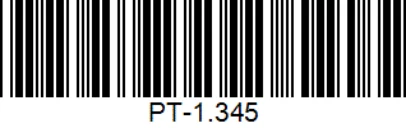
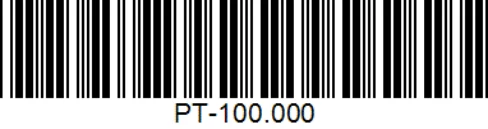
View original page 51 — diagrams and layout
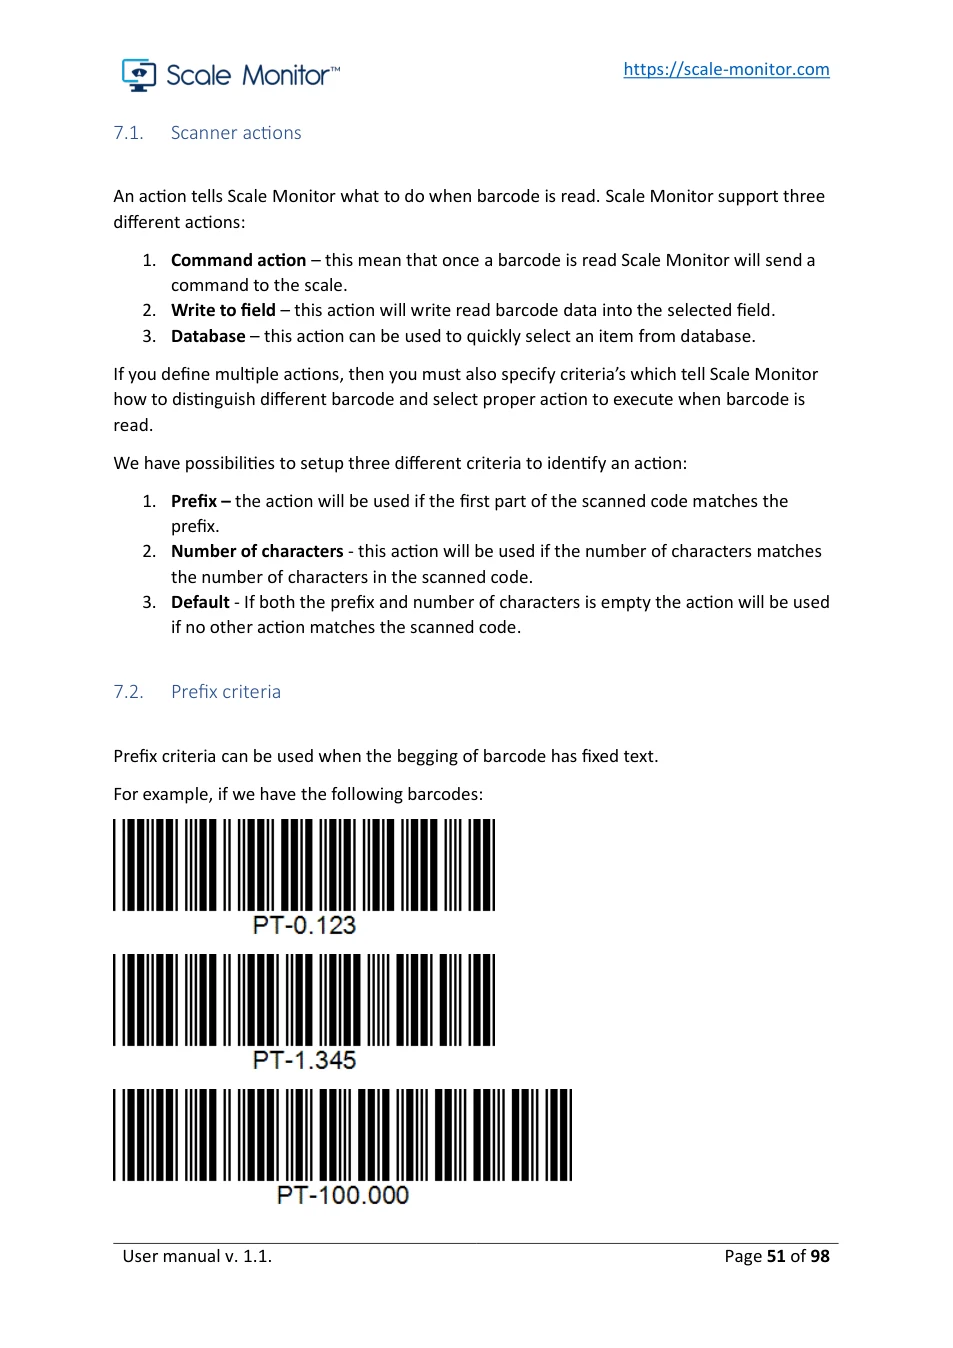
We see that all the barcodes have prefix of PT- followed by the number which is not static.
Such barcode could be used for taring scale where PT would stand for Preset tare followed by the number which represents tare value.
7.3. Number of characters criteria
We can set as criteria also number of characters in the code. For example:
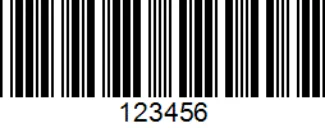
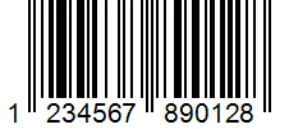
6 characters long barcode could represent work order number while 13 characters long barcode could represent article number.
7.4. Default
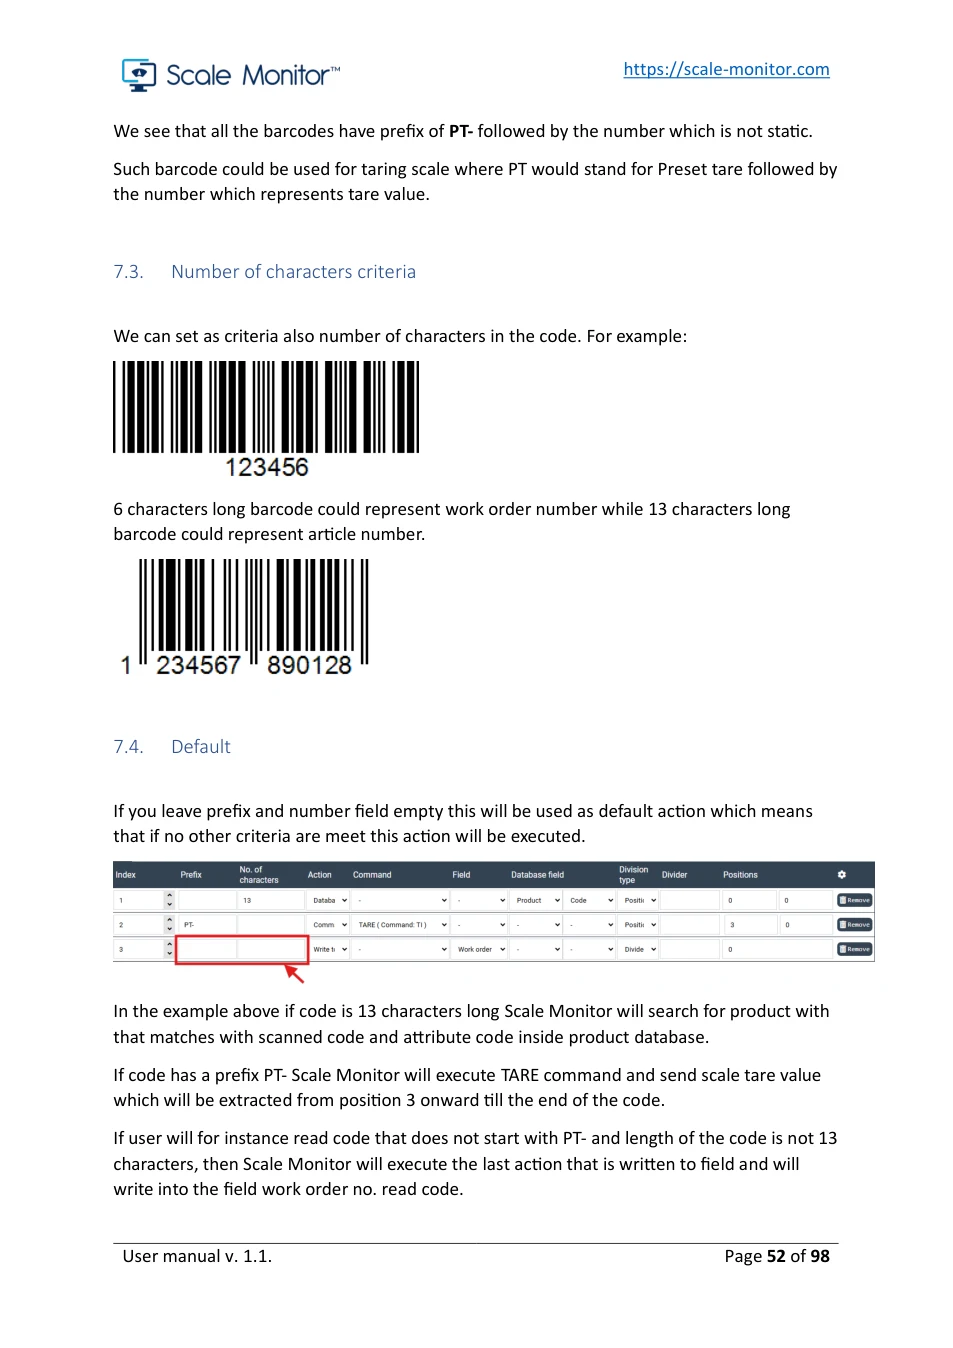
If you leave prefix and number field empty this will be used as default action which means that if no other criteria are meet this action will be executed.

In the example above if code is 13 characters long Scale Monitor will search for product with that matches with scanned code and attribute code inside product database.
If code has a prefix PT- Scale Monitor will execute TARE command and send scale tare value which will be extracted from position 3 onward till the end of the code.
If user will for instance read code that does not start with PT- and length of the code is not 13 characters, then Scale Monitor will execute the last action that is written to field and will write into the field work order no. read code.
View original page 52 — diagrams and layout
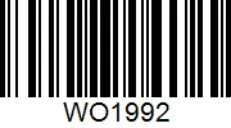
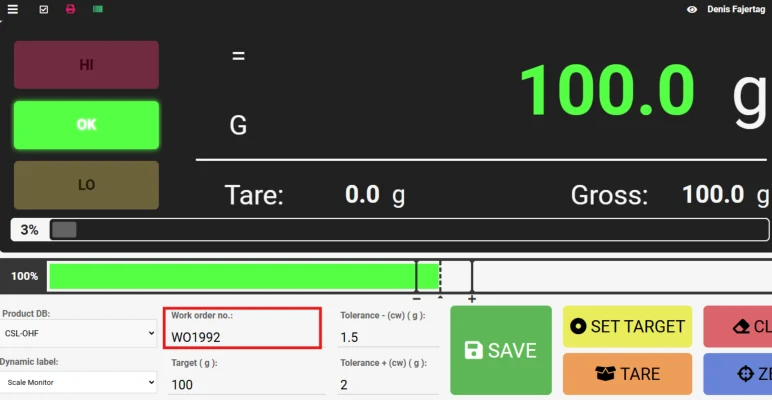
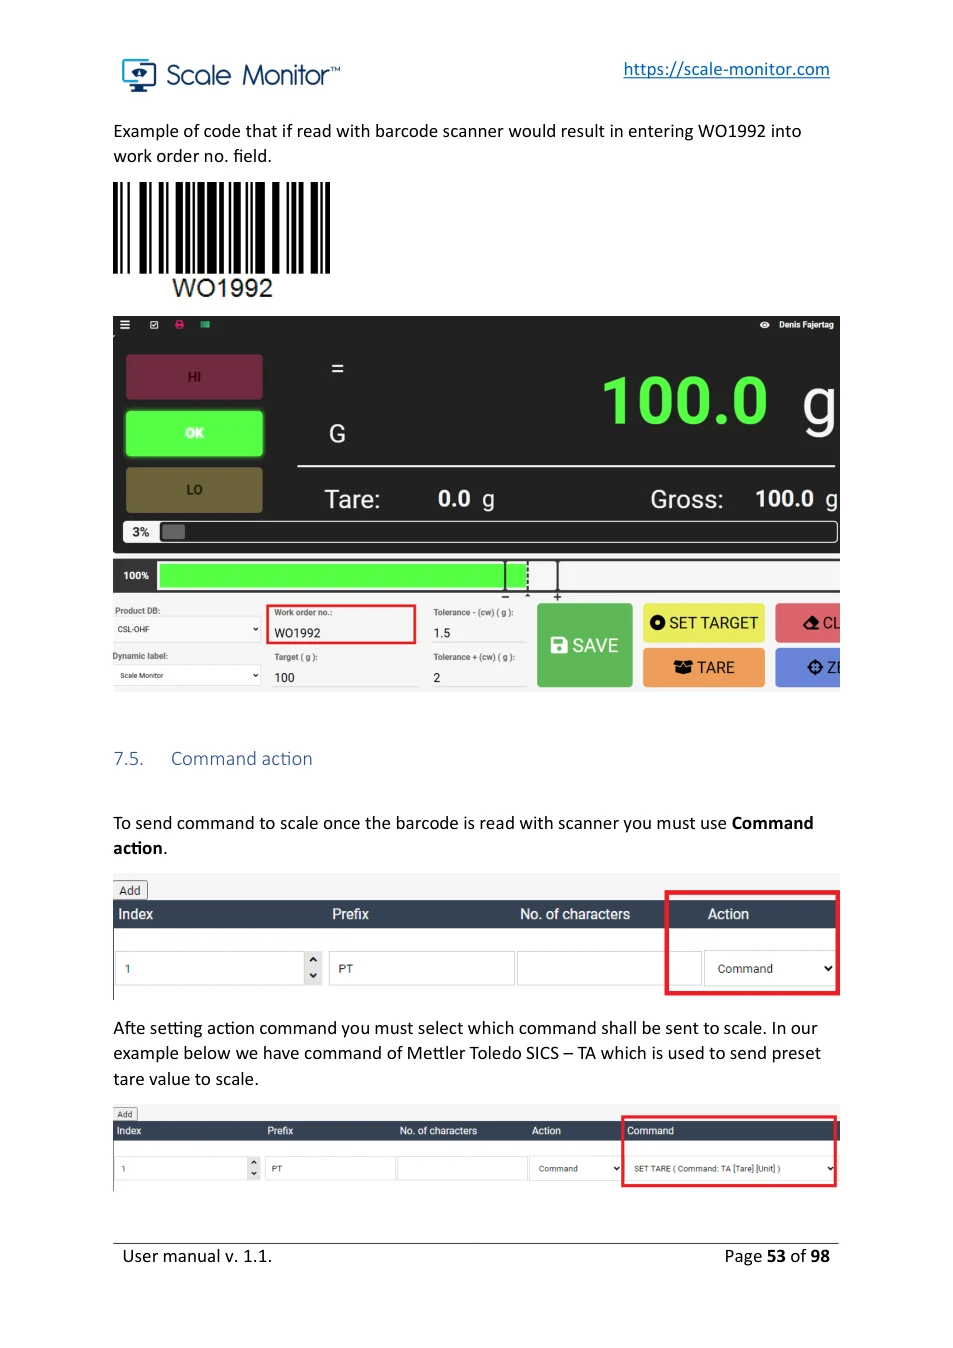
Example of code that if read with barcode scanner would result in entering WO1992 into work order no. field.
7.5. Command action
To send command to scale once the barcode is read with scanner you must use Command action .

Afte setting action command you must select which command shall be sent to scale. In our example below we have command of Mettler Toledo SICS – TA which is used to send preset tare value to scale.

View original page 53 — diagrams and layout
TA command in our example requires two parameters first is tare value and second is unit.
Code below for example has prefix PT followed by space which is followed by tare value and again there is space followed by the unit.
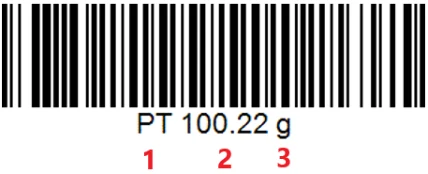
If code has divider like above where space is divider between different data, then it is the best to set division type to divider. In the first field we have our prefix that is PT so Scale Monitor can identify action which it must execute and in the second field we have tare value and in third field we have unit.
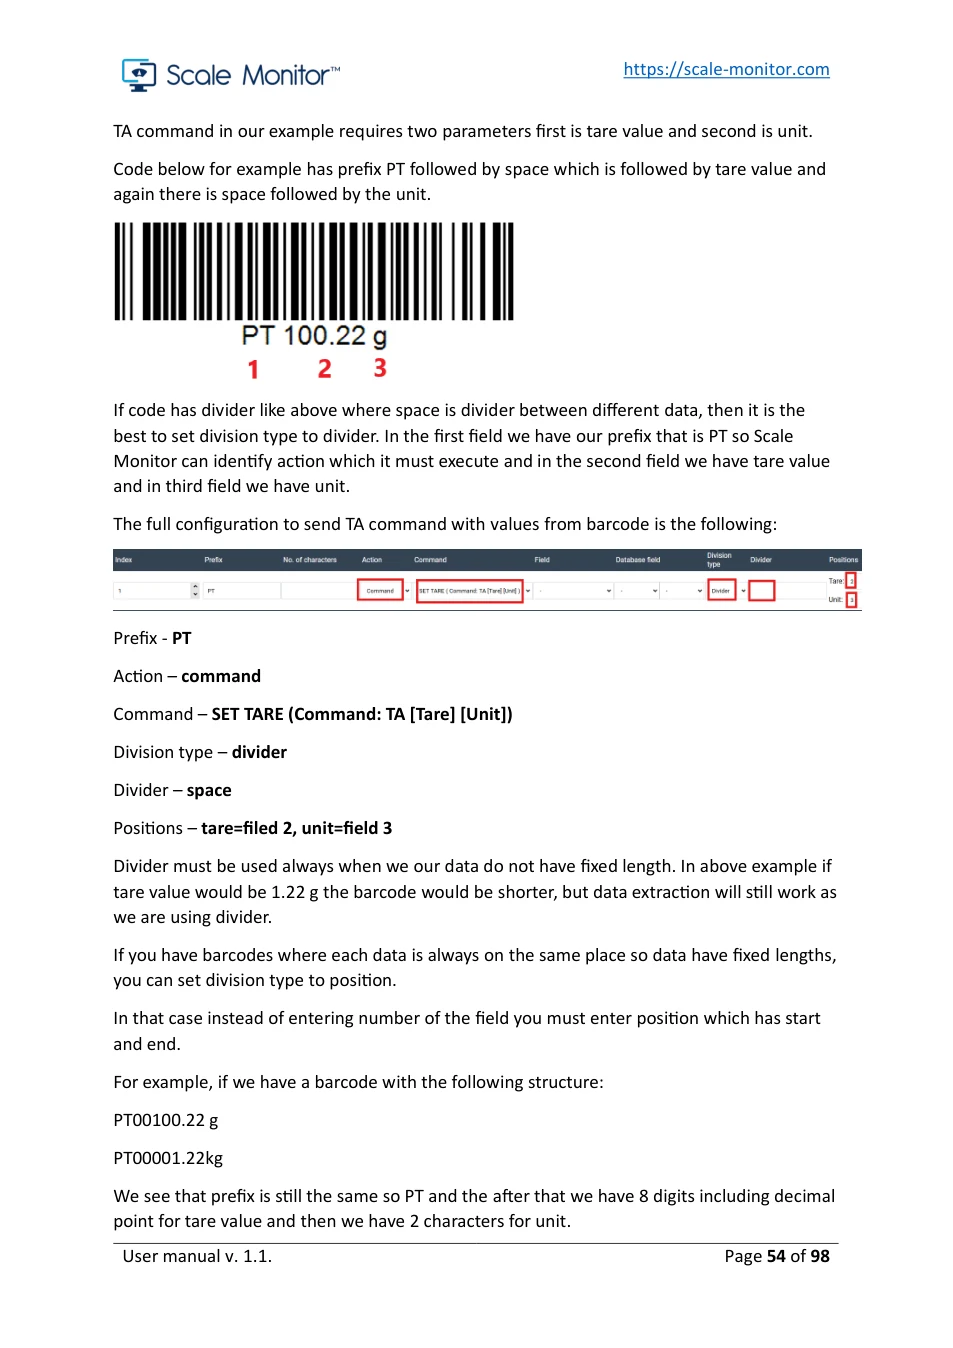
The full configuration to send TA command with values from barcode is the following:

Prefix - PT
Action – command
Command – SET TARE (Command: TA [Tare] [Unit])
Division type – divider
Divider – space
Positions – tare=filed 2, unit=field 3
Divider must be used always when we our data do not have fixed length. In above example if tare value would be 1.22 g the barcode would be shorter, but data extraction will still work as we are using divider.
If you have barcodes where each data is always on the same place so data have fixed lengths, you can set division type to position.
In that case instead of entering number of the field you must enter position which has start and end.
For example, if we have a barcode with the following structure:
PT00100.22 g
PT00001.22kg
We see that prefix is still the same so PT and the after that we have 8 digits including decimal point for tare value and then we have 2 characters for unit.
View original page 54 — diagrams and layout
For the simplicity of manual, I used zeroes instead of spaces, but it could be also space instead of zeroes in the code.
In that case we would have to set following configuration:

Prefix - PT
Action – command
Command – SET TARE (Command: TA [Tare] [Unit])
Division type – position
Positions – tare=from 3 to 11, unit=from 11 to 13
7.6. Write to field action
Write to field action is basically copy and paste function by using barcode reader. Once barcode is read it will be copied into field you selected.
The easiest configuration is if you set default criteria and set just action write to field and select field where to write:

Now any code that will be read will be written into word order field.
If you want to write to field just part of barcode you can use division type which can be divider or position.
For instance, if you have barcode that start with WO and then follows 6-digit work order number and you want to copy only work order number you would need to set:

So scanning barcode below will extract only 250332:
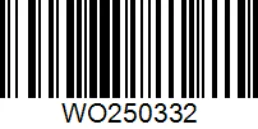
And write to the field:
View original page 55 — diagrams and layout
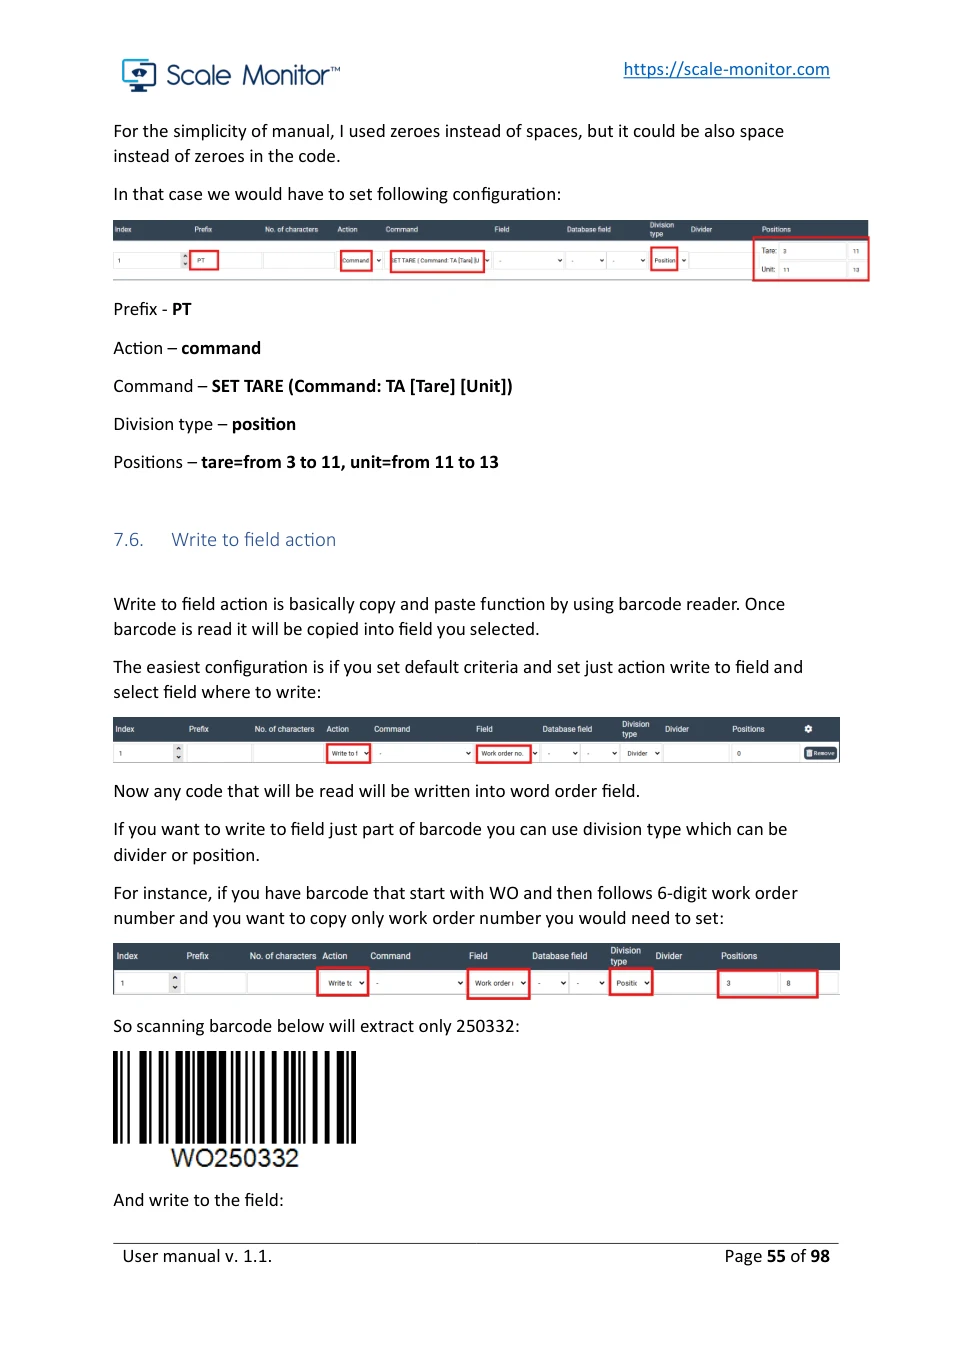
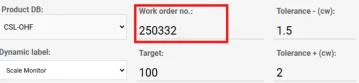
If you set end position to 0 it will go to the end of barcode. If you leave both positions to 0 it will copy the whole code.
If you have barcode which has data divided by divider, then you can set up divider and set field which you want to copy.
For example, if you have barcode WO,250322,CSL-OHF and you want to copy just 250322 which is work order number you would need to set following configuration:
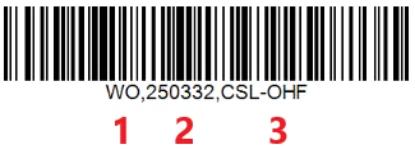
In above code we see that when we split code by comma (,) we get three data:
1 – WO
2 – 250332
3 – CSL-OHF
So we have to set index to 2. You will always need to use divider if your data inside code has dynamic length.

7.7. Database action
If you want to select item from database, you must set action to database and select database and field where Scale Monitor will look for item which value matches to scanned code.
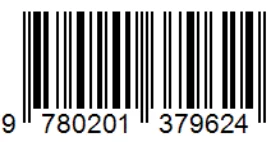
The simplest configuration would be without any criteria and searching by whole code. For example, let’s search for a product with EAN-13 code:
View original page 56 — diagrams and layout
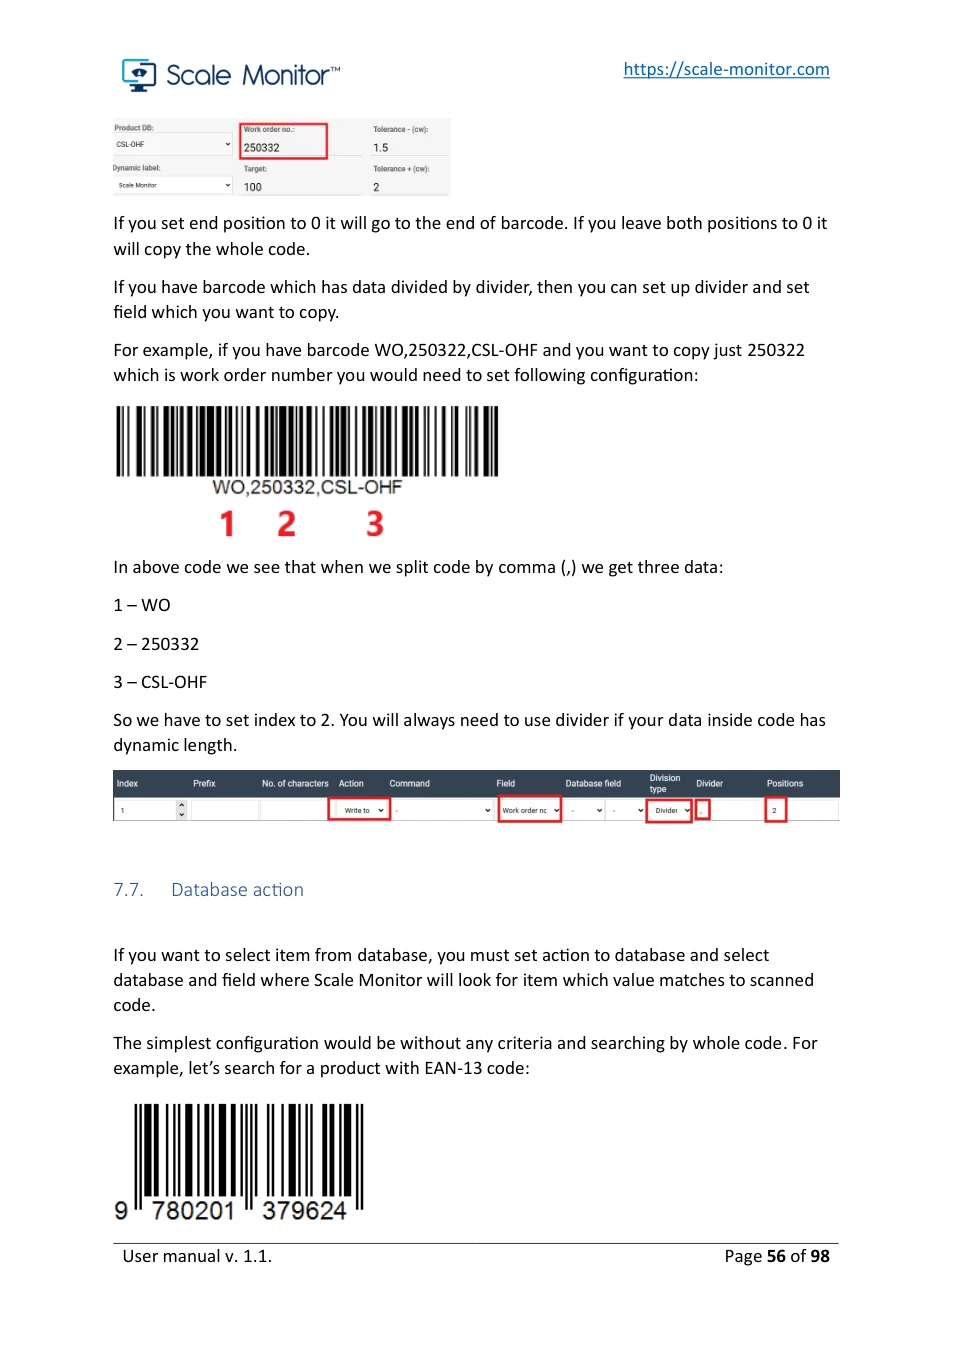
Item in database Product has in column code set value to 978020137962 which is what is written in above code.
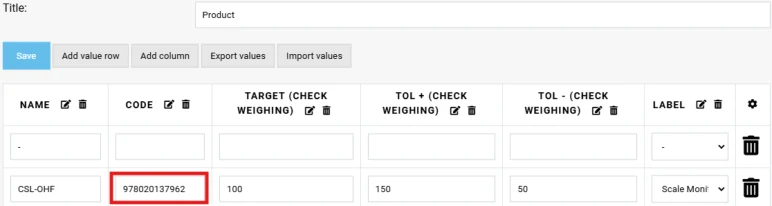
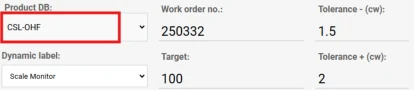
If you set, following configuration and scan above code Scale Monitor will select product with code 978020137962 which in our case is CSL-OHF.

It will set product:
In this case Scale Monitor searches in product database for item that has in column Code value equal to scanned barcode.
If you need match just part of the code, you can set this by entering position from which Scale Monitor shall extract part of the code or set divider and define field from which Scale Monitor shall extract data. You can see how to use divider and position in Command action or Write to field action.
8. Virtual scale indicator
Virtual scale indicator is fully customizable scale indicator. You can customize weight display, buttons, add additional field such as LOT, work order number, custom databases such as material databases, graph and so on.
You can have multiple virtual scale indicators and you can link virtual scale indicator to a specific application.
Scale Monitor support three levels to set virtual indicator:
- Global – this is a default virtual indicator that is predefined inside Scale Monitor. - Application – you can set in application setting to use specific virtual indicator.
View original page 57 — diagrams and layout
- Browser – every time you change virtual indicator this setting is stored inside web browser. This means that when you come back to Scale Monitor with the same web browser the last virtual indicator you set will be used. If you did not set any virtual indicator, then application indicator will be used or global indicator if virtual indicator was not set under application either.
If you use the same scale on PC, tablet, and phone you can set for every device different indicator. This way you can optimize your virtual scale to fit the screen of your device.
You can use the same virtual scale indicator on multiple scales even if these scales are from different manufacturers or are of different models.
This means that you will not have to learn anymore how to use different scale as virtual scale indicators works always the same on all scales.
You can also see video manual about virtual scale indicator on YouTube: https://youtu.be/qVMaViH-MrY
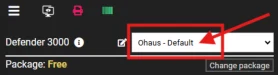
8.1. Selected virtual scale indicator and edit window You can always see which virtual scale indicator is being used by clicking on menu:
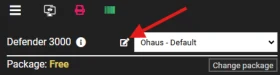
To edit selected virtual scale indicator, you can click on pencil in front of list of virtual scale indicators.
A new window will open:
View original page 58 — diagrams and layout
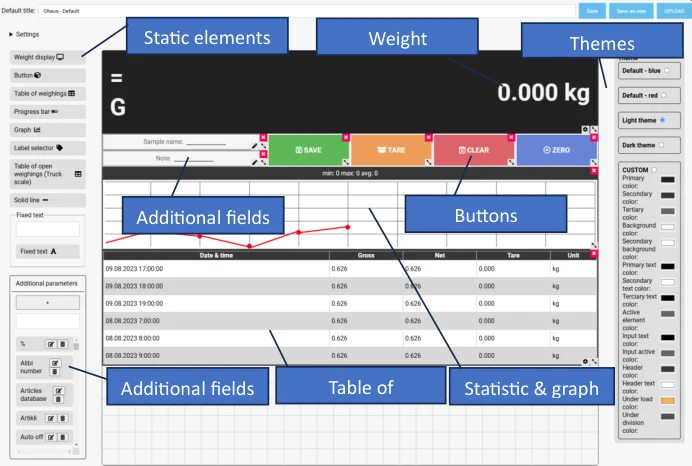
Static elements
Weight Themes
Additional fields Buttons
Additional fields Table of Statistic & graph
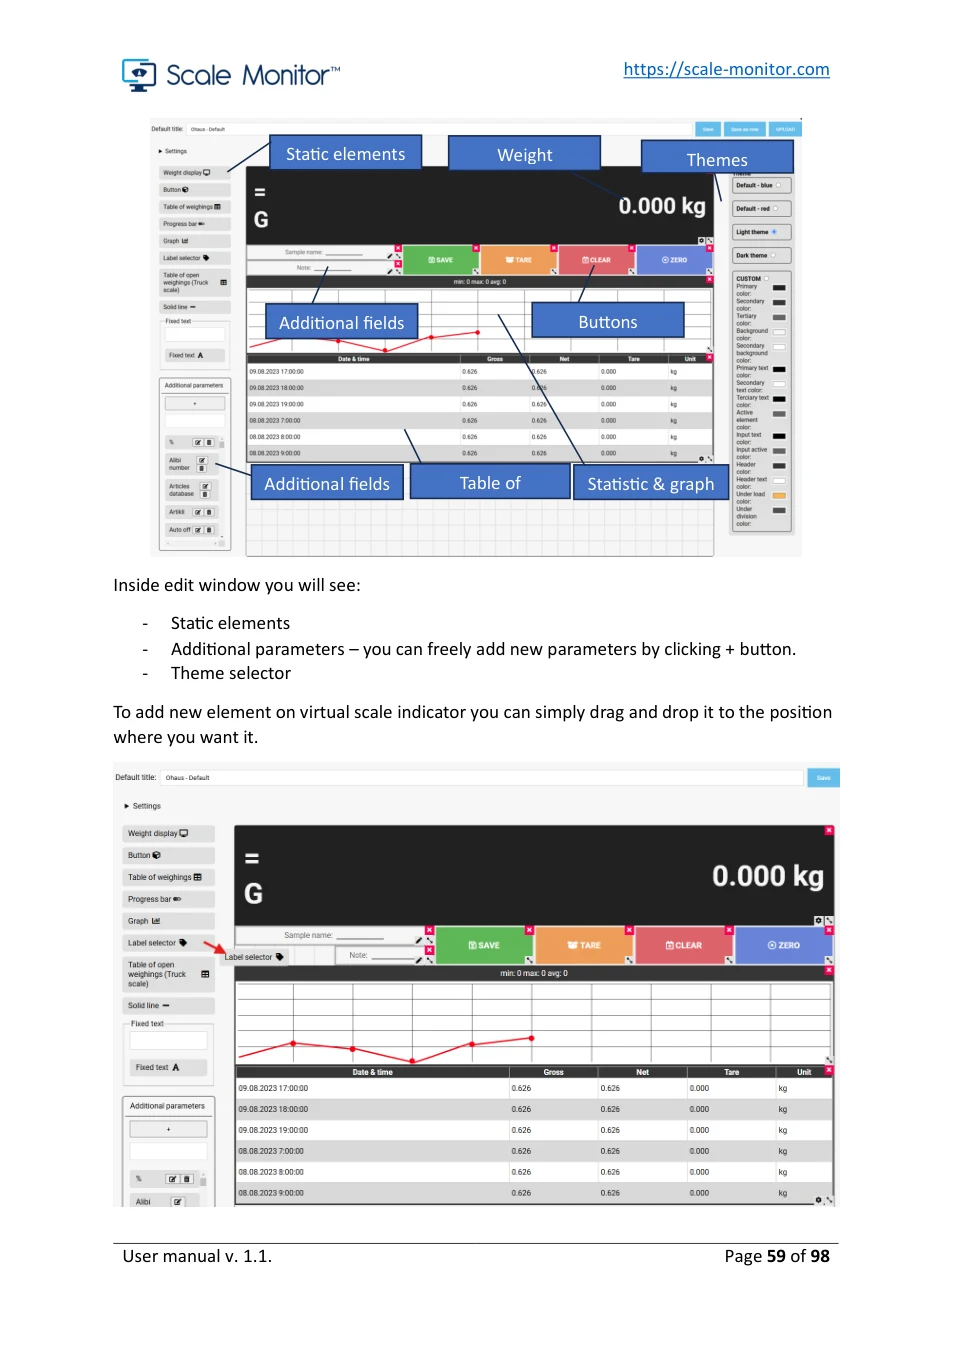
Inside edit window you will see:
- Static elements - Additional parameters – you can freely add new parameters by clicking + button. - Theme selector
To add new element on virtual scale indicator you can simply drag and drop it to the position where you want it.
View original page 59 — diagrams and layout
Some elements such as weighing’s list and weight display have gear icon in in down right corner or pencil icon for instance additional parameters. By clicking this icon, you will enter in to edit mode of this element.
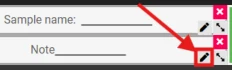
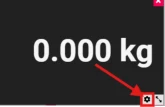
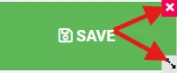
If you click left, click, and hold on element you will be able to move this element. If you click on arrows icon in down right corner, you will be able to resize this element.
If you click on x in upper right corner, you will remove element from virtual indicator.
8.2. Save as new
If you wish to create new virtual scale indicator, you can always save as new any existing virtual scale indicator. To do this you go into edit mode change the name of the virtual scale indicator and click on Save as new button.

8.3. Weight display
Weight display is specific element which is used to show weight and all related data such as stability, weight type, all weighing data gross, net and tare, unit and capacity or progress bar.
To edit weight display you must click on gear icon which is positioned in lower right corner of weight display.
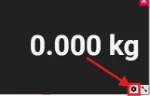
Once you click on gear icon new window will open where you will be able to design and customize weight display.
View original page 60 — diagrams and layout
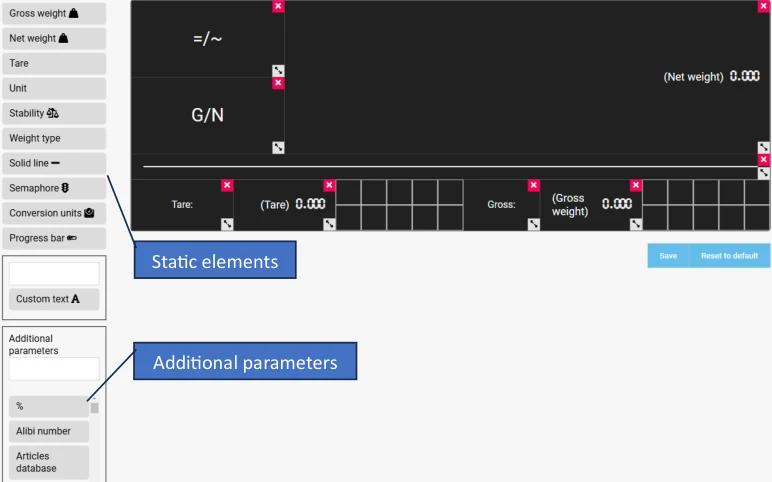
Static elements
Additional parameters
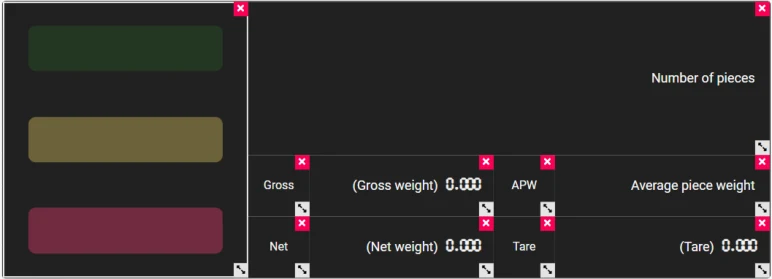
If you need you design also multiple weight displays on one virtual scale indicator.
Example of display for counting application:
On the weight display you can also add semaphore where if target and tolerances are set Scale Monitor will show status.
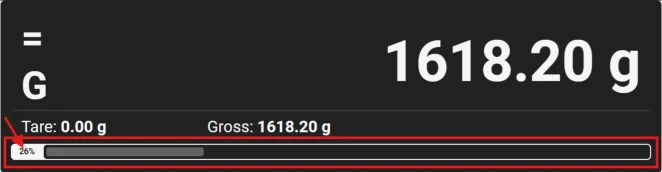
You can also add progress bar which is basically capacity bar where Scale Monitor shows in percentage and visually in progress bar how much capacity of the scale is used.
View original page 61 — diagrams and layout
In order that capacity bar works correctly you must enter correct scale maximum setting Settings → General.
You can also custom conversion unit which must be set in settings – see
View original page 62 — diagrams and layout
Conversion units.
8.4. Buttons
You can add buttons on virtual scale indicator. Buttons can be used to send command to scale or to execute Scale Monitor functions such as save a weighing or set a target.
There are several button types:
1. Command button – this button is used to send command to scale. 2. Turn on/off continuous communication – this button is used to turn on/off continuous communication with scale. 3. Save weighing – this button is used to save current weighing. 4. Set additional parameter – this button is used to set additional parameter such as for instance number of pieces in counting application. 5. Application function – this button is used to execute application specific function such as for instance save incoming weighing or set target in check weighing application. 6. Prepare format –
When you select button type different options will be available depending on the type you selected.
For every button you may set icon and colour.
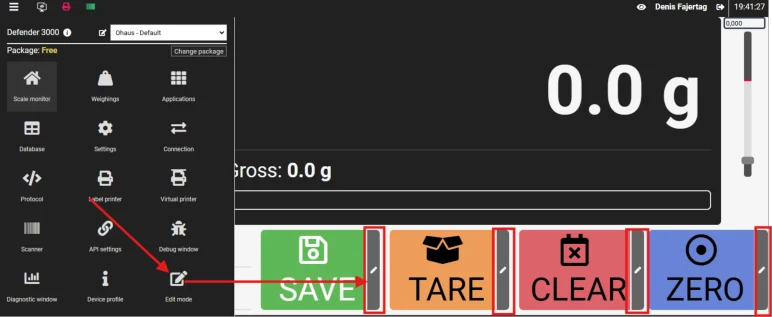
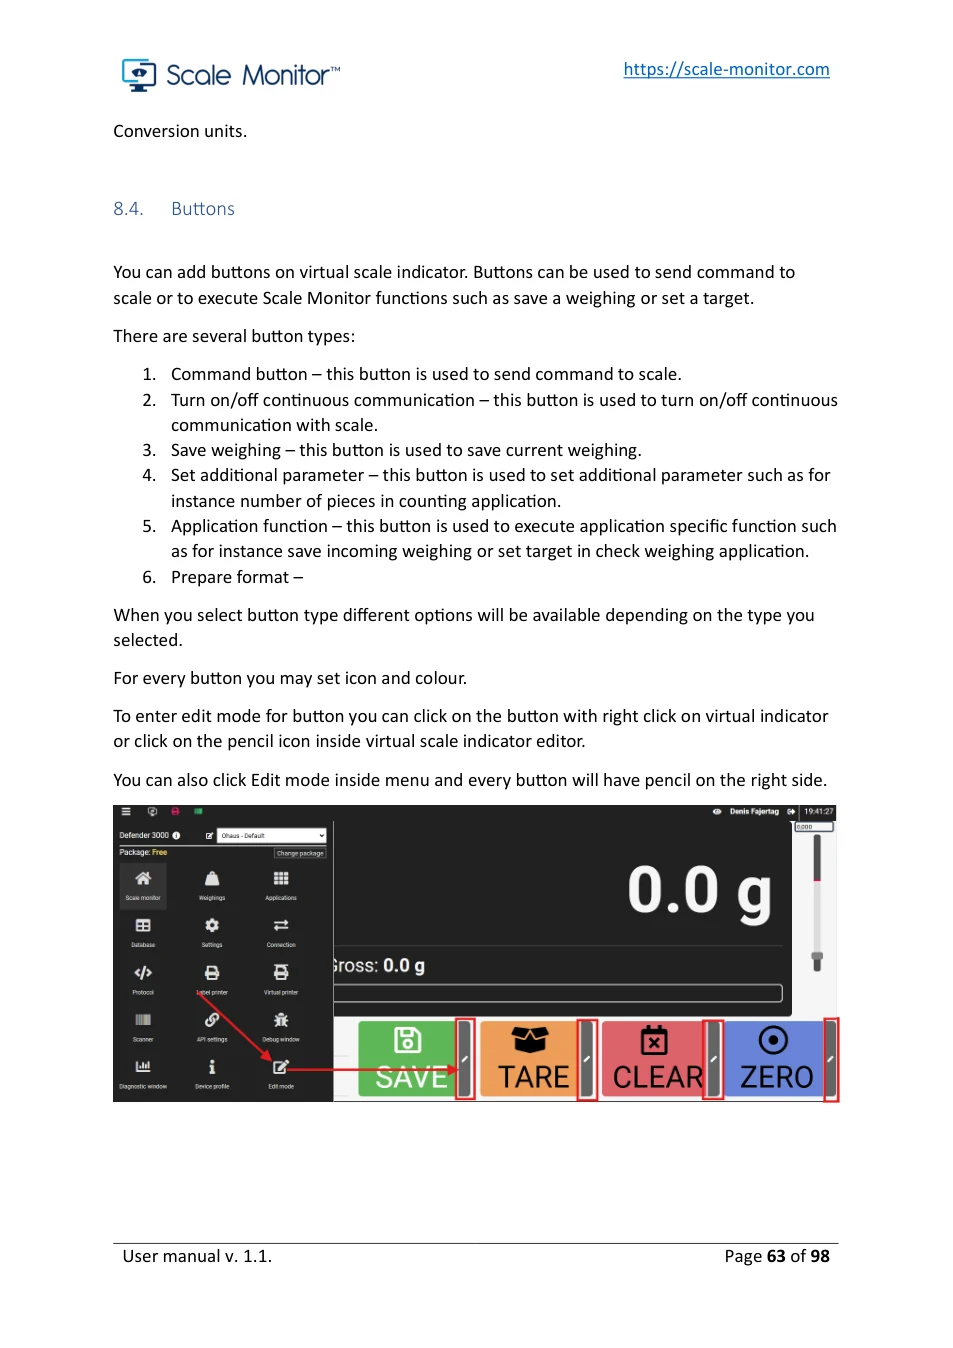
To enter edit mode for button you can click on the button with right click on virtual indicator or click on the pencil icon inside virtual scale indicator editor.
You can also click Edit mode inside menu and every button will have pencil on the right side.
View original page 63 — diagrams and layout
8.4.1. Command button
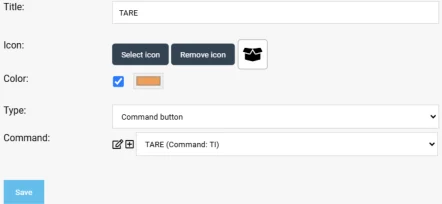
Command button is button that sends a command to the scale.
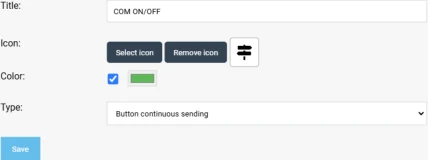
8.4.2. Turn on/off continuous communication This button is used to enable or disable continuous communication with scale. In continuous mode Scale Monitor is continuously sending command that is specified in Continuous mode.
8.4.3. Save weighing Button type save weighing will save current weigh in Scale Monitor together with all field that are on the display. When you select this type, you also have option to set if weight must be stable to save weighing.
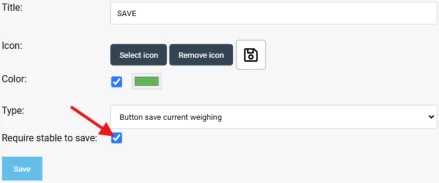
If you try to save weighing when weight on scale is not stable error message will be displayed.
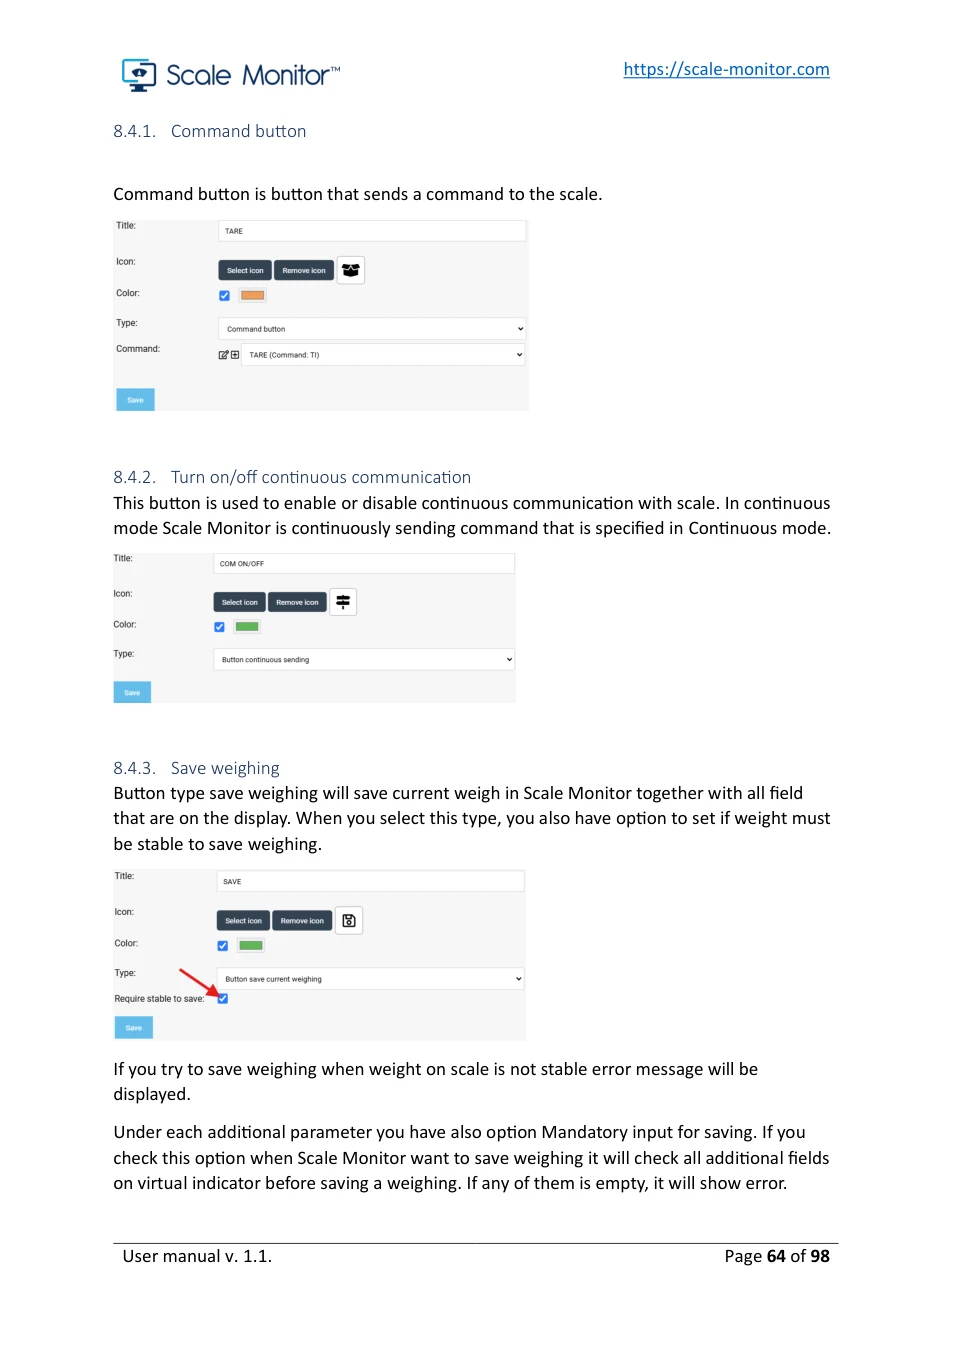
Under each additional parameter you have also option Mandatory input for saving. If you check this option when Scale Monitor want to save weighing it will check all additional fields on virtual indicator before saving a weighing. If any of them is empty, it will show error.
View original page 64 — diagrams and layout
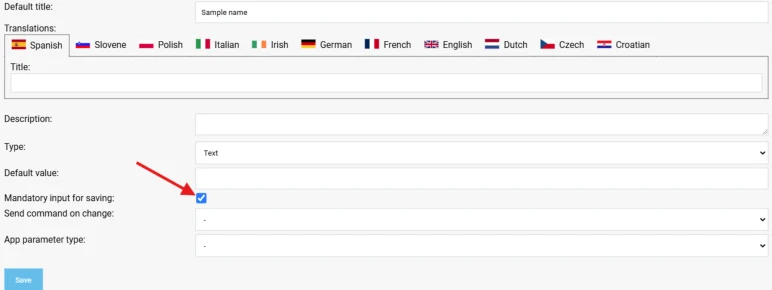
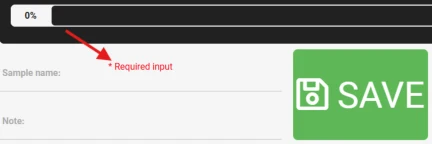
If empty and error message appears next to the name of additional field:
8.4.4. Set additional parameter Set additional parameter type of button will write into specified field value that is set. For instance in part counting application you can use this function to create button with preset number of pieces.
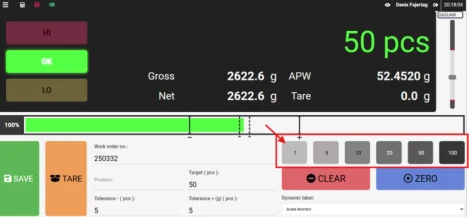
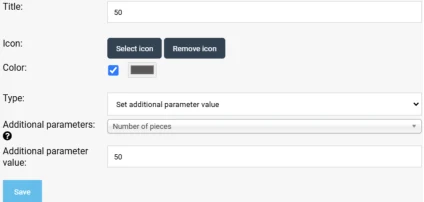
In the example below when button 50 is pressed it will write into field number of pieces number 50 which will trigger sampling function inside Scale Monitor which will divide current net weight with number 50 to calculate weight of one piece.
View original page 65 — diagrams and layout
You can use same functionality to set tare or tolerance values or to write some specific value into any other field you have on virtual scale indicator, so you do not have to write it manually.
8.4.5. Application function button Application function button will execute specific application function inside Scale Monitor. For example, if you are in check weighing application and you want to add on your virtual indicator a Set target button which will set current weight on scale as new target value you must set this type of button.
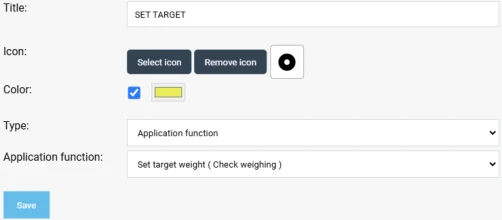
Under application function you must select which function must be executed when button is pressed. In example above Scale Monitor will set new target in check weighing application.
8.4.6. Prepare format
8.5. Table of weighing’s
Table of weighing’s is specific element which can be used to show last weighing on virtual scale indicator.
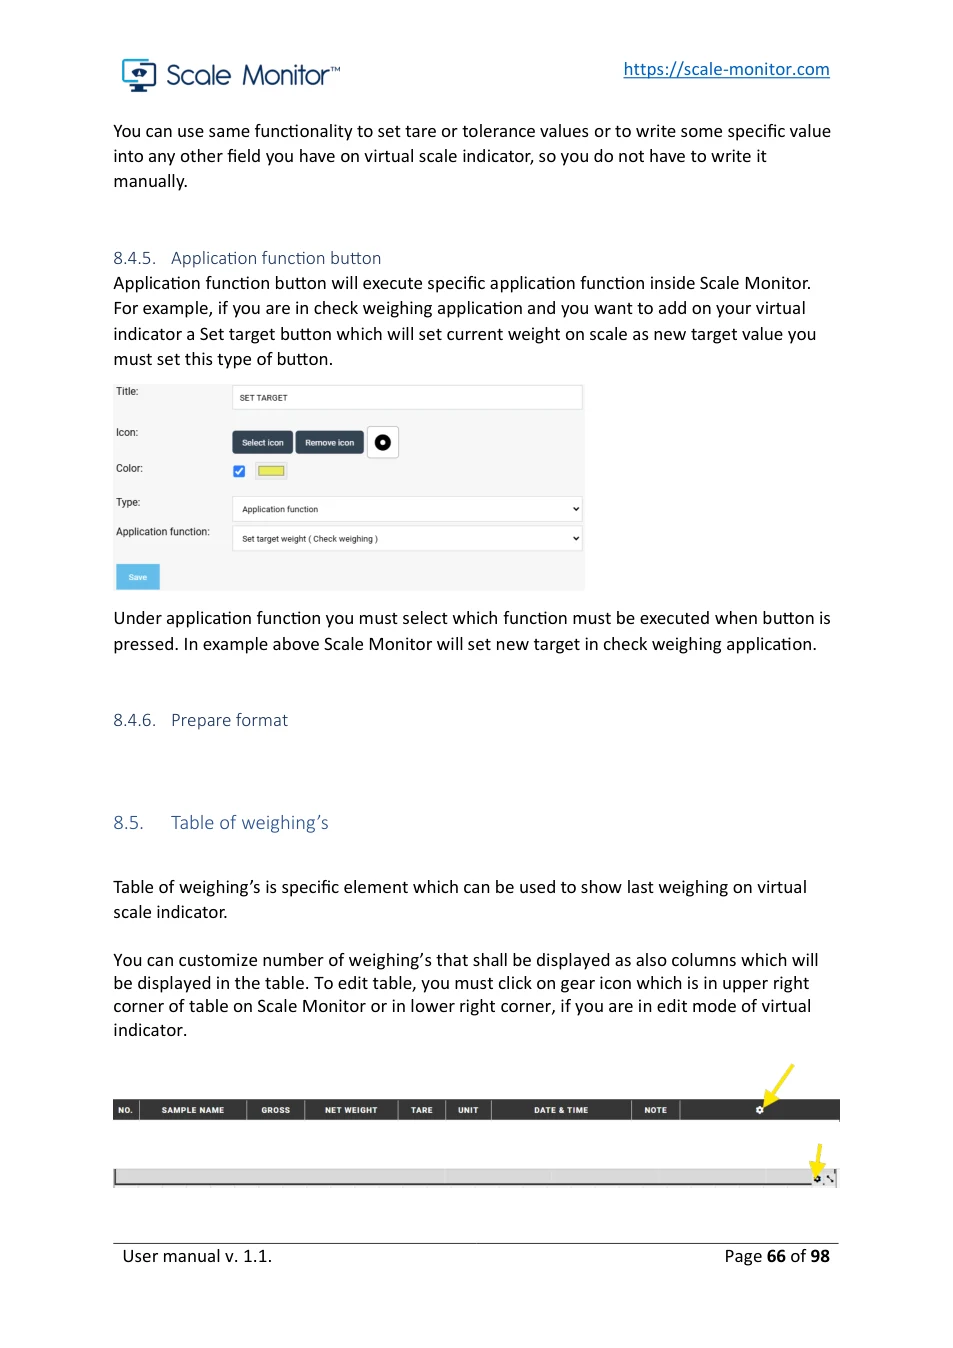
You can customize number of weighing’s that shall be displayed as also columns which will be displayed in the table. To edit table, you must click on gear icon which is in upper right corner of table on Scale Monitor or in lower right corner, if you are in edit mode of virtual indicator.


View original page 66 — diagrams and layout
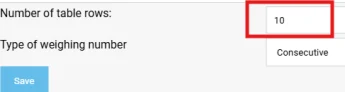
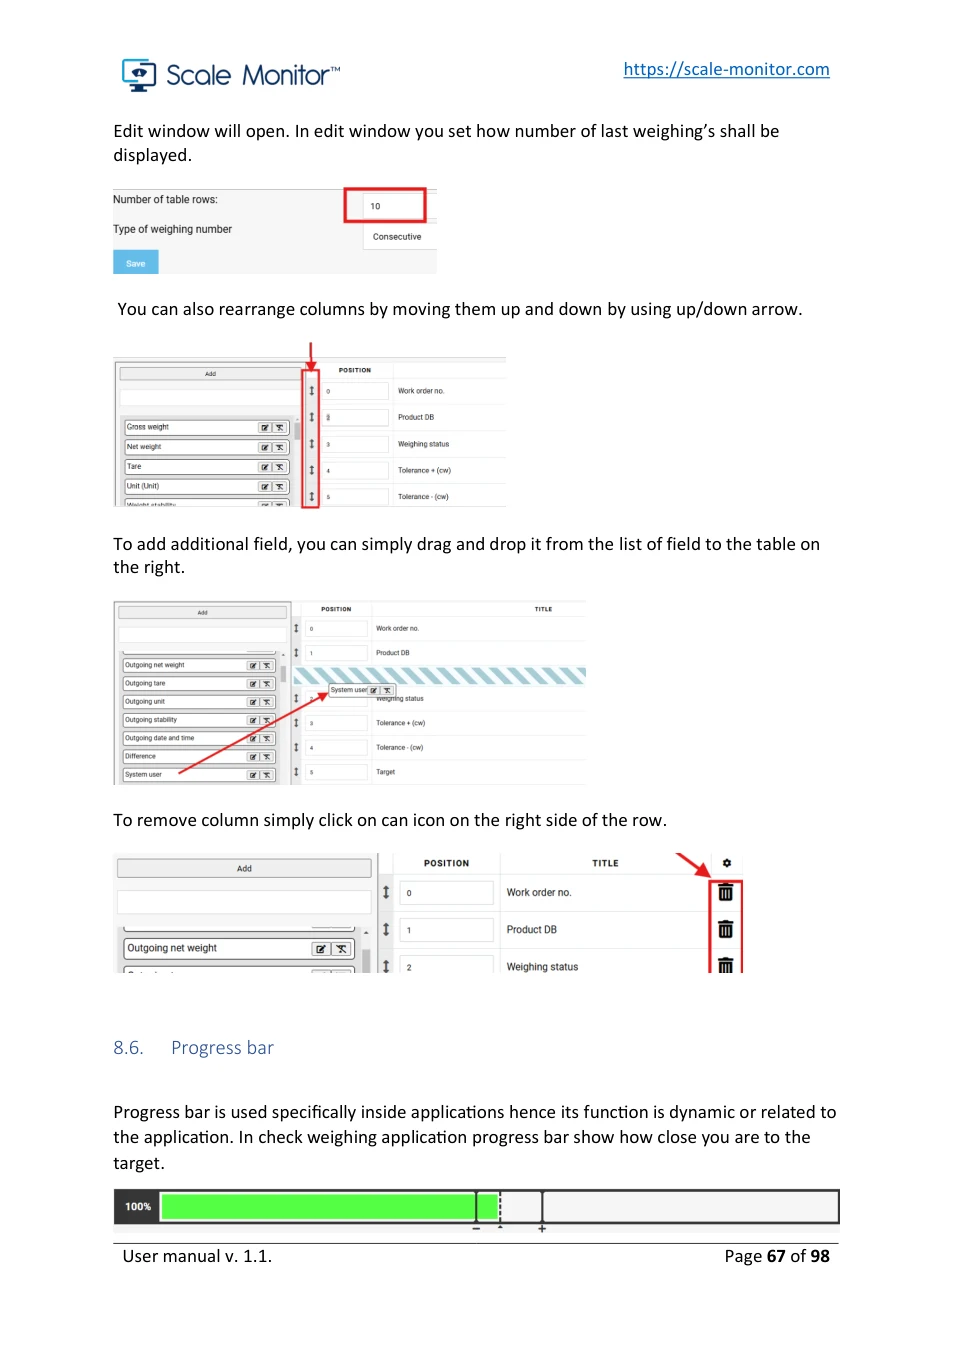
Edit window will open. In edit window you set how number of last weighing’s shall be displayed.
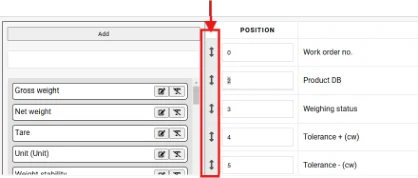
You can also rearrange columns by moving them up and down by using up/down arrow.
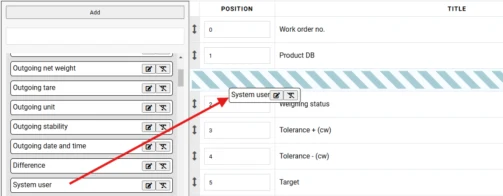
To add additional field, you can simply drag and drop it from the list of field to the table on the right.
To remove column simply click on can icon on the right side of the row.

8.6. Progress bar
Progress bar is used specifically inside applications hence its function is dynamic or related to the application. In check weighing application progress bar show how close you are to the target.

View original page 67 — diagrams and layout
There are many times also additional information like bar which shows where on progress bar is lower limit/upper limit and target. Colours are used to show if weight is in tolerance or not.
See applications for explanation of progress bar functionalities inside application.
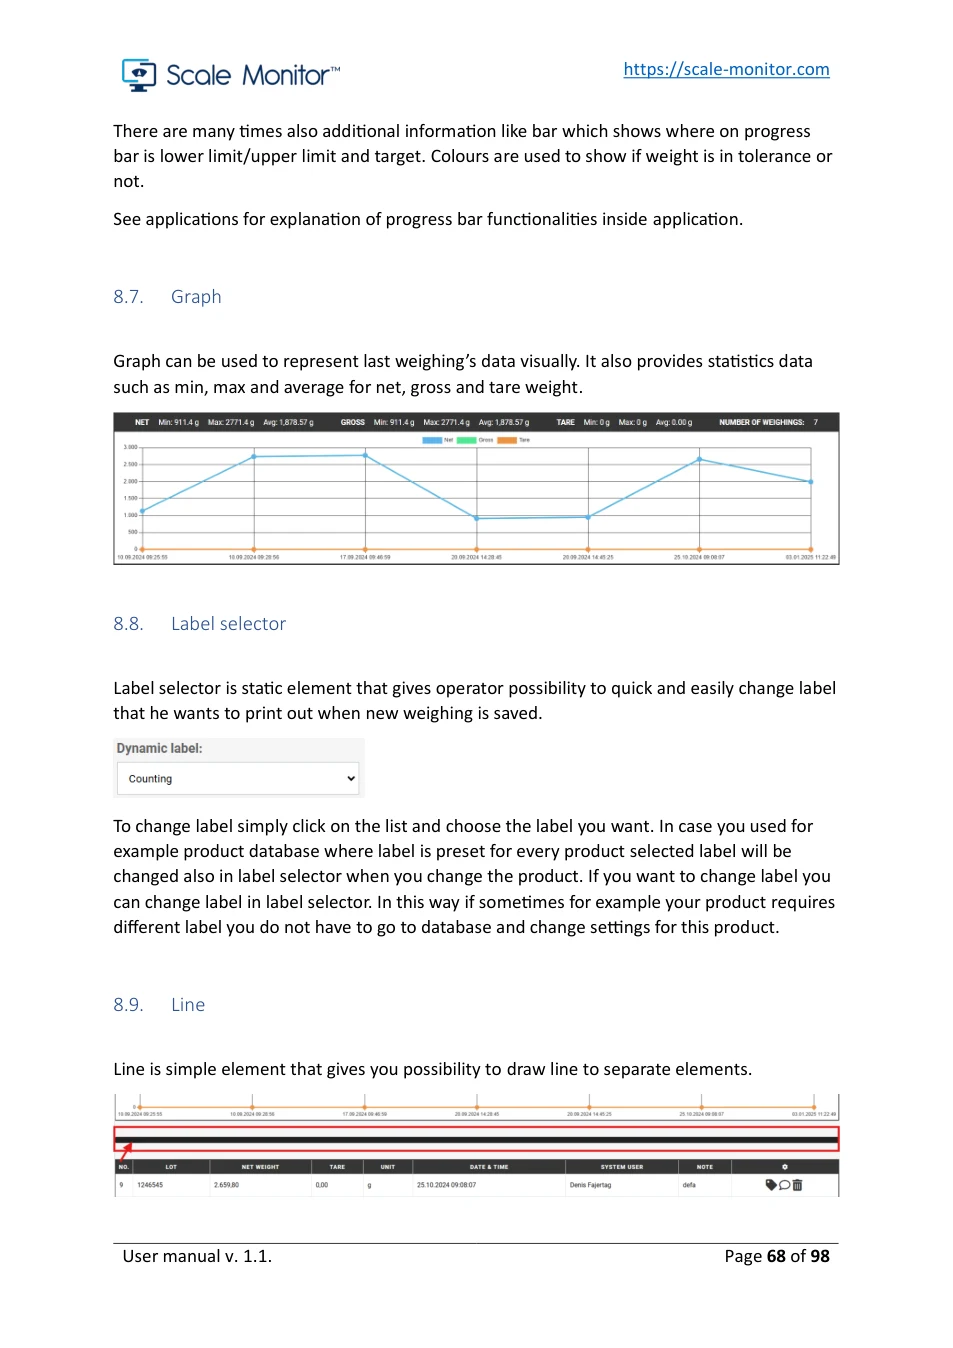
8.7. Graph
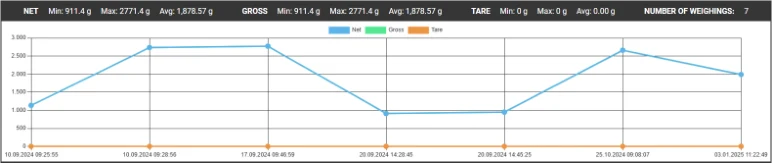
Graph can be used to represent last weighing’s data visually. It also provides statistics data such as min, max and average for net, gross and tare weight.
8.8. Label selector
Label selector is static element that gives operator possibility to quick and easily change label that he wants to print out when new weighing is saved.
To change label simply click on the list and choose the label you want. In case you used for example product database where label is preset for every product selected label will be changed also in label selector when you change the product. If you want to change label you can change label in label selector. In this way if sometimes for example your product requires different label you do not have to go to database and change settings for this product.
8.9. Line
Line is simple element that gives you possibility to draw line to separate elements.

View original page 68 — diagrams and layout
8.10. Fixed text
Fixed text gives you possibility to add fixed text to the virtual indicator such us for instance note or instructions for operator.
8.11. Additional parameters
Additional parameters are basically dynamic elements of certain type. For example, if you must enter LOT and save it with weighing you can create text element with name LOT. If you must enter number of work order and save it together, with weighing you can create a number element with name “Work order no.”.
Additional parameters give you possibility to create your own field and place them on virtual indicator. You are not limited to the number of additional parameters so you can use virtual scale indicator as form with predefined fields which operator along weighing will have to fill out. This way you can streamline you process operations by using only one app to collect all data you need together with weighing data.
Please note that every parameter that is displayed on virtual scale indicator will be saved together with weighing data. If you need to save LOT together with weighing all you have to do is to add LOT parameter to your virtual scale indicator.
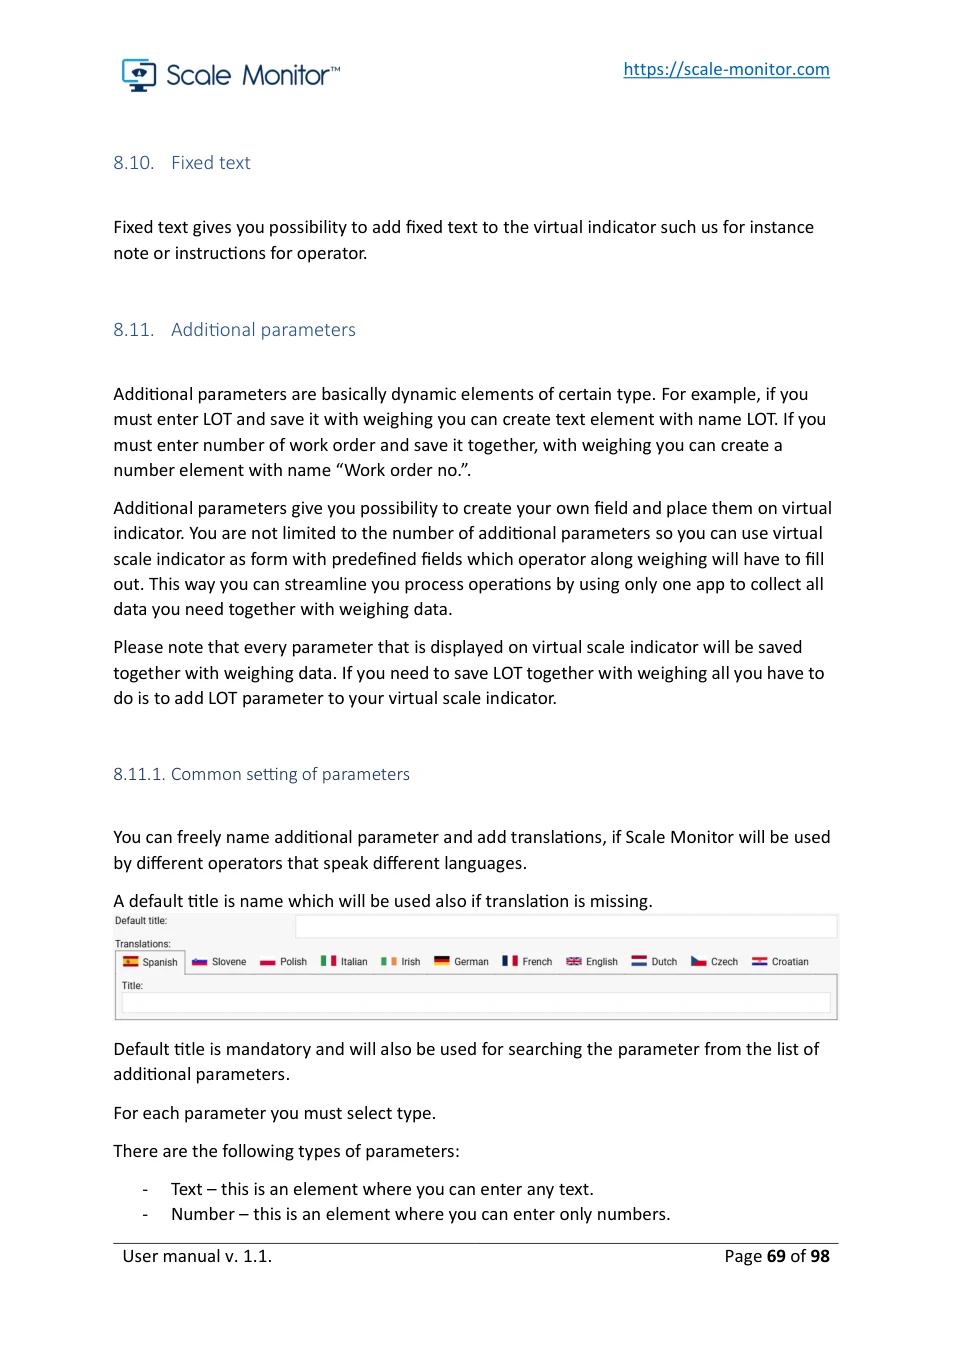
8.11.1. Common setting of parameters
You can freely name additional parameter and add translations, if Scale Monitor will be used by different operators that speak different languages.
A default title is name which will be used also if translation is missing.

Default title is mandatory and will also be used for searching the parameter from the list of additional parameters.
For each parameter you must select type.
There are the following types of parameters:
- Text – this is an element where you can enter any text. - Number – this is an element where you can enter only numbers.
View original page 69 — diagrams and layout
- List - this is an element where you can select element from the list. - Check box – an element which you can check or uncheck. - Databases – database element connected to specific database – see Databases. - Predefined database – here you can choose predefined database without the need for creating one.
You can also add description of parameter where you can also include instructions or explanation what to enter the field.
You can also enter a default value which will be pre-entered into the field.
Note that every operator that will enter some data into field this data will be stored inside his browser. When operator return to the same Scale Monitor with same browser his data will appear inside fields this means he will not have to re-enter all data again. Saving of data is automatic once they are entered.
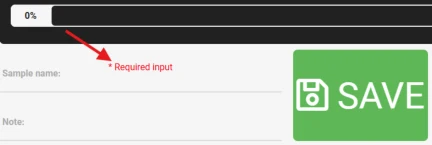
For every parameter you can also set mandatory input for saving option which will require that operator either select or enter text into the field. Saving a weighing with empty fields will show with red colour a message “Required input”.
8.11.2. Add new parameter
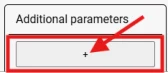
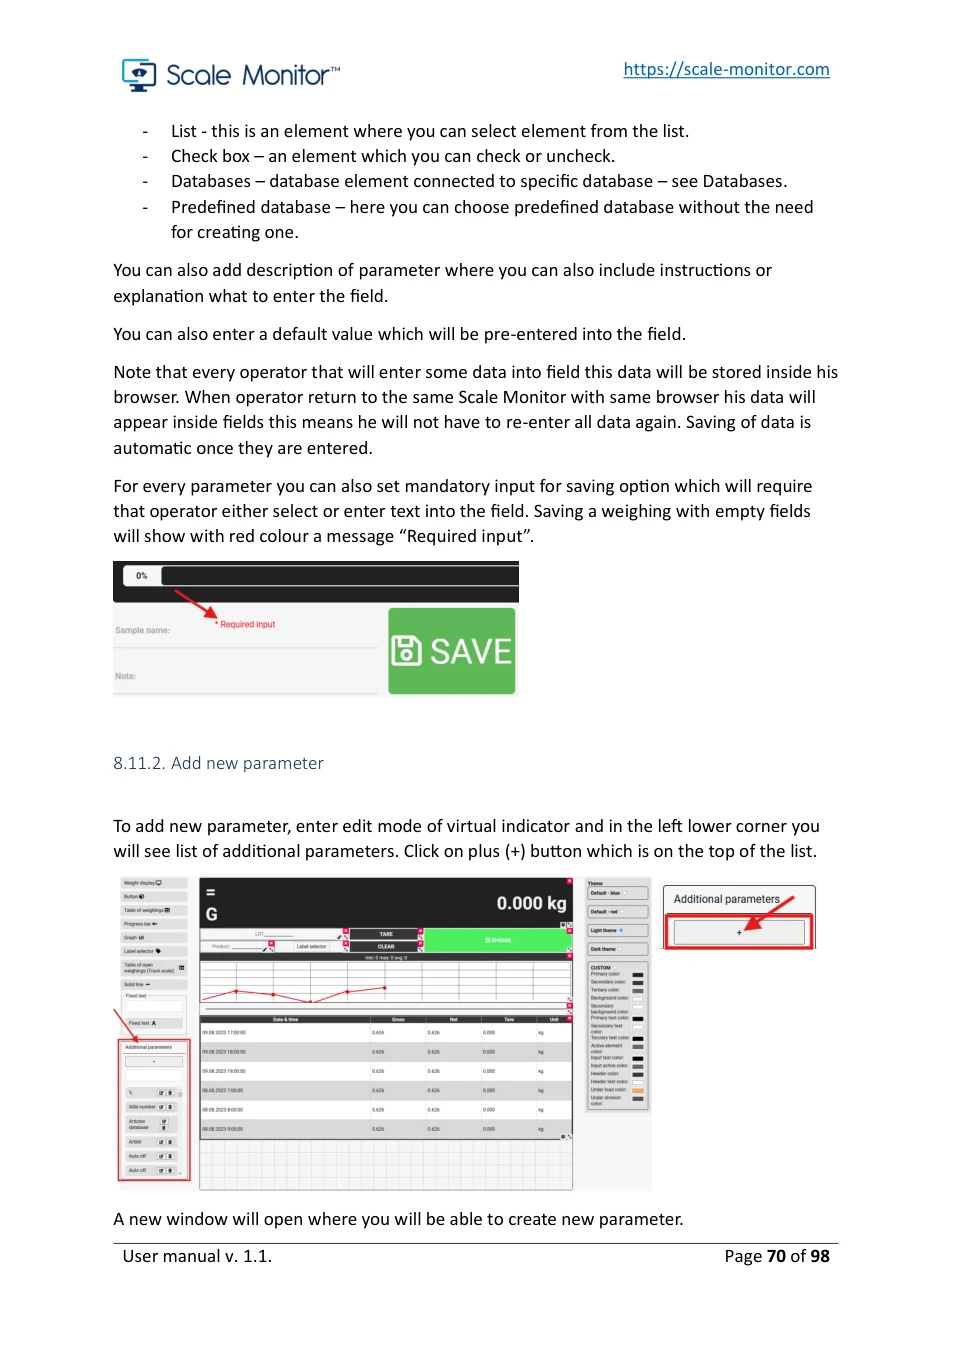
To add new parameter, enter edit mode of virtual indicator and in the left lower corner you will see list of additional parameters. Click on plus (+) button which is on the top of the list.
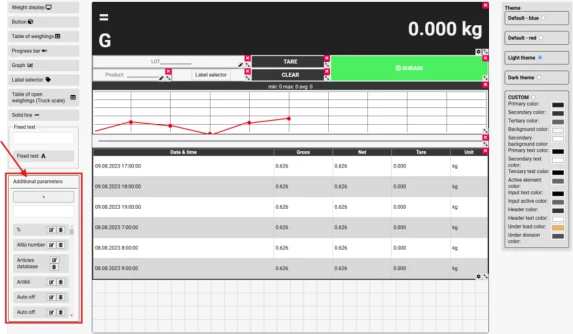
A new window will open where you will be able to create new parameter.
View original page 70 — diagrams and layout
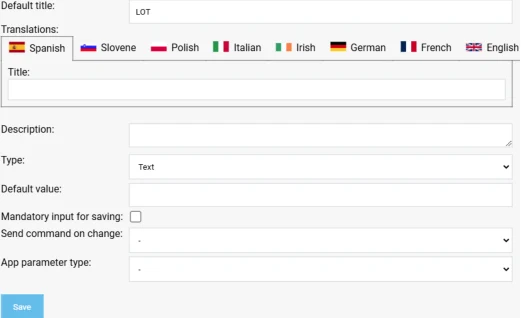
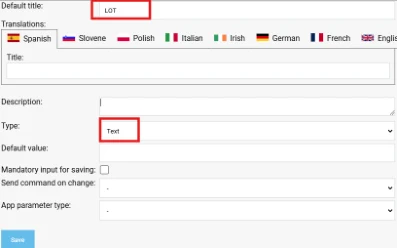
On the above photo you see how LOT element of type text is created. All we had to do was enter default title and set type to text. When we save parameter, we can add it to virtual indicator by searching for it in the list and dragging and dropping it on the position where want parameter to appear.
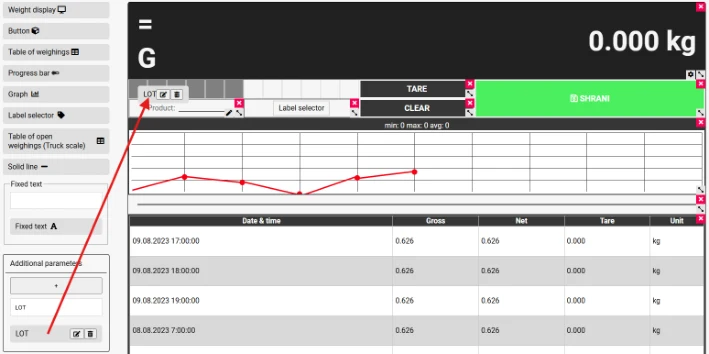
If you want that parameter LOT appears in the table of weighing’s you must add it to the table – see Table of weighing’s.
8.11.3. Edit parameter
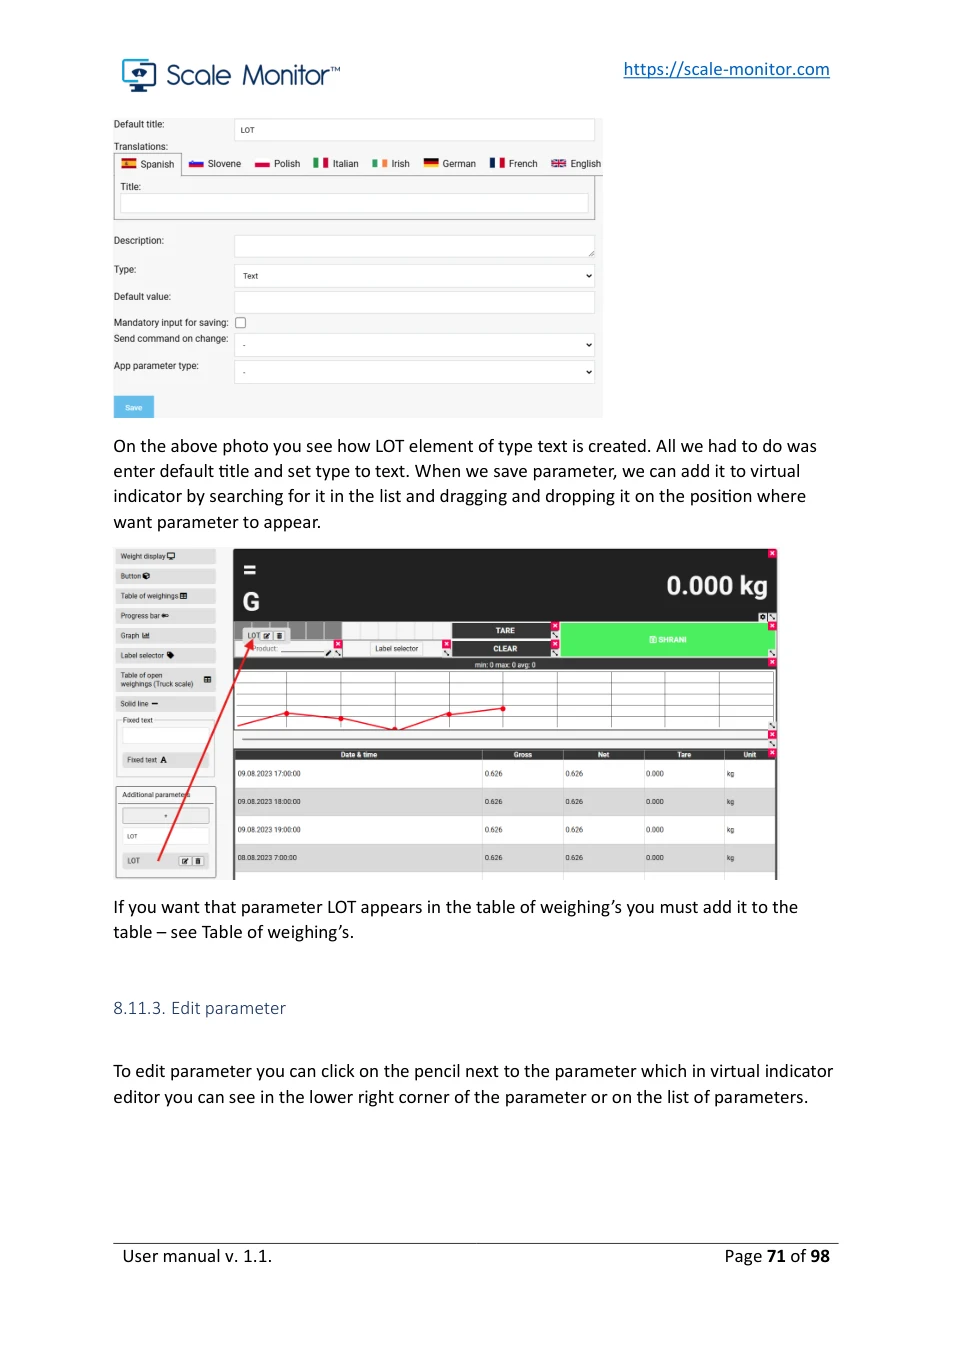
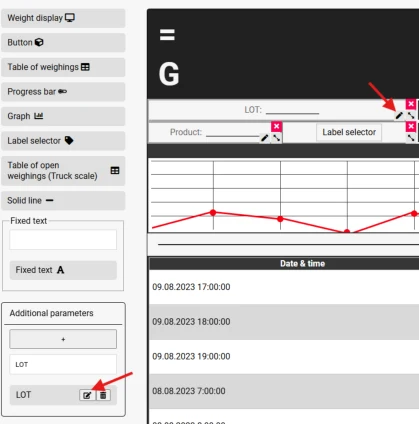
To edit parameter you can click on the pencil next to the parameter which in virtual indicator editor you can see in the lower right corner of the parameter or on the list of parameters.
View original page 71 — diagrams and layout
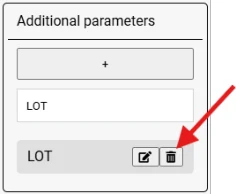
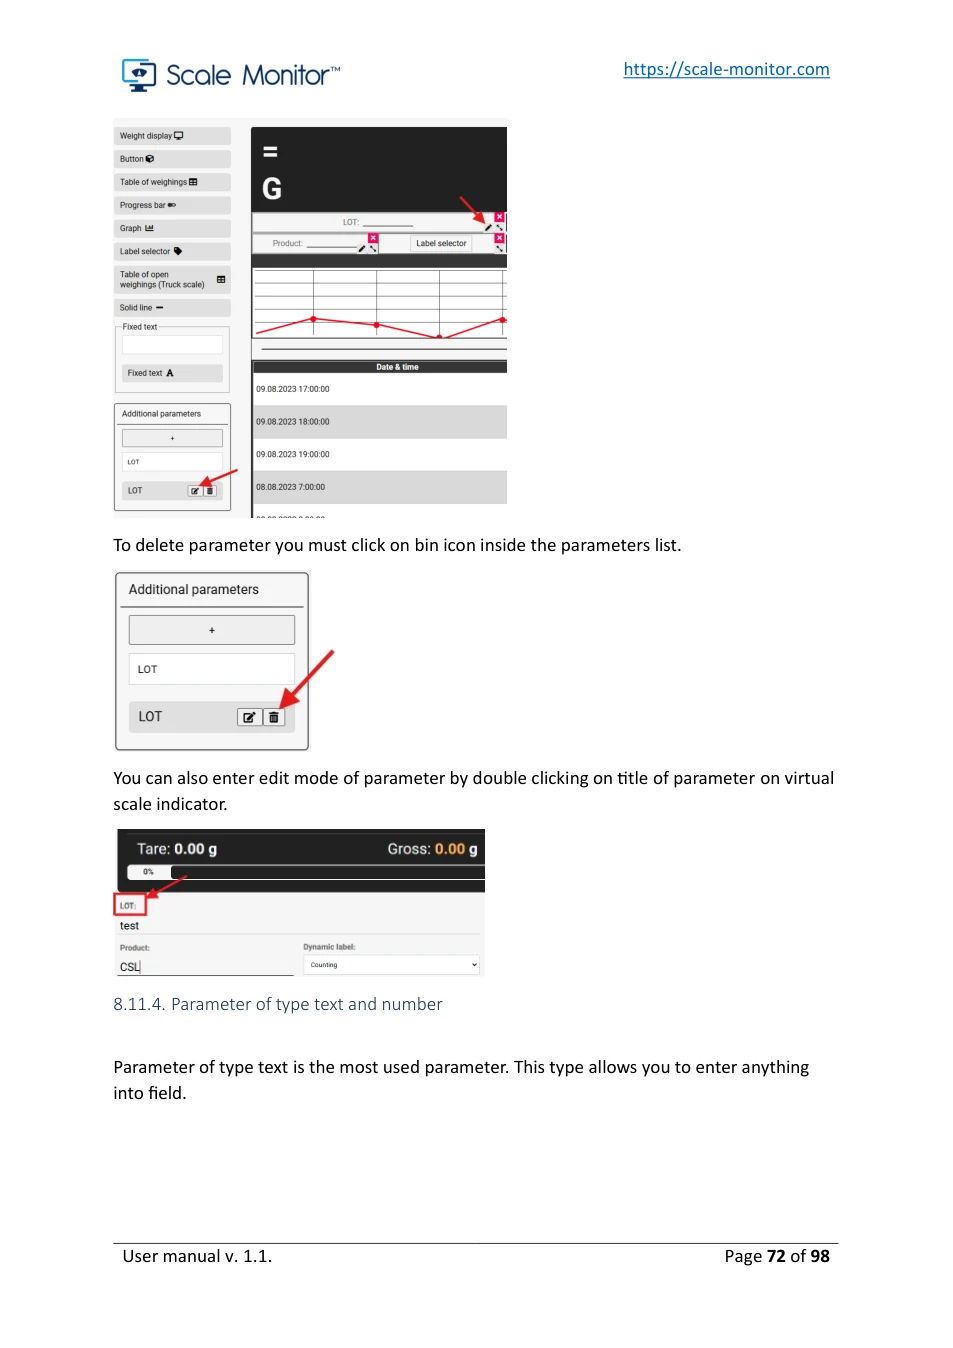
To delete parameter you must click on bin icon inside the parameters list.
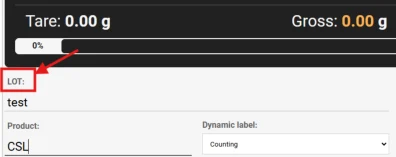
You can also enter edit mode of parameter by double clicking on title of parameter on virtual scale indicator.
8.11.4. Parameter of type text and number
Parameter of type text is the most used parameter. This type allows you to enter anything into field.
View original page 72 — diagrams and layout
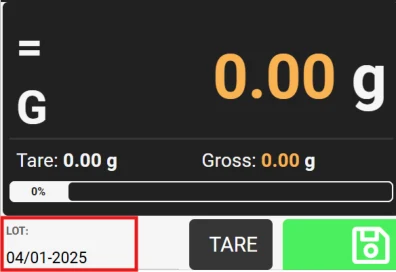
Example of LOT parameter on virtual scale indicator:
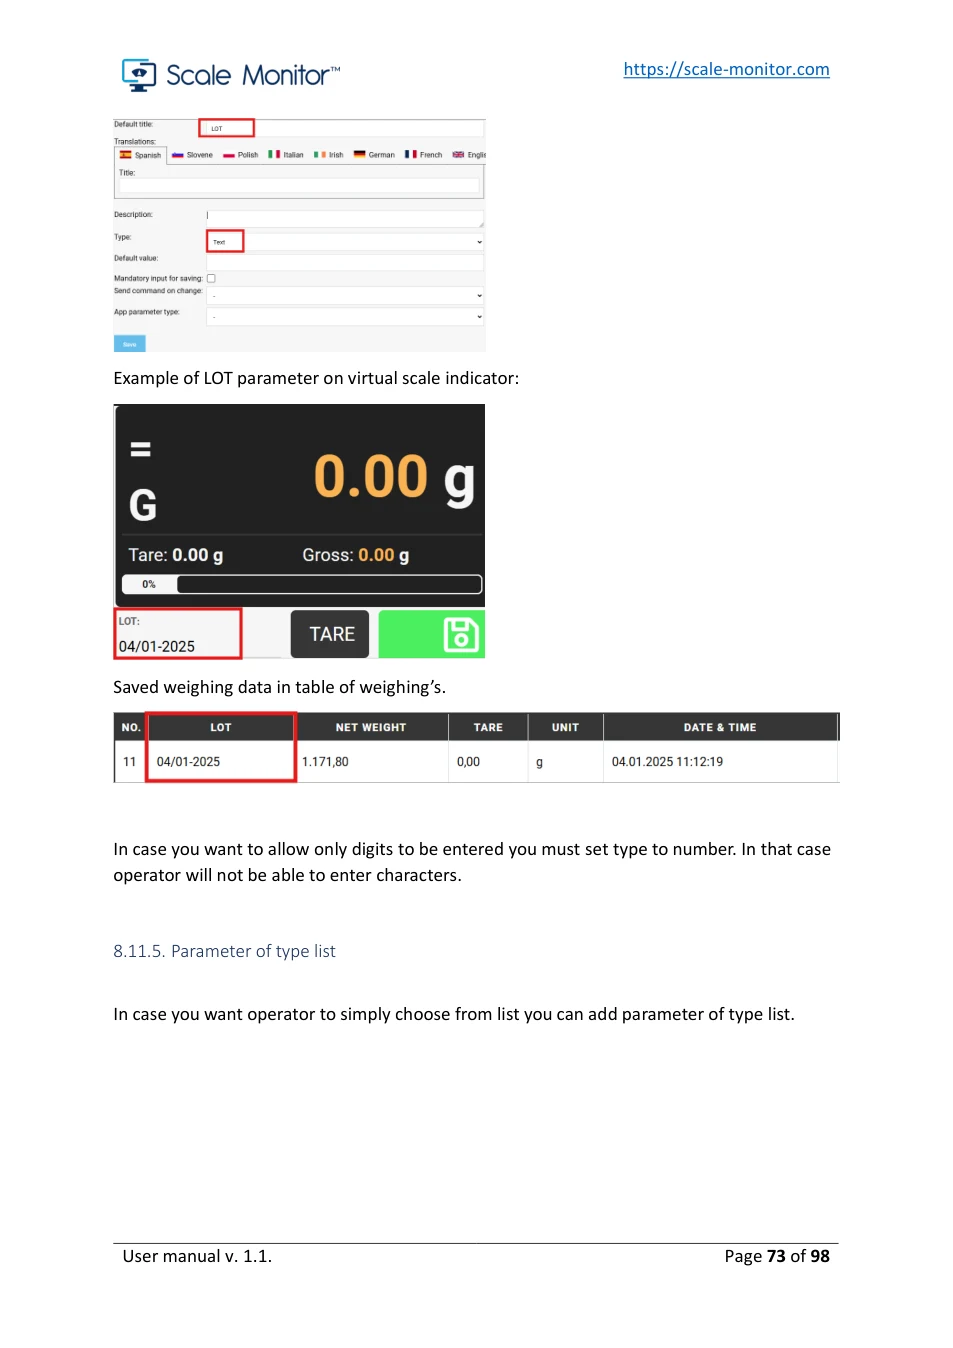
Saved weighing data in table of weighing’s.

In case you want to allow only digits to be entered you must set type to number. In that case operator will not be able to enter characters.
8.11.5. Parameter of type list
In case you want operator to simply choose from list you can add parameter of type list.
View original page 73 — diagrams and layout
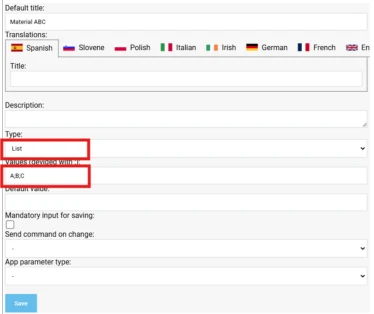
In the above example we create list of materials where operator will be able to select A, B and C material. Values that appear on the list must be separated by semicolon (;).
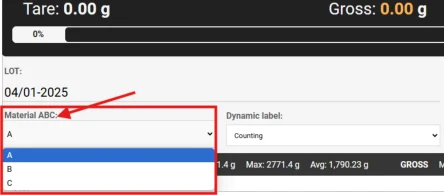
If you add as the first value is empty, space or dash (-) this will be treated as material not selected in case the parameter will have set mandatory input for saving.
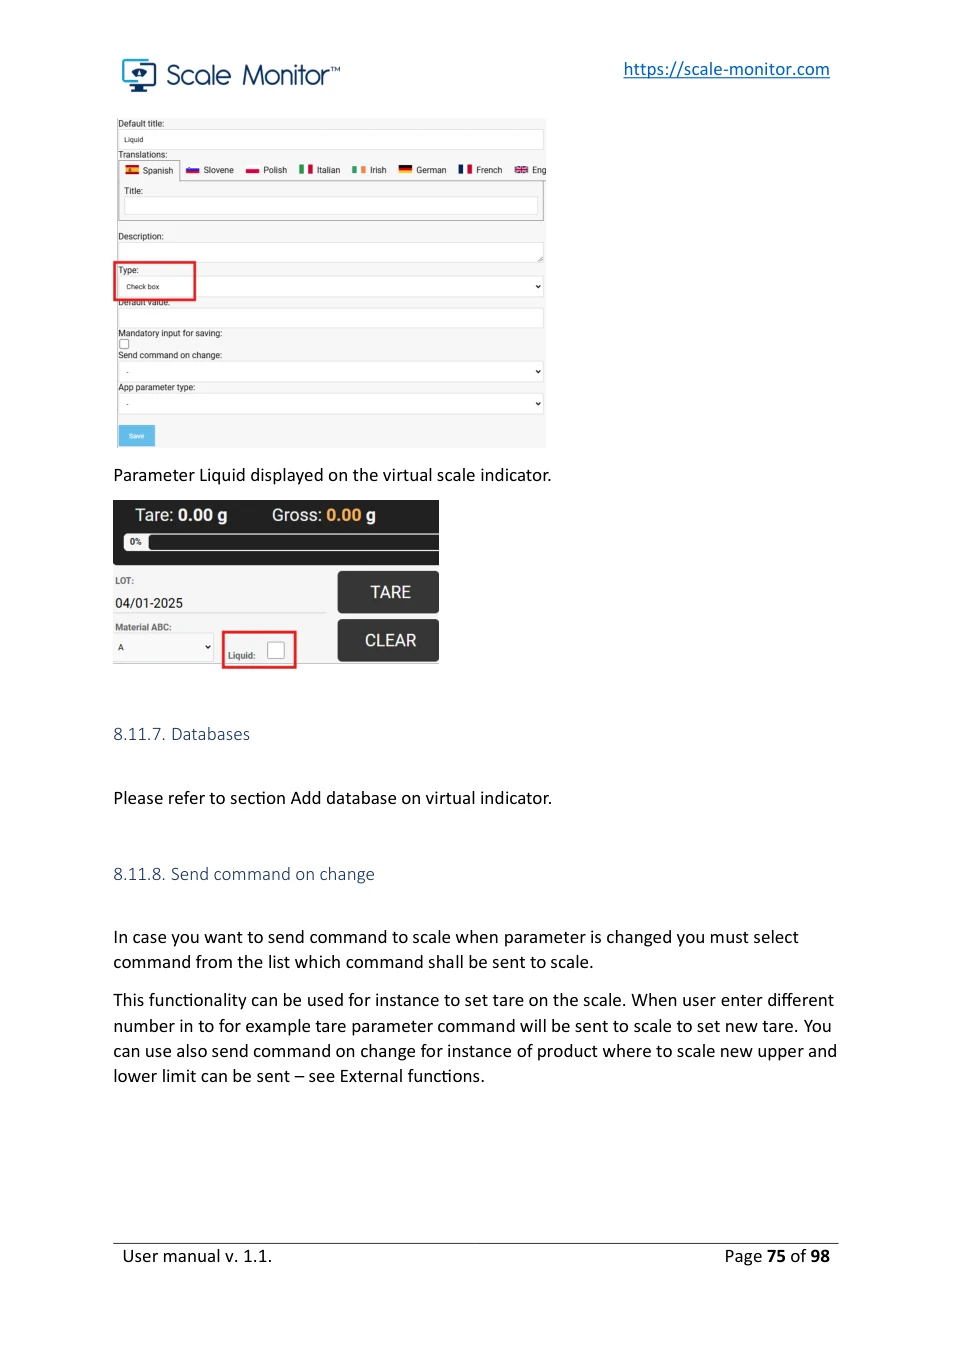
8.11.6. Parameter of type check box
In case you want operator to just check or tick elements you can add parameter of type check box.
View original page 74 — diagrams and layout
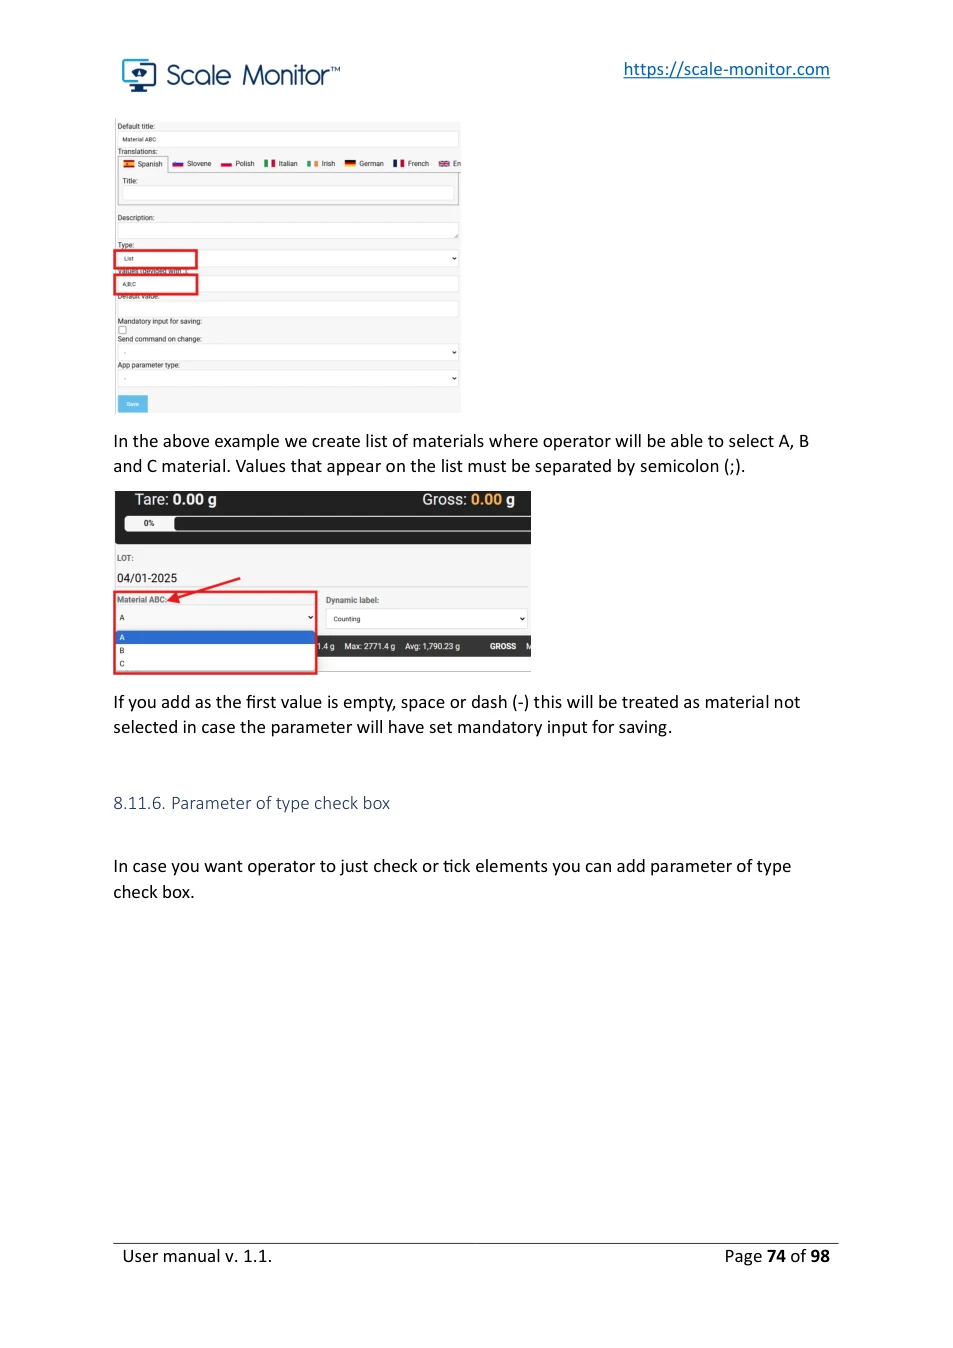
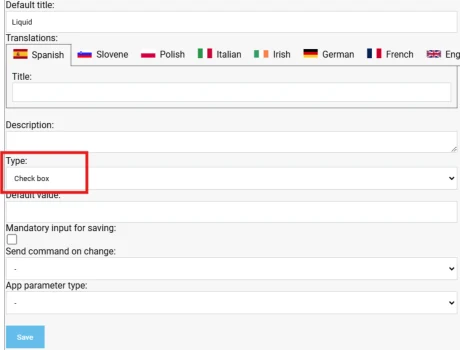
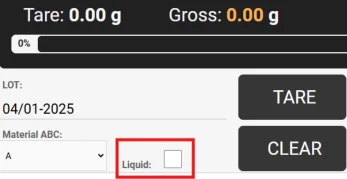
Parameter Liquid displayed on the virtual scale indicator.
8.11.7. Databases
Please refer to section Add database on virtual indicator.
8.11.8. Send command on change
In case you want to send command to scale when parameter is changed you must select command from the list which command shall be sent to scale.
This functionality can be used for instance to set tare on the scale. When user enter different number in to for example tare parameter command will be sent to scale to set new tare. You can use also send command on change for instance of product where to scale new upper and lower limit can be sent – see External functions.
View original page 75 — diagrams and layout
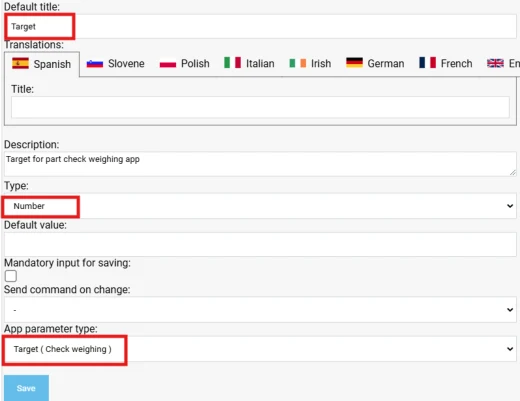
8.11.9. App parameter type
App parameter type allows you to create field which will be used for specific application functions. For example you can create target parameter which will be used in check weighing application to set target weight.
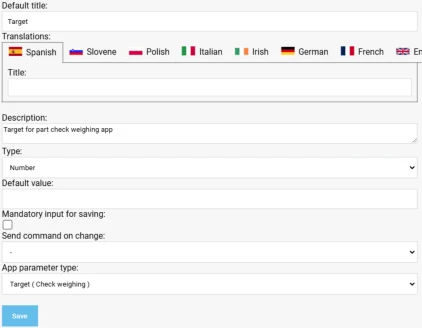
In the above example we create new parameter Target of type number and set app parameter type to Target (check weighing). When you enter into Target field number this number will be used as a reference for target weight which means that Scale Monitor will use this number to compare it with the weight on the scale.
8.12. Themes
Themes gives you possibility to change colour on virtual scale indicator. There are some predefined themes and one custom theme where you can set colours for any group of elements.
8.13. Export/import of virtual scales indicator
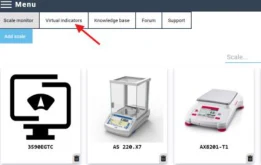
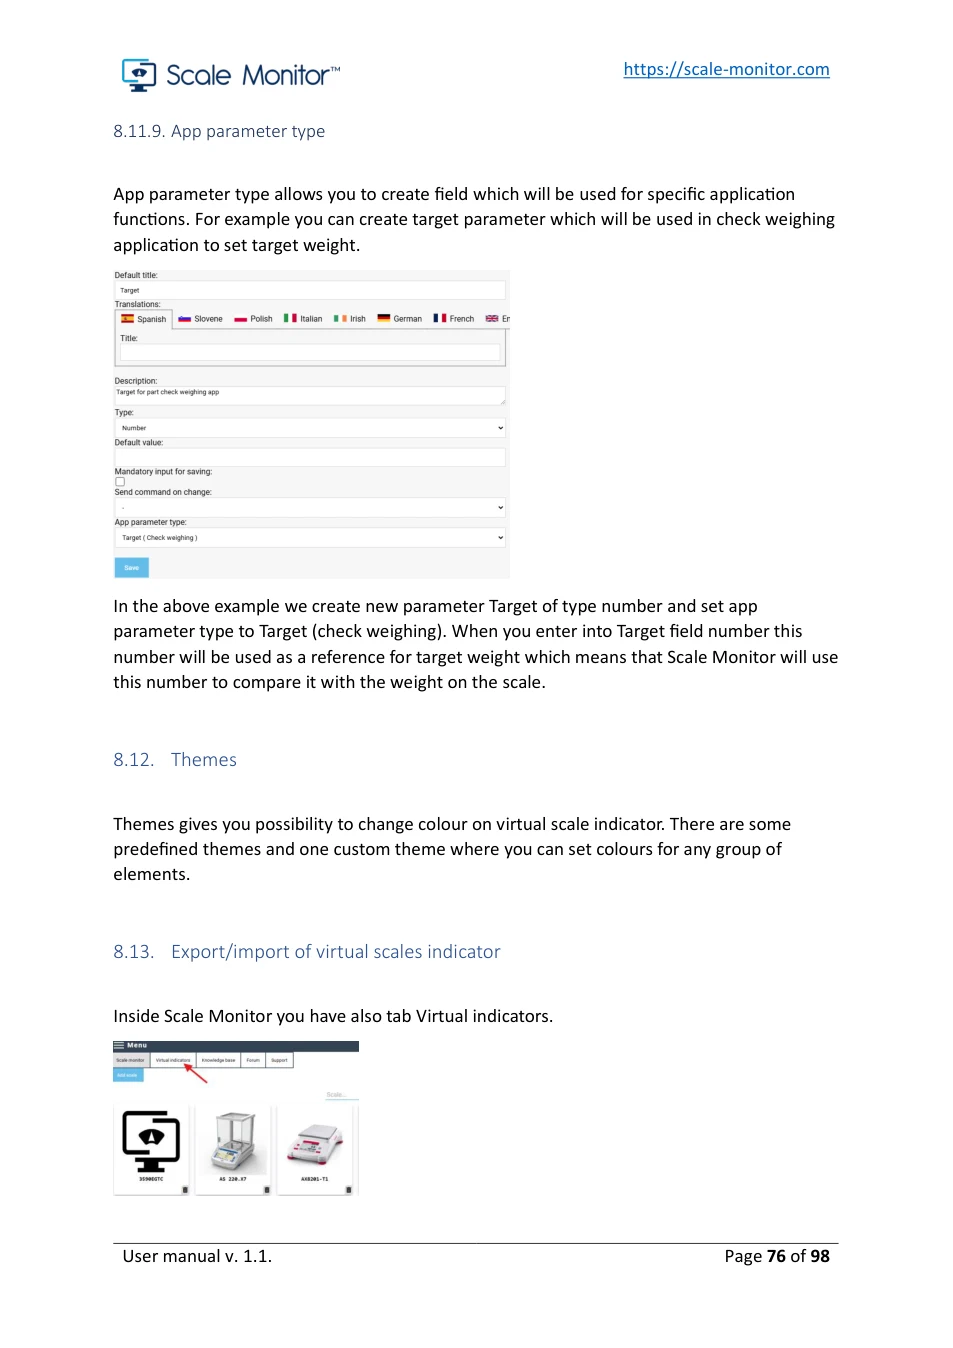
Inside Scale Monitor you have also tab Virtual indicators.
View original page 76 — diagrams and layout
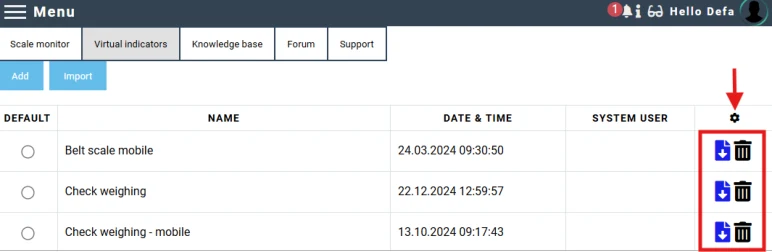
Here you can export and import virtual indicators that you created. Some indicators are preset and cannot be deleted or changed. You can always create new indicator from existing one – see Save as new.
You can also delete virtual indicator by clicking bin icon on the right side.
9. Weighing’s
Weighing’s is basically history of all saved weighing’s. Here you can search for weighing based on the different criteria such as data, time, gross/net/tare weight, and additional parameters.
You will be able to filter weighing’s on different additional parameters if they are added to the table of weighing’s. In that case filter will be automatically shown on filter list.
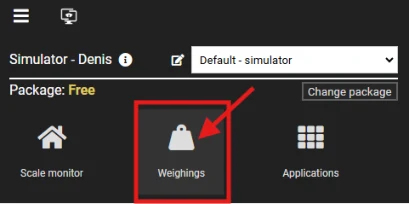
To enter weighing’s history you must click in menu on weighing’s.
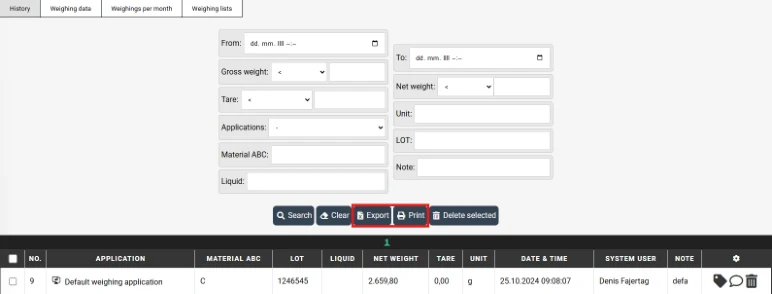
9.1. Print or export to Excel
You can print data or export them. All data in filter will be printed or exported. If you leave filter empty all weighing’s will be exported or printed. Please note in case you have several thousands of weighing’s stored export process might take few minutes to complete.
View original page 77 — diagrams and layout
10. Applications
Applications in Scale Monitor offers additional functionalities which are not available in standard weighing application. Such applications are check weighing, counting application, truck scale application and so on.
Each application can have its own functions, settings and dedicated virtual indicator.
Applications are working independently of scale which means that even if your scale does not support application such as part counting or check weighing you can still use applications on Scale Monitor. Scale Monitor has its own logic and algorithms for instance to calculate average piece weight inside counting application or to determine if weight is in tolerance or not in check weighing application. This means even if you have the most basic scale that only shows weight you will still be able to use all advanced applications of Scale Monitor.
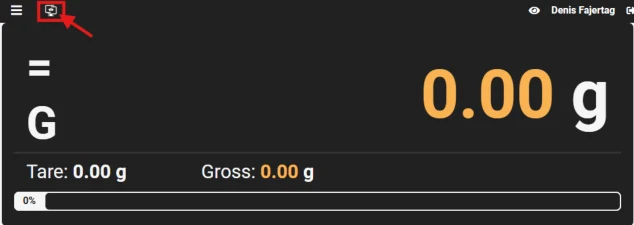
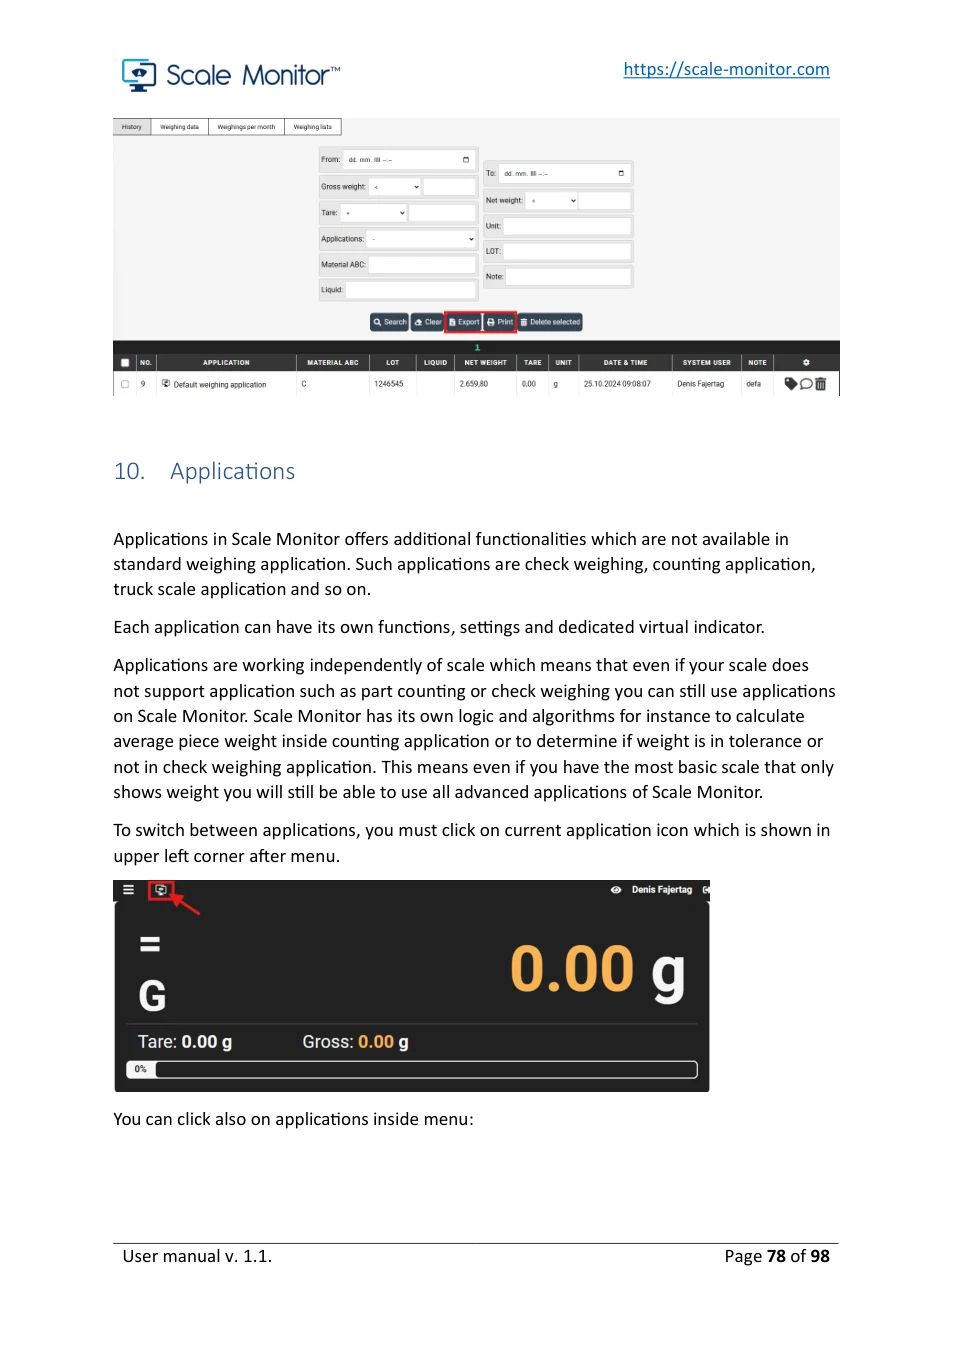
To switch between applications, you must click on current application icon which is shown in upper left corner after menu.
You can click also on applications inside menu:
View original page 78 — diagrams and layout
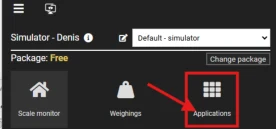
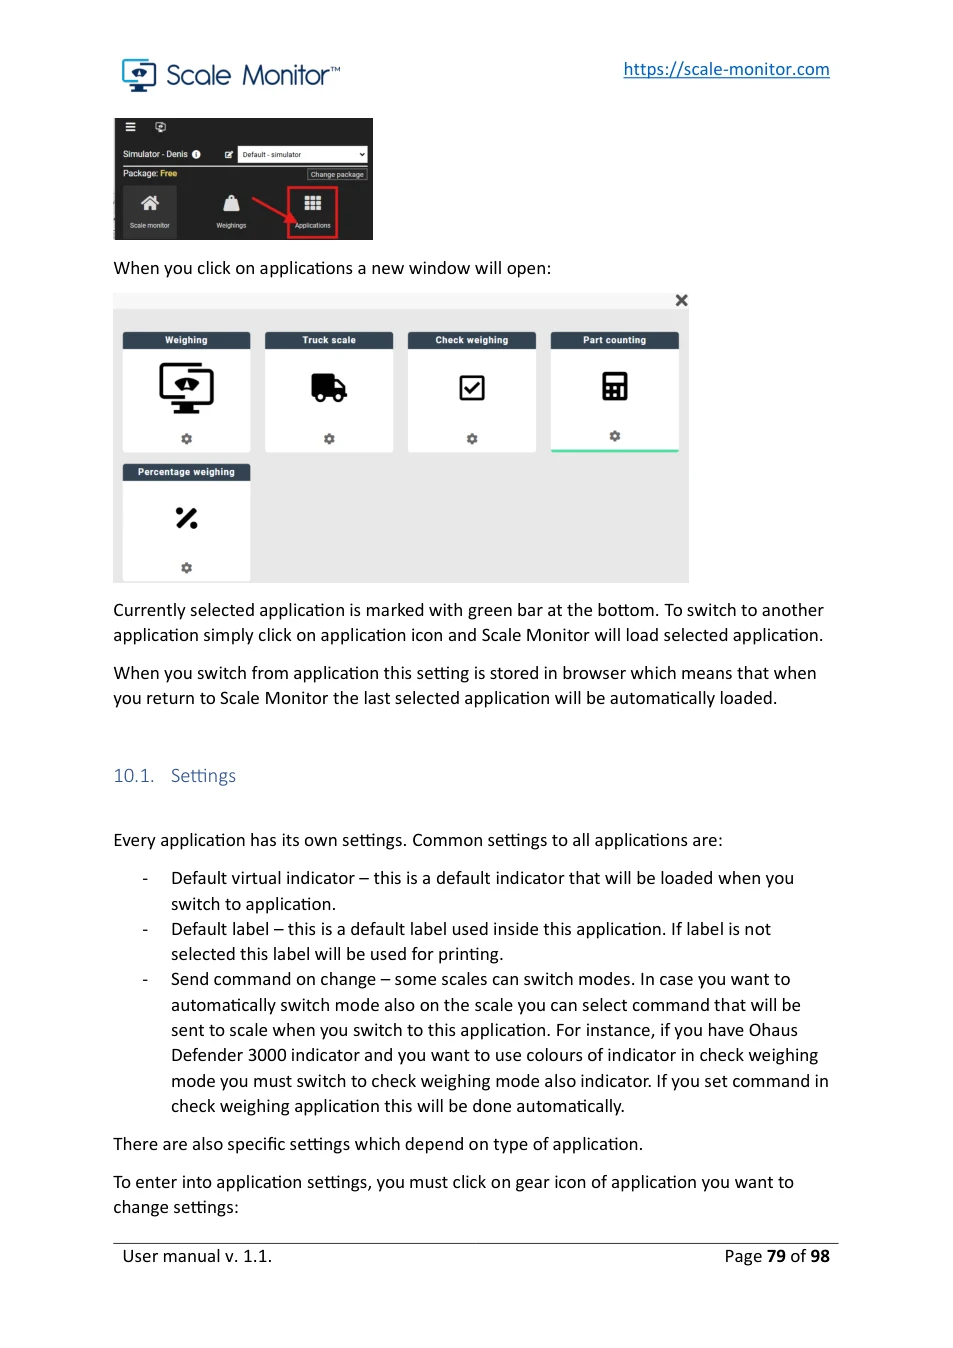
When you click on applications a new window will open:
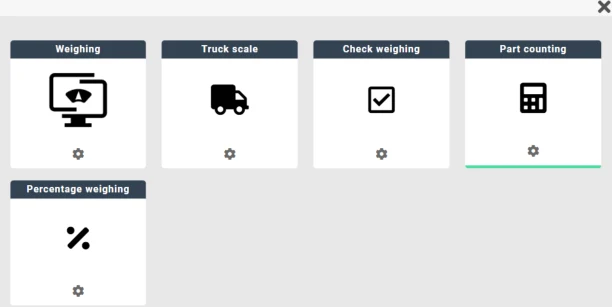
Currently selected application is marked with green bar at the bottom. To switch to another application simply click on application icon and Scale Monitor will load selected application.
When you switch from application this setting is stored in browser which means that when you return to Scale Monitor the last selected application will be automatically loaded.
10.1. Settings
Every application has its own settings. Common settings to all applications are:
- Default virtual indicator – this is a default indicator that will be loaded when you switch to application. - Default label – this is a default label used inside this application. If label is not selected this label will be used for printing. - Send command on change – some scales can switch modes. In case you want to automatically switch mode also on the scale you can select command that will be sent to scale when you switch to this application. For instance, if you have Ohaus Defender 3000 indicator and you want to use colours of indicator in check weighing mode you must switch to check weighing mode also indicator. If you set command in check weighing application this will be done automatically.
There are also specific settings which depend on type of application.
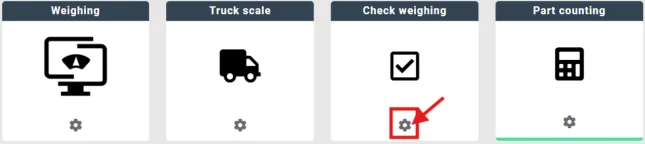
To enter into application settings, you must click on gear icon of application you want to change settings:
View original page 79 — diagrams and layout
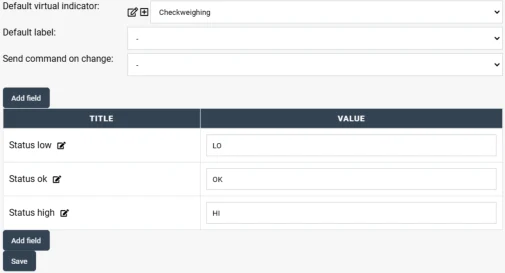
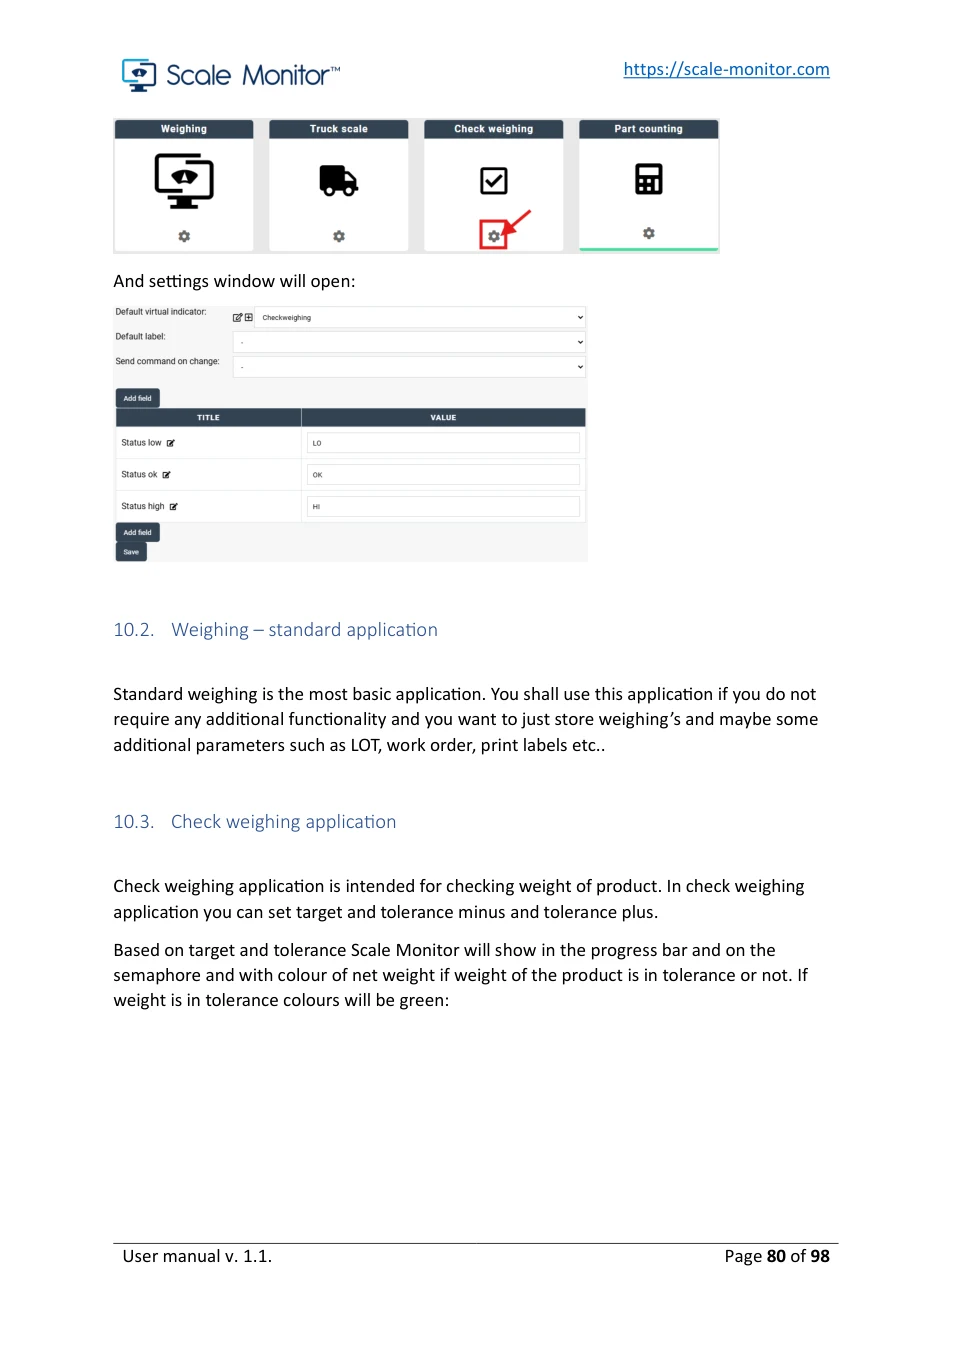
And settings window will open:
10.2. Weighing – standard application
Standard weighing is the most basic application. You shall use this application if you do not require any additional functionality and you want to just store weighing’s and maybe some additional parameters such as LOT, work order, print labels etc..
10.3. Check weighing application
Check weighing application is intended for checking weight of product. In check weighing application you can set target and tolerance minus and tolerance plus.
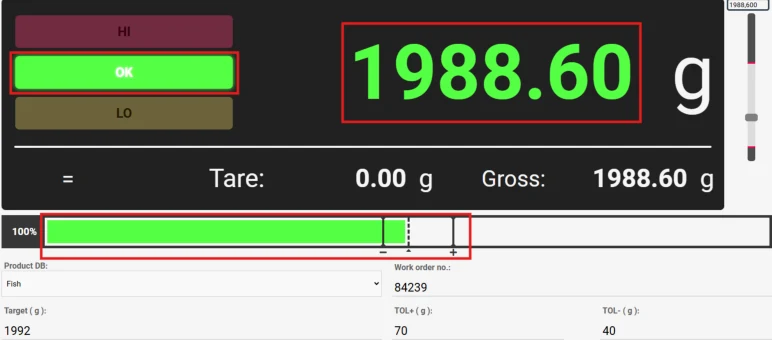
Based on target and tolerance Scale Monitor will show in the progress bar and on the semaphore and with colour of net weight if weight of the product is in tolerance or not. If weight is in tolerance colours will be green:
View original page 80 — diagrams and layout
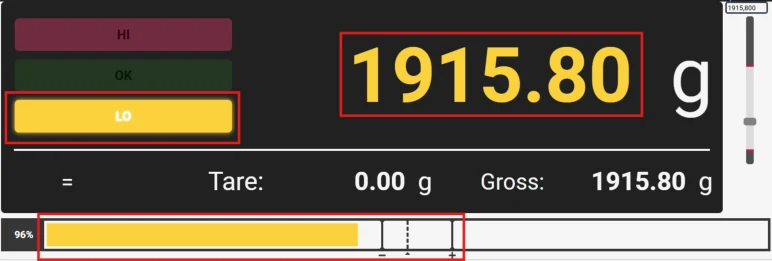
If weight is under lower tolerance (target – tolerance_minus) all colours will be yellow:
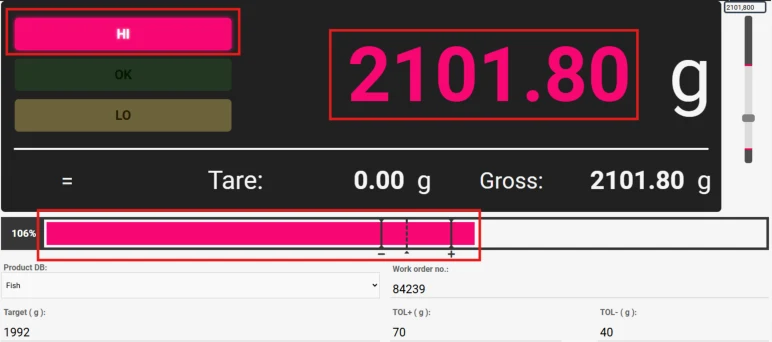
If weight is above upper tolerance (target + tolerance_plus) then all colours will be red:
You can also see in percentage what is the weight of product according to the set target inside progress bar:
View original page 81 — diagrams and layout
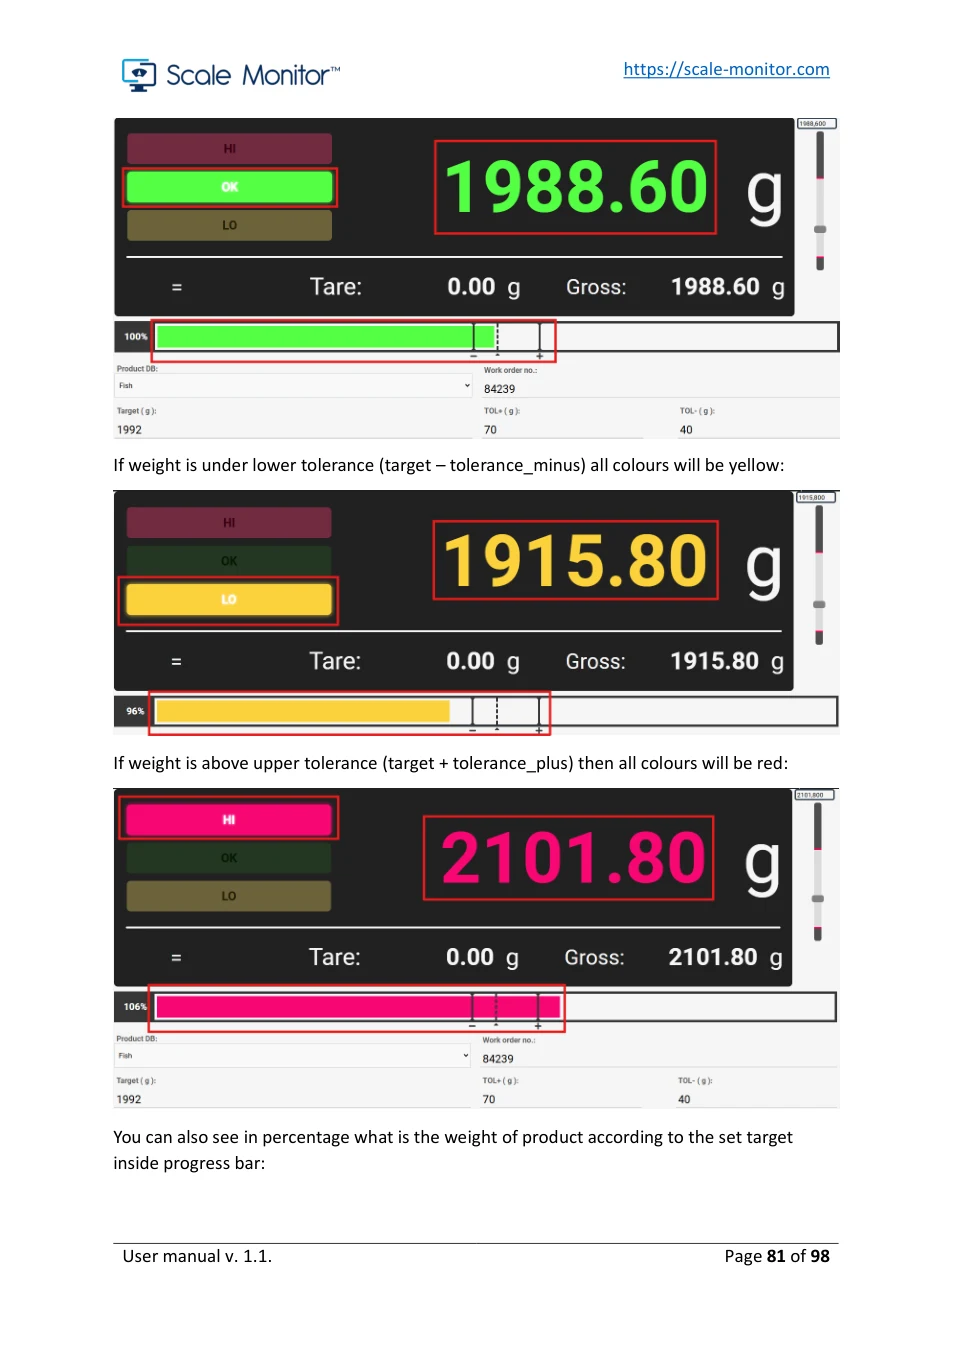
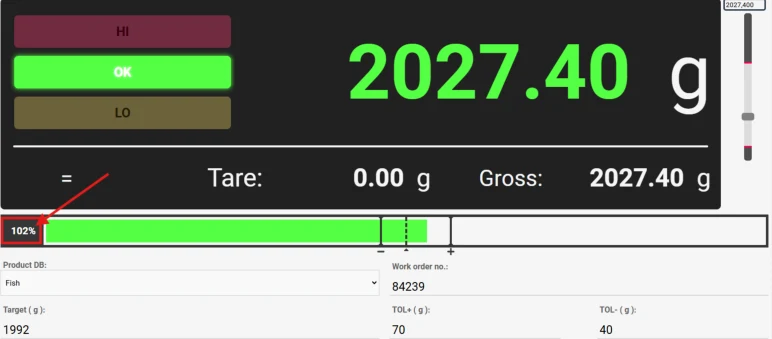
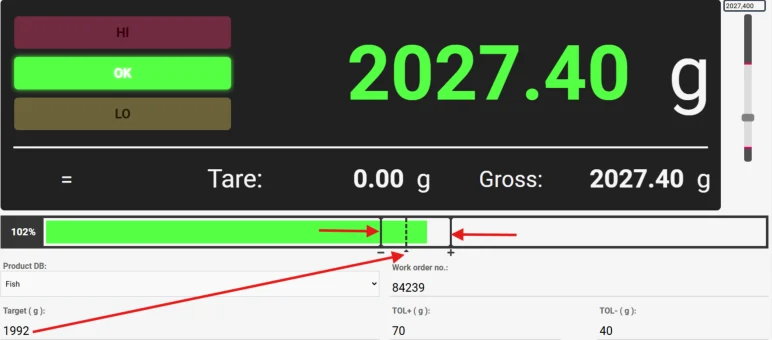
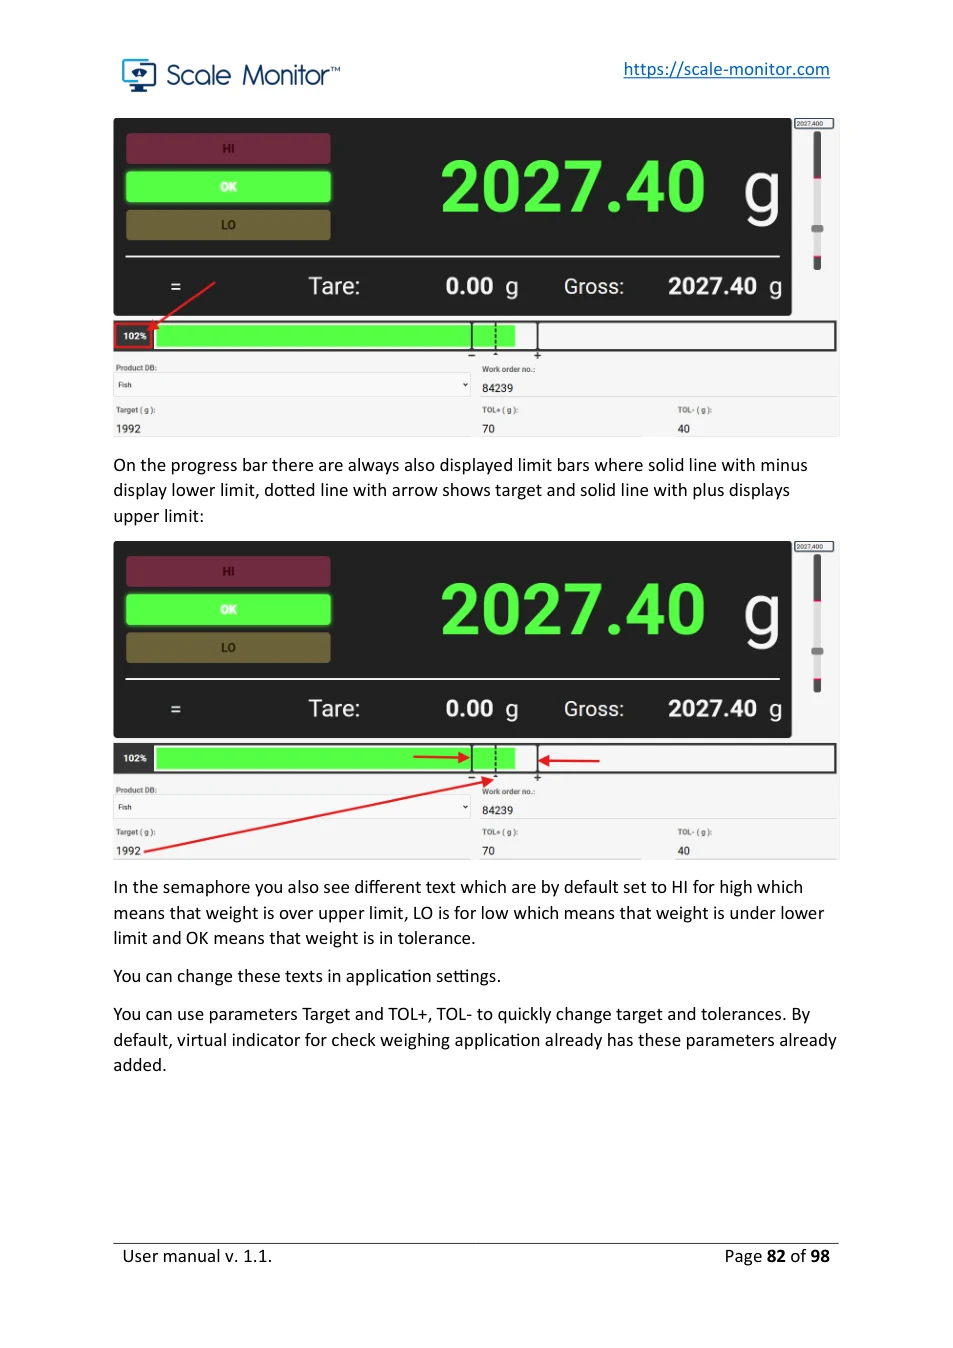
On the progress bar there are always also displayed limit bars where solid line with minus display lower limit, dotted line with arrow shows target and solid line with plus displays upper limit:
In the semaphore you also see different text which are by default set to HI for high which means that weight is over upper limit, LO is for low which means that weight is under lower limit and OK means that weight is in tolerance.
You can change these texts in application settings.
You can use parameters Target and TOL+, TOL- to quickly change target and tolerances. By default, virtual indicator for check weighing application already has these parameters already added.
View original page 82 — diagrams and layout
10.3.1. Add parameter for check weighing application
If you want to add application related parameters to your virtual indicator, you can create a normal parameter of type number and set App parameter type to Target (check weighing) or Tolerance + (check weighing) etc. See Add new parameter and
View original page 83 — diagrams and layout
App parameter type.
10.3.2. Databases in check weighing application
You can also use database for example of products where you can set target and tolerances. If you use database once, you change or select product target and tolerance are automatically changed to the values set for this product. See Databases and External functions on how to setup product database and link functions.
10.4. Part counting application
Part counting application is intended to count number of pieces on the scale. To start part counting you must first put reference number of pieces on the scale and in Scale Monitor you must execute sampling.
By default, virtual scale indicator has predefined number of pieces for sampling: 1, 5, 10, 20, 50 and 100.
View original page 84 — diagrams and layout
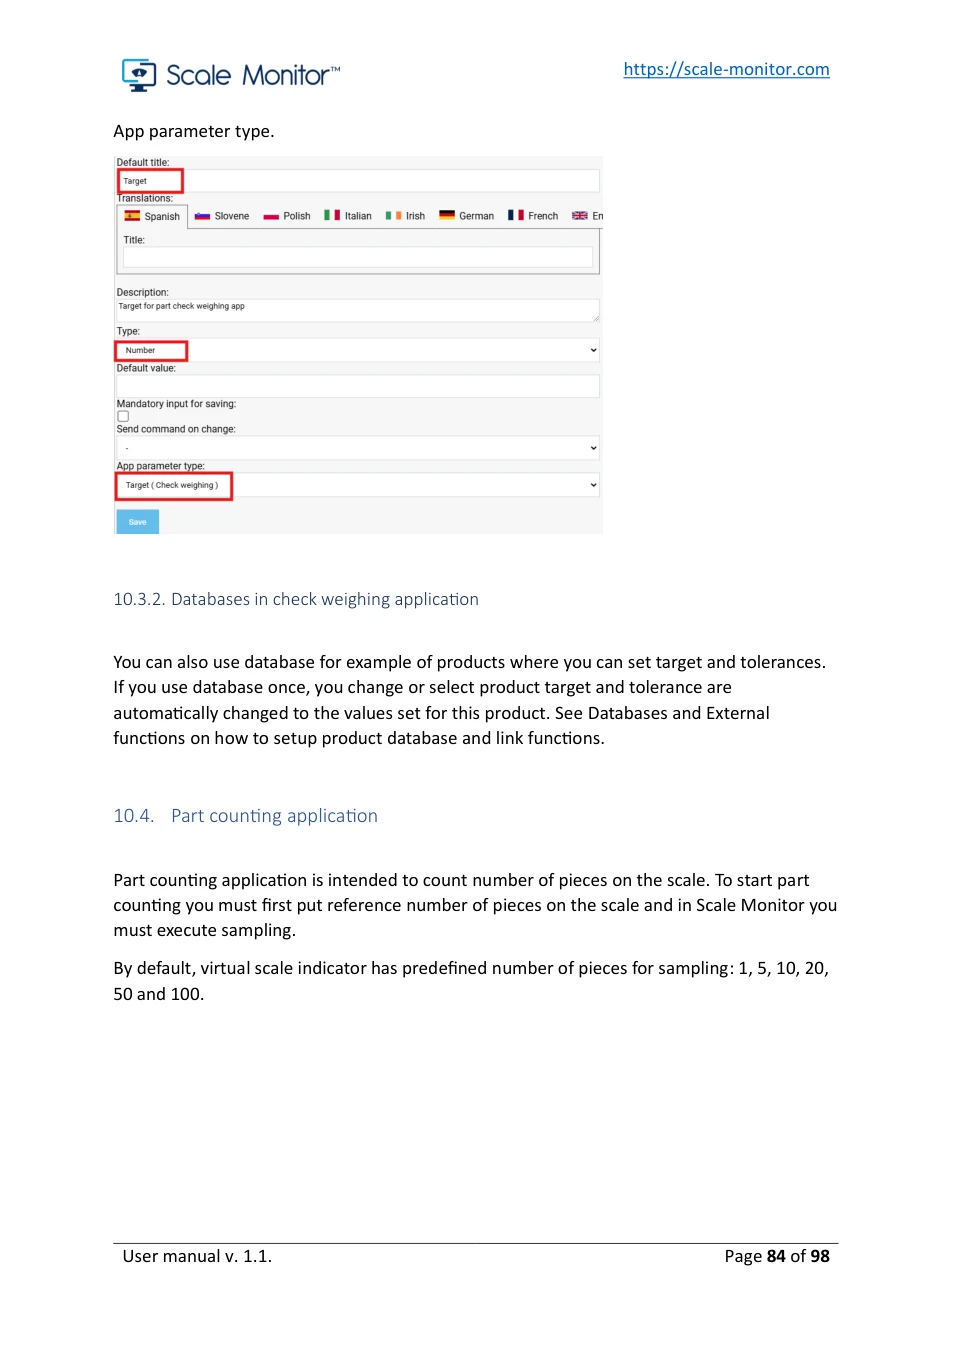
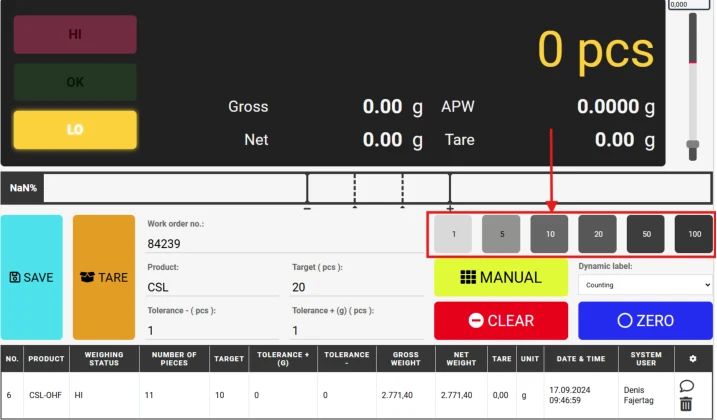
If you add 5 pieces on scale, you must click on button 5. This way Scale Monitor knows that it must execute sampling with reference of 5 pieces.
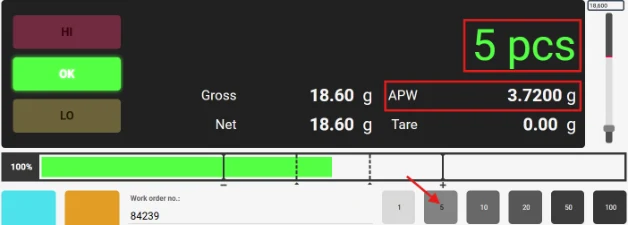
After sampling is done Scale Monitor will calculate APW (average piece weight) and displayed number of pieces in weight display.
In above example 5 pieces weigh 18.60 g and because we said to Scale Monitor to execute sampling with 5 pieces Scale Monitor has divided 18.60 g with 5 pieces which means that average piece weight (APW) is 3.72 g in our example. APW is also shown on the weight display.
If you know APW you can manually enter it into the field APW. If you want to perform sampling for instance for 13 pieces you can manually enter number of pieces into the field No. of pieces.
View original page 85 — diagrams and layout
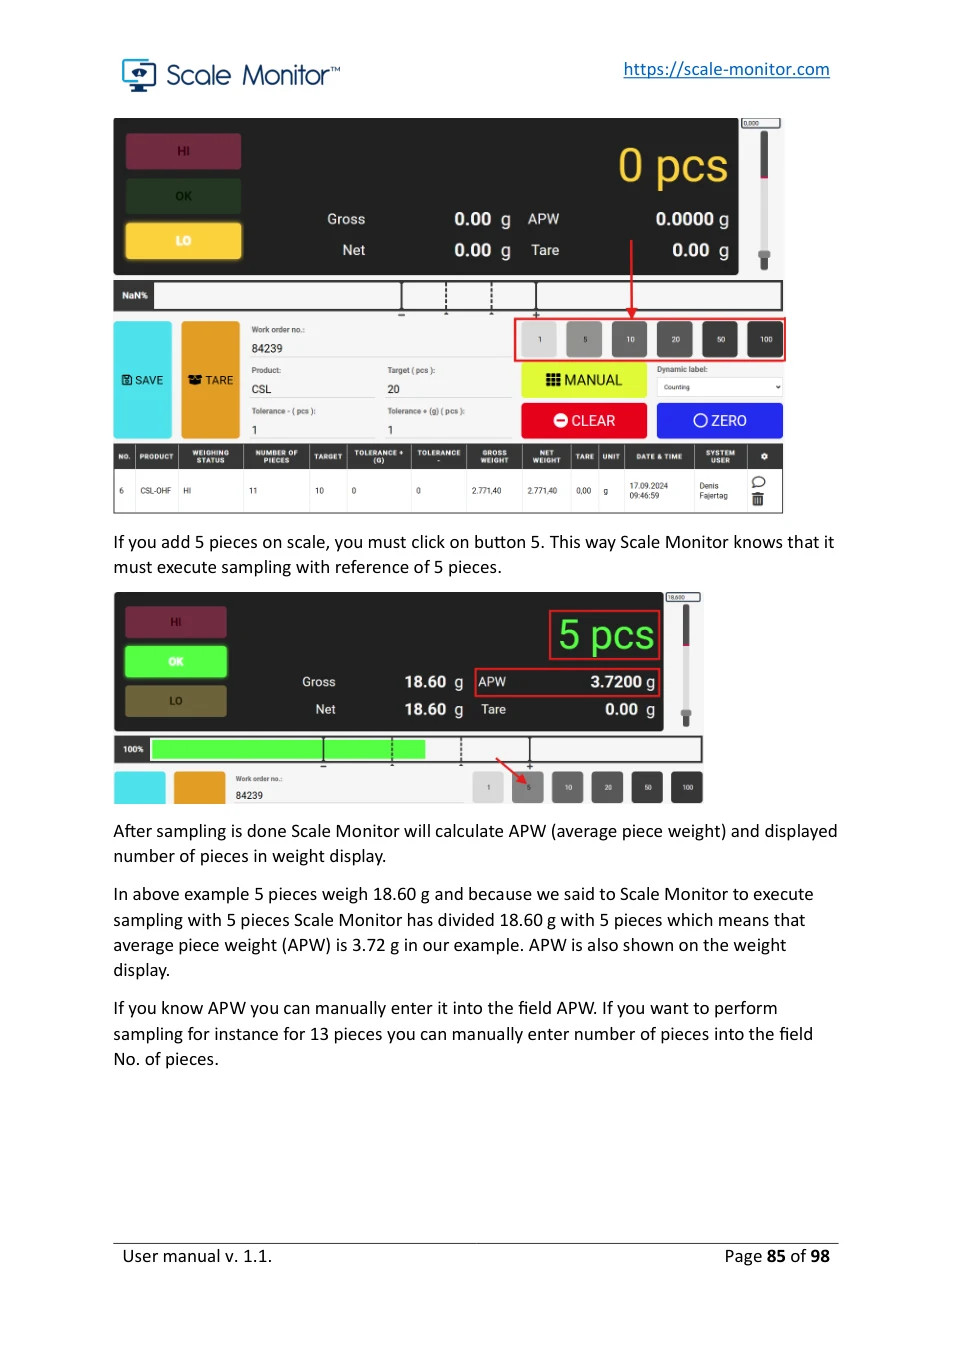
10.4.1. Proper sampling
To perform proper sampling, it is generally advisable to use as reference number of pieces for sampling 10% of counting quantity. If you are counting 500 pieces your reference shall be at least 50 pieces. If you count 200 pieces your reference shall be at least 20 pieces.
This rule exists because not every piece has the same weight which means that weight of pieces varies from piece to piece. If your sample is small and weight of one piece is much bigger, then other pieces this will distort our average piece weight significantly. Therefore, larger number of pieces are advisable for sampling and not less than 10% of counting quantity.
If you are counting over 1.000 of pieces for example 10.000 pieces you do not have to perform sampling with 1.000 pieces as 100 pieces is big enough sample also in case, there are some pieces which weight varies a lot.
If you want to count 100 pieces, there is a big chance that you will make an error while counting therefore we recommend that you put 5 pieces on scale because it is easy to count. Then just add other pieces to scale and Scale Monitor will automatically count number of pieces and when you reach for instance 10 pieces click 10 and Scale Monitor will recalculate average piece weight. When you reach 20 pieces click 20 and so on. This way you will speed up sampling process and you will not have to count many pieces as just 5 is enough.
10.4.2. Counting with target and tolerances
Like the check weighing application you can also use target and tolerances in case you must pack for example 10 pieces into the box. In that case you must enter target and tolerance if there is any. If there is no tolerance leave tolerance empty or set 0.
When you set target Scale Monitor will show with colour of the number of pieces, with progress bar colour and limits and on semaphore if you are inside tolerance or not.
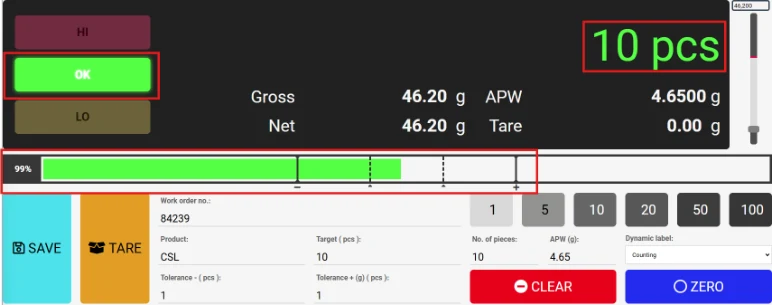
View original page 86 — diagrams and layout
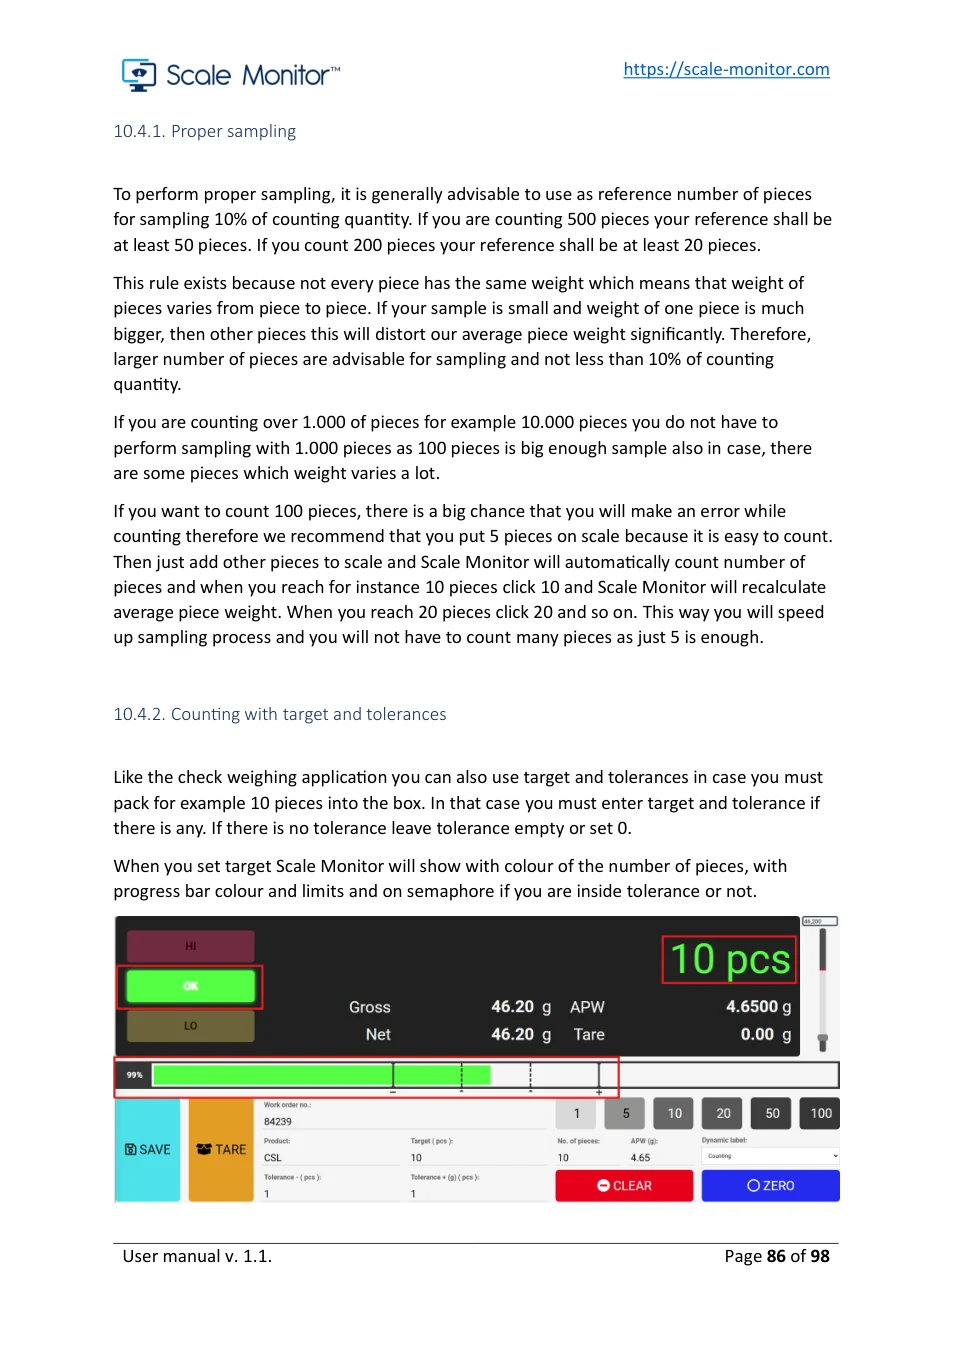
As you see on above photo, we set target to 10 pieces and because we have on our simulator 10 pieces all colours are green which means we are in tolerance. If number of pieces is below under limit colours are yellow and red if number of pieces is above upper limit.
If you set tolerance plus or minus you will see in progress bar solid lines with plus and minus under to show exactly where is the limit.

If you set only target you will see just two lines which shows where the weight must be to reach the target. Scale Monitor calculates number of pieces mathematically which means that if the APW is set to 4.65 g and the weight on the scale is 44 g it will show 9 pieces. If weight is 44.5 g it will show 10 pieces. Let’s see why:
If we divide 44 g / 4.65 g = 9.46 – this is less than 9.5 therefore we round the number down to 9. If we divide 44.5 g / 4.65 g = 9,57 which is more than 9.5 therefore we round number to 10. This is why we always have two lines that shows us where is the target number of pieces because target area in our example is between 9.5 and 10.5 pieces which in weight is from 44.18 g till 48.78 g.
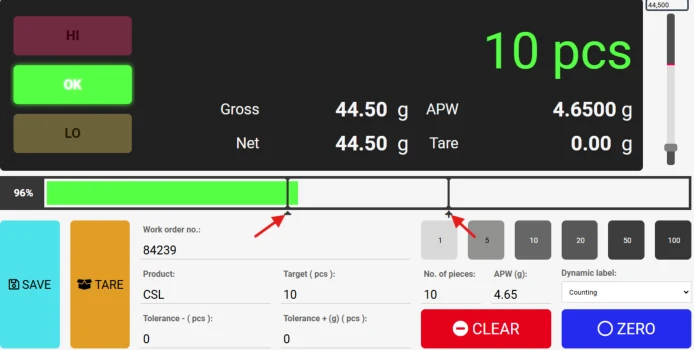
10.4.3. Part counting application settings
Under application settings you will find beside common application settings also the following attributes related to part counting application:
- Quantity description – by default this is set to pcs but if you want to change it you can just enter different value here. Pcs is abbreviation for pieces, and it is shown in weight display after number of pieces. - APW unit – this is unit used to calculate average piece weight. - APW number of decimals – you can change number of decimals for calculating average piece weight. By default, it is set to 4 but you can increase or decrease value
View original page 87 — diagrams and layout
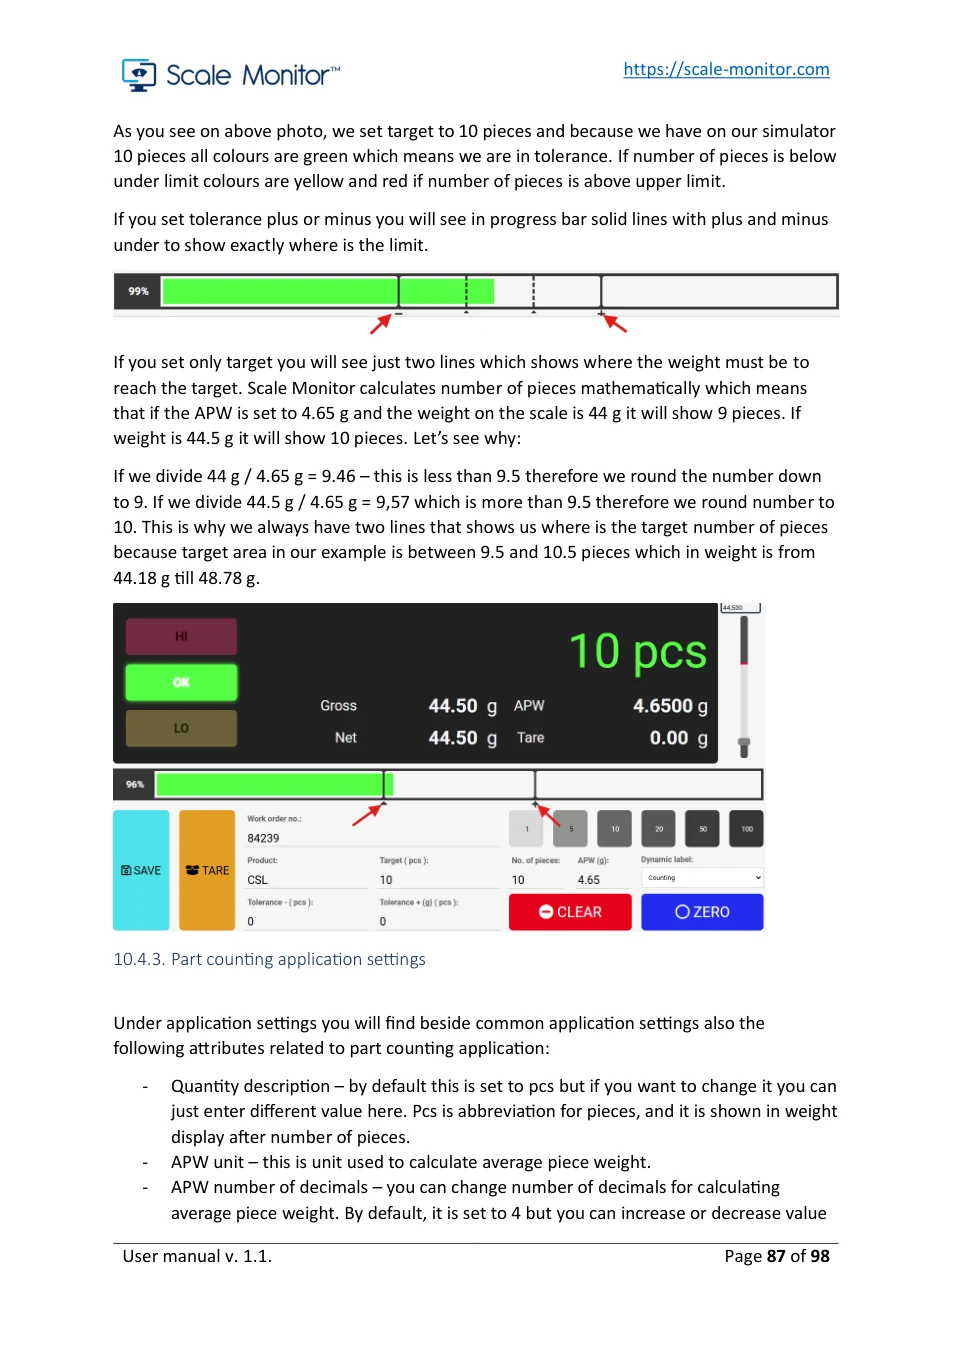
if needed. It is advisable that you set number of decimals to be higher for two decimal places than scale decimals. If you have scale with division 0.01 g it means that it has 2 decimal places. In that case you shall set number of decimal places to 4. - Number of decimal places for pieces – in some cases there is a need to also show number of pieces with decimal places. By default, it is set to 0 which means no decimals but if you need you can also set decimal places for showing number of pieces.
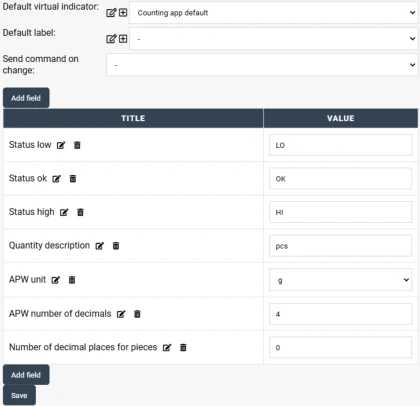
10.4.4. Part counting related parameters
Part counting application has the following parameters:
- APW – average piece weight – this weight used to determine number of pieces on scale. - Number of pieces – this parameter is used in sampling and represent number of pieces on the scale for sampling. - Target – this parameter is used for check weighing or packing exact number of pieces. - Tolerance plus and minus – in case you have tolerance for counting pieces you can use these two parameters to set upper and lower limit.
If you want to add application related parameters to your virtual indicator, you can create a normal parameter (see Parameter of type text and number) of type number and set App parameter type to Target (part counting) or Tolerance + (part counting) etc.
View original page 88 — diagrams and layout
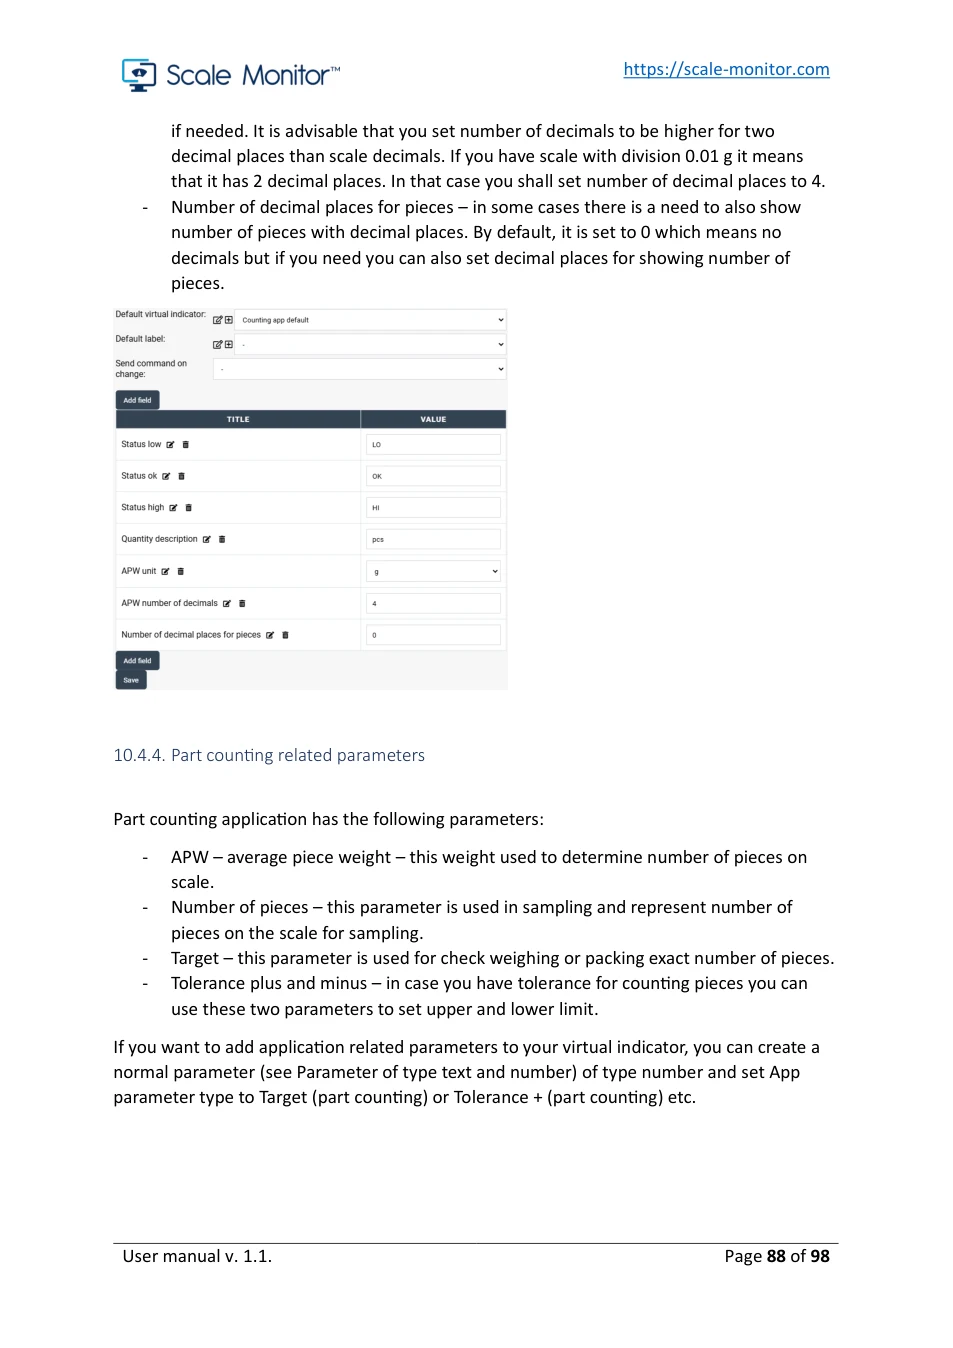
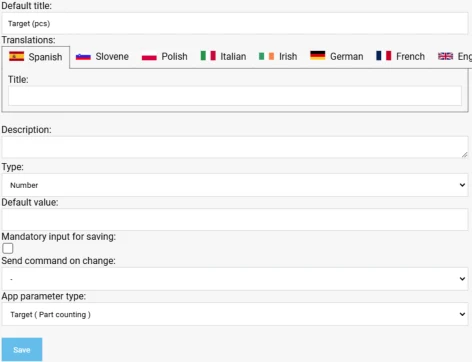
On the default virtual indicator these field are already preset.
10.4.5. Databases in part counting application
If you have multiple products with different average piece weight (APW) it is advisable to use database where you store APW for each product. When you select product from database APW will be automatically set and in this way, you can skip sampling process when you want to count this product.
To create new database, see Add new database.
Example of product database:
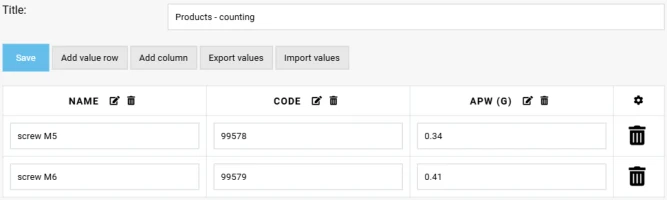
Once you created new database with parameters you must also add column APW and link it to external function (see External functions).
View original page 89 — diagrams and layout
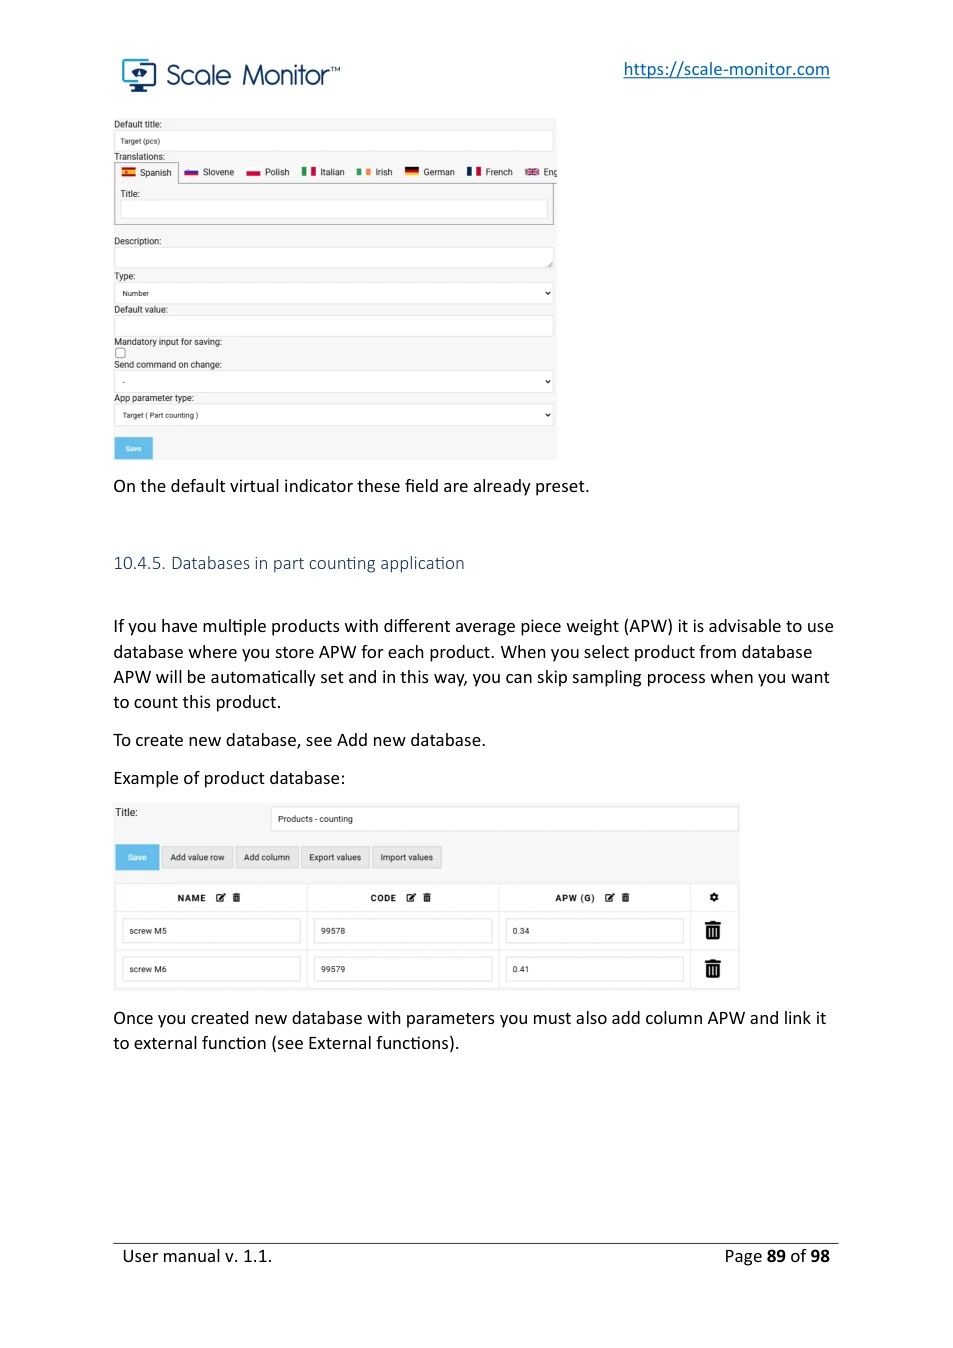
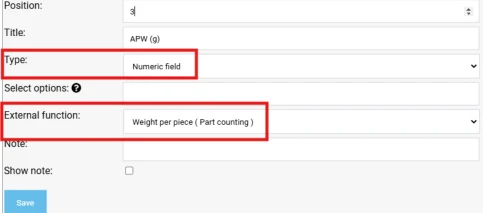
If you want to use also target and tolerances the procedure is the same as for APW.
To add database to your virtual indicator, see Add database on virtual indicator.
10.5. Reference weighing
Reference weighing application is used for checking product and see difference expressed in percentage.
To start using reference weighing application you must put on the scale your reference and click on the button “SET REFERENCE” or enter reference weight into “Reference weight” field.
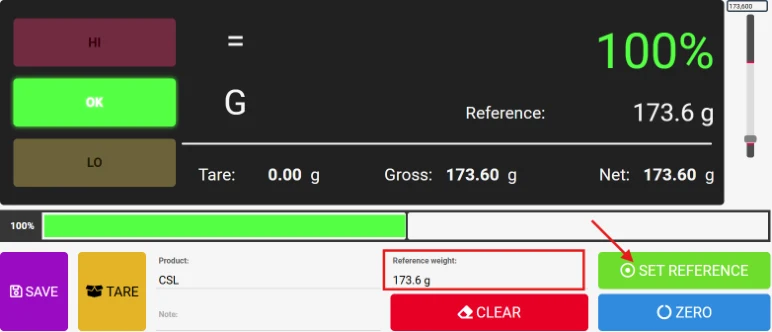
If the weight on the scale is the same as reference weight Scale Monitor show green colour on progress bar, semaphore and percentage in weight display otherwise it will show yellow if percentage is below 100% and red if percentage is above 100%.
View original page 90 — diagrams and layout
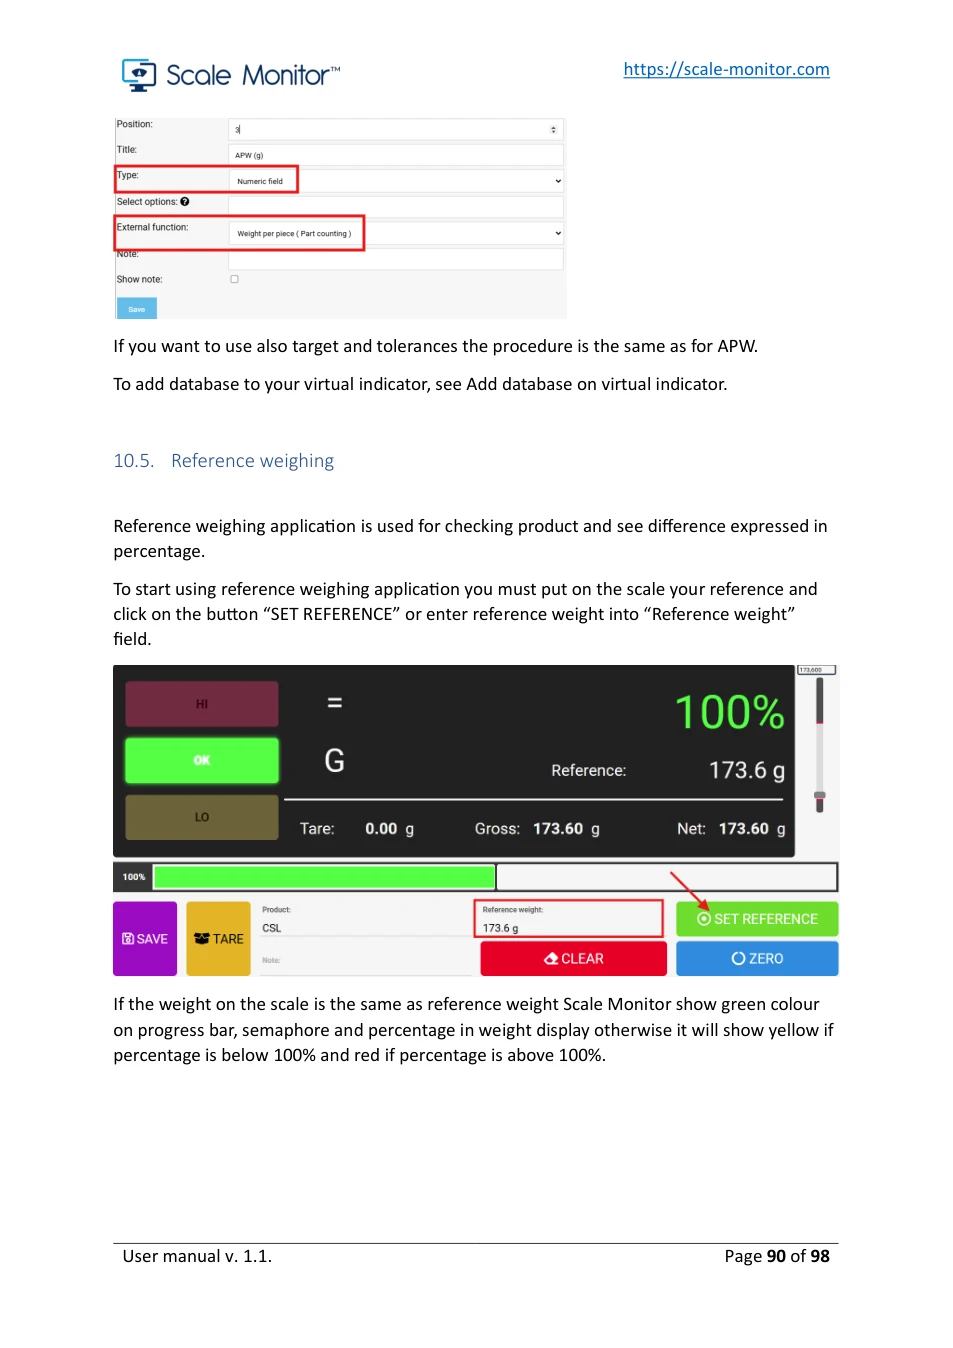
10.5.1. Reference weighing settings
Under application settings you will find beside common application settings also the number of percentage decimal places. By default, this is to 0 but if you want to see percentage with decimal places you can enter here number of decimal places you want to see.
11. Debug
Debug mode is intended to debug communication with scale. It offers you quick and easy insight into communication.
Every scale has communication protocol with which program can communicate with a scale. The most widely used communication protocol is from Mettler Toledo SICS which stands for Standard Interface Command Set.
The most famous command is SI – send immediately. If you want to test if communication with your Mettler Toledo scale is working, you can go to Menu → Debug and new window will open.
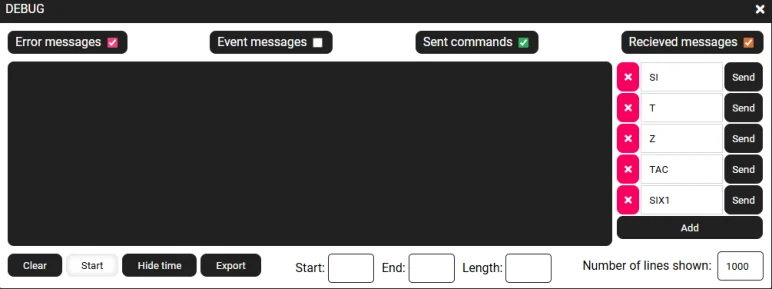
On top you see different buttons to enable or disable what you want to see in console.

On the right you have a table where you can add any number of commands which you can send to scale.
View original page 91 — diagrams and layout
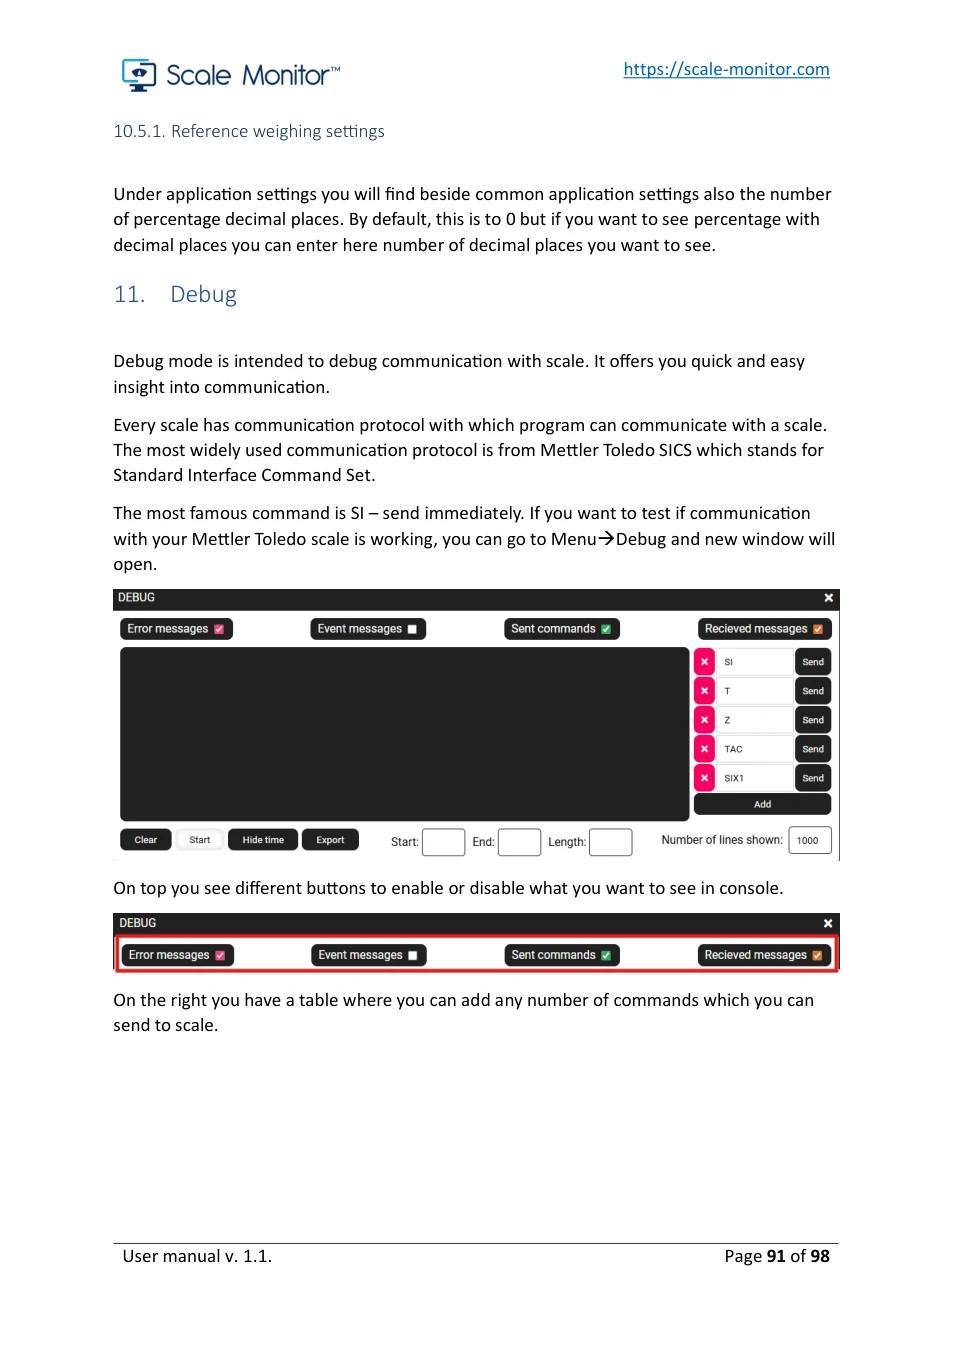
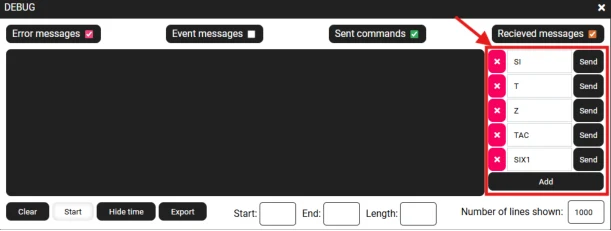
On the bottom of the window, you have clear button to empty console, start/stop button for communication, hide/show time button and start, end and length which shows start/end position together with length of marked string in console. This is very useful for creating new protocol – see Protocol.
If you want to send command to scale, simply click on add button and enter command you want to send to scale. Once you click send button next to command you will see what command was sent and if communication with scale is working you will get also reply from scale. To distinguish between sent commands and replies we use colours – green is for sent commands and orange is for received replies.
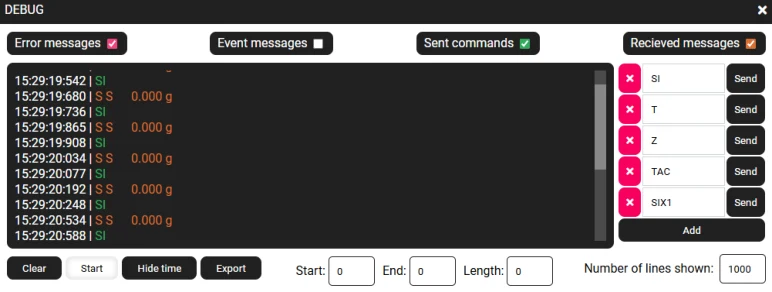
With built-in debugger you can test you communication with scale and also resolve problems in quick and easy way.
11.1. Diagnostic
If you want to check how quick is your communication with scale or diagnose communication, you can use diagnostic. To open diagnostic window, go to Menu → Diagnostic and diagnostic window will open.
View original page 92 — diagrams and layout
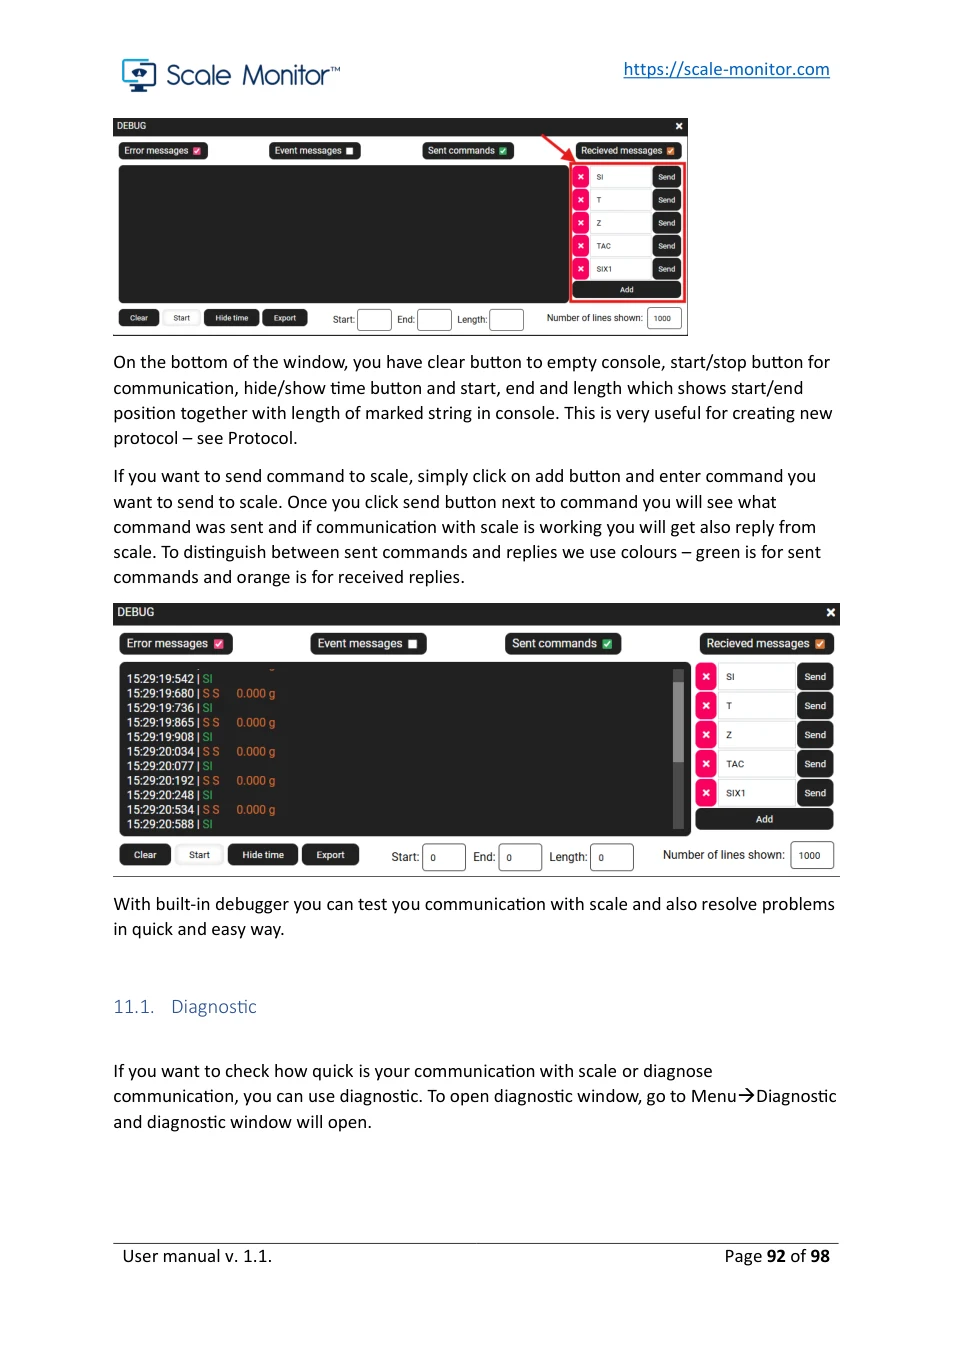
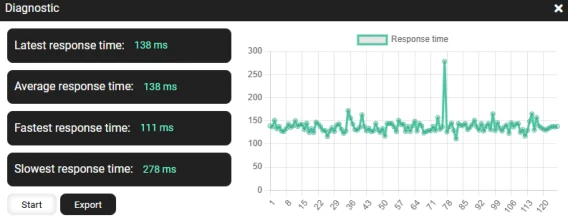
In diagnostic window you will see:
- latest response time, - average response time, - fastest response time and - slowest response time.
12. Users
Once you register for Scale Monitor you are automatically administrator of the Scale Monitor. If you want to use Scale Monitor with several different users, you can simply add new users. This means that other users will be able to use scales that are in your Scale Monitor.
12.1. User language settings
Each user can setup the language in which it would like to use Scale Monitor.
Once you are logged into Scale Monitor you have two ways to change your language:
1. click on man icon in upper right corner and select Settings
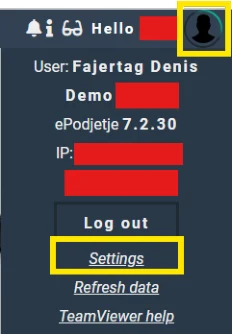
View original page 93 — diagrams and layout
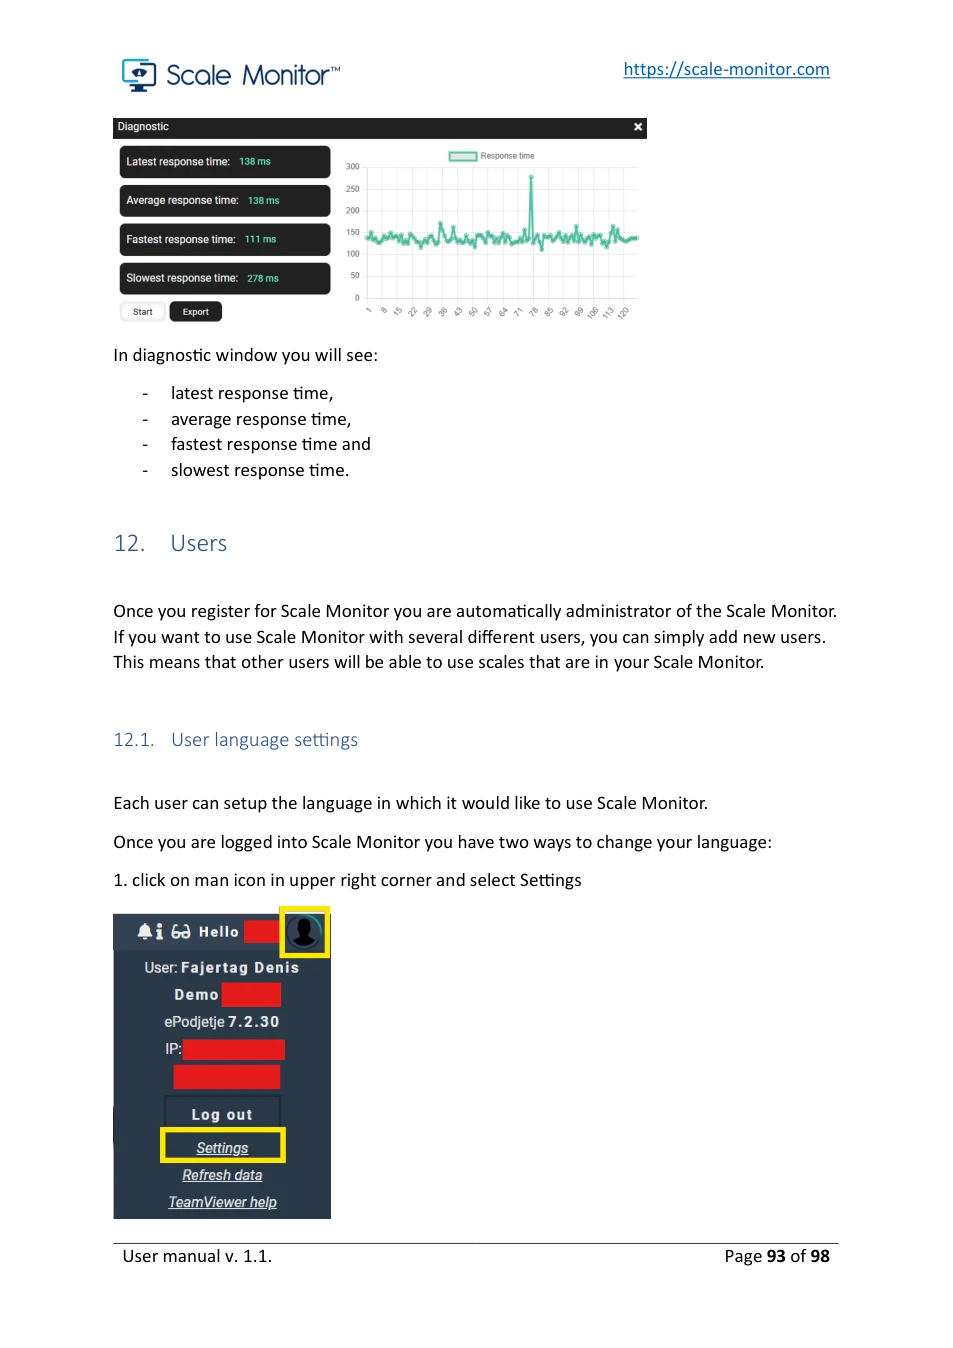
2. if you are on your scale you can click on your name which is also displayed in upper right corner

New window will open where you can change your language:
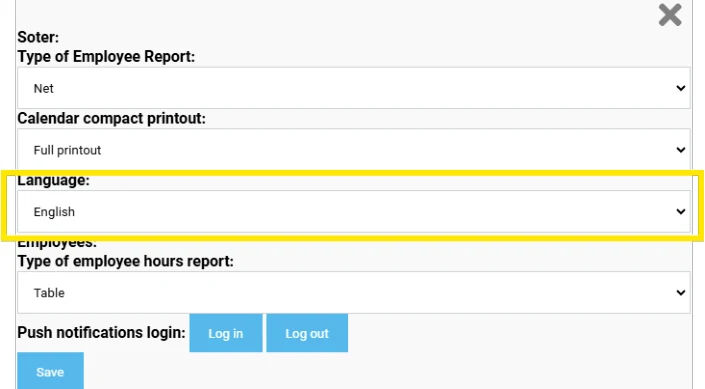
After you selected language, you would like to use click save and refresh website to load new language.
12.2. Add new system user
Once you login you must click on the Menu → Settings → System users
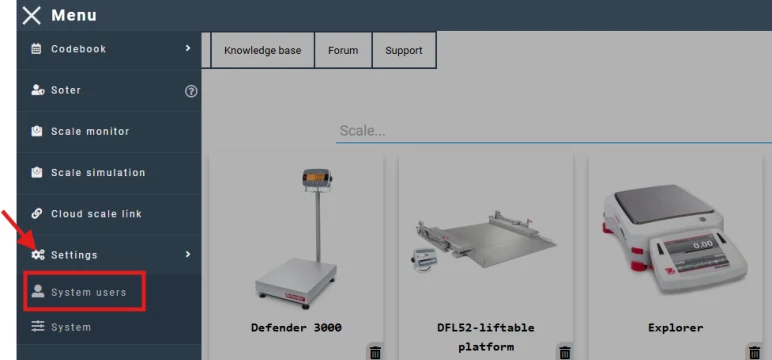
View original page 94 — diagrams and layout
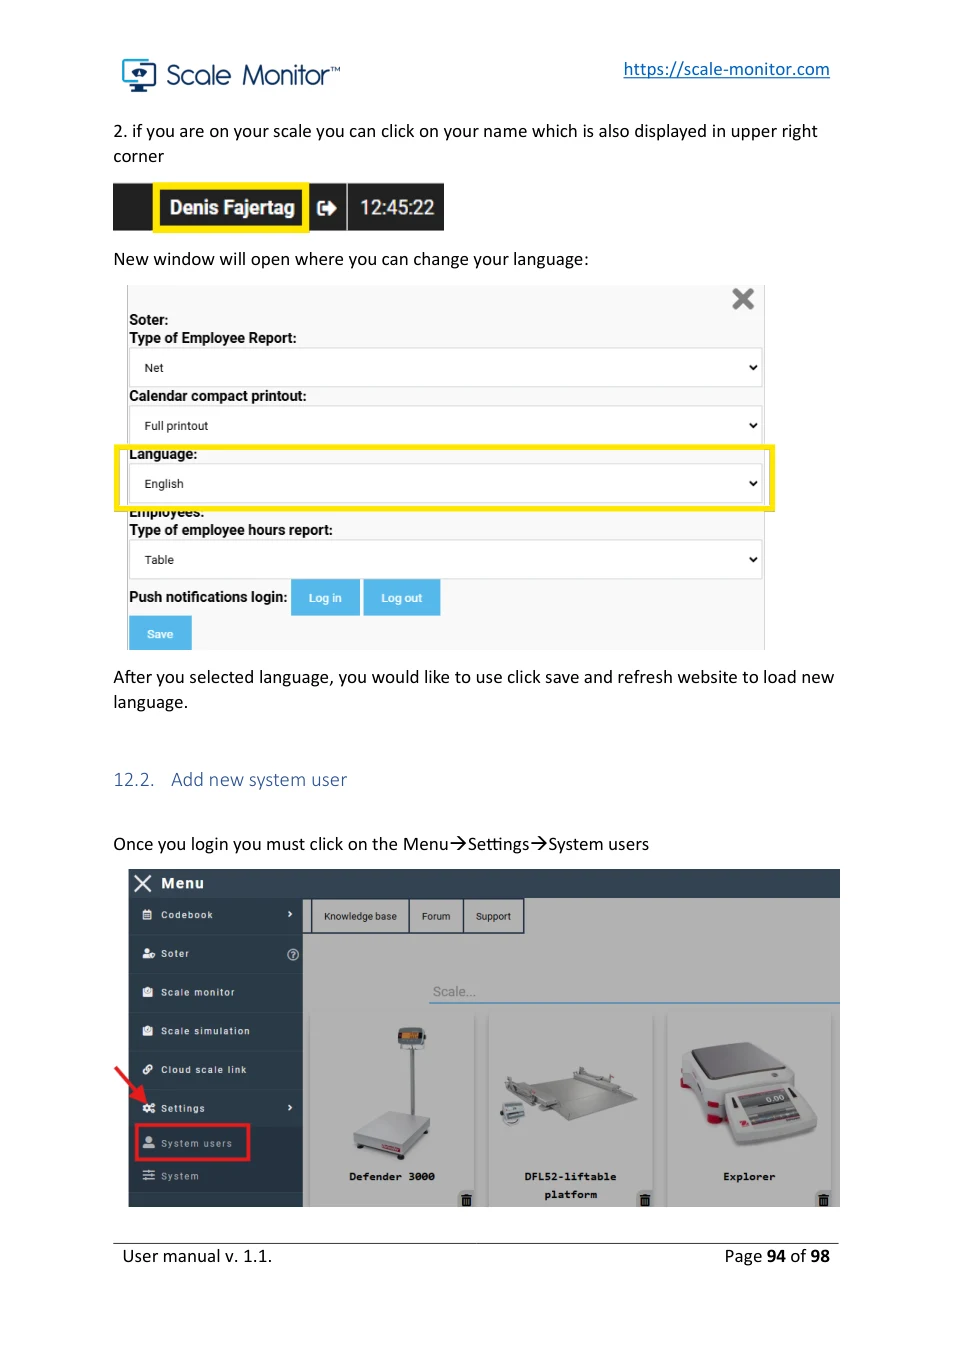
User menu will open where you will see existing users and Add system user button.
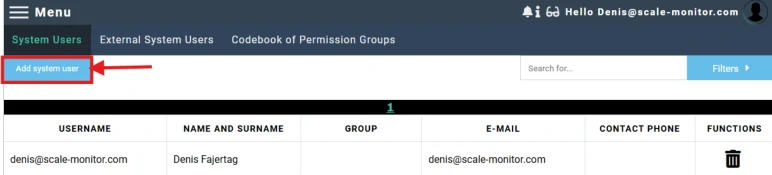
To add new user click on button Add system user and new window will open:
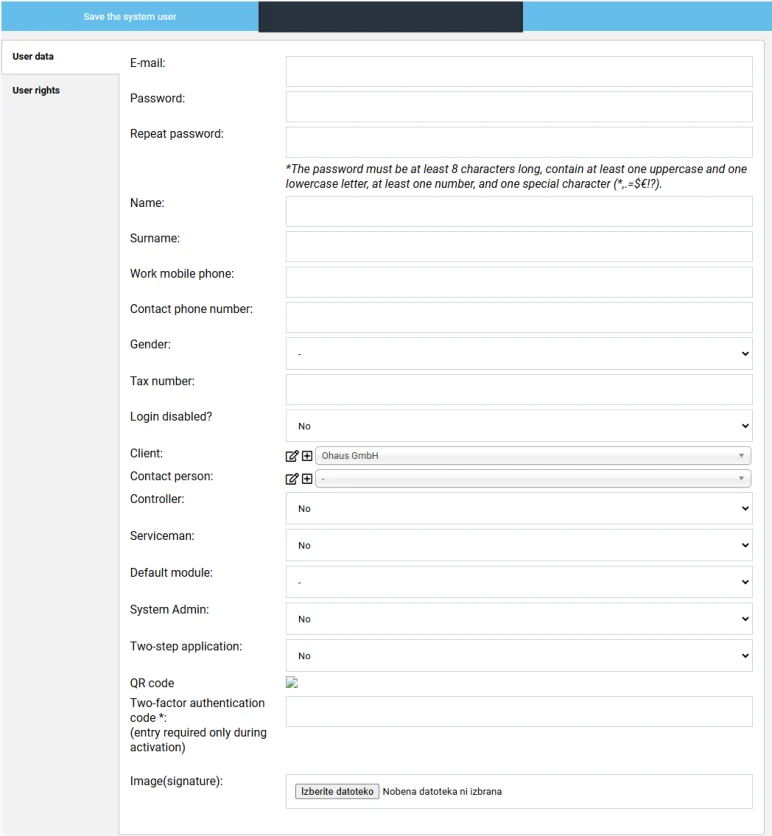
You must enter email address, password, name, and surname. All other data are optional. Once you create new user you must also set his rights. By default, user does not have any
View original page 95 — diagrams and layout
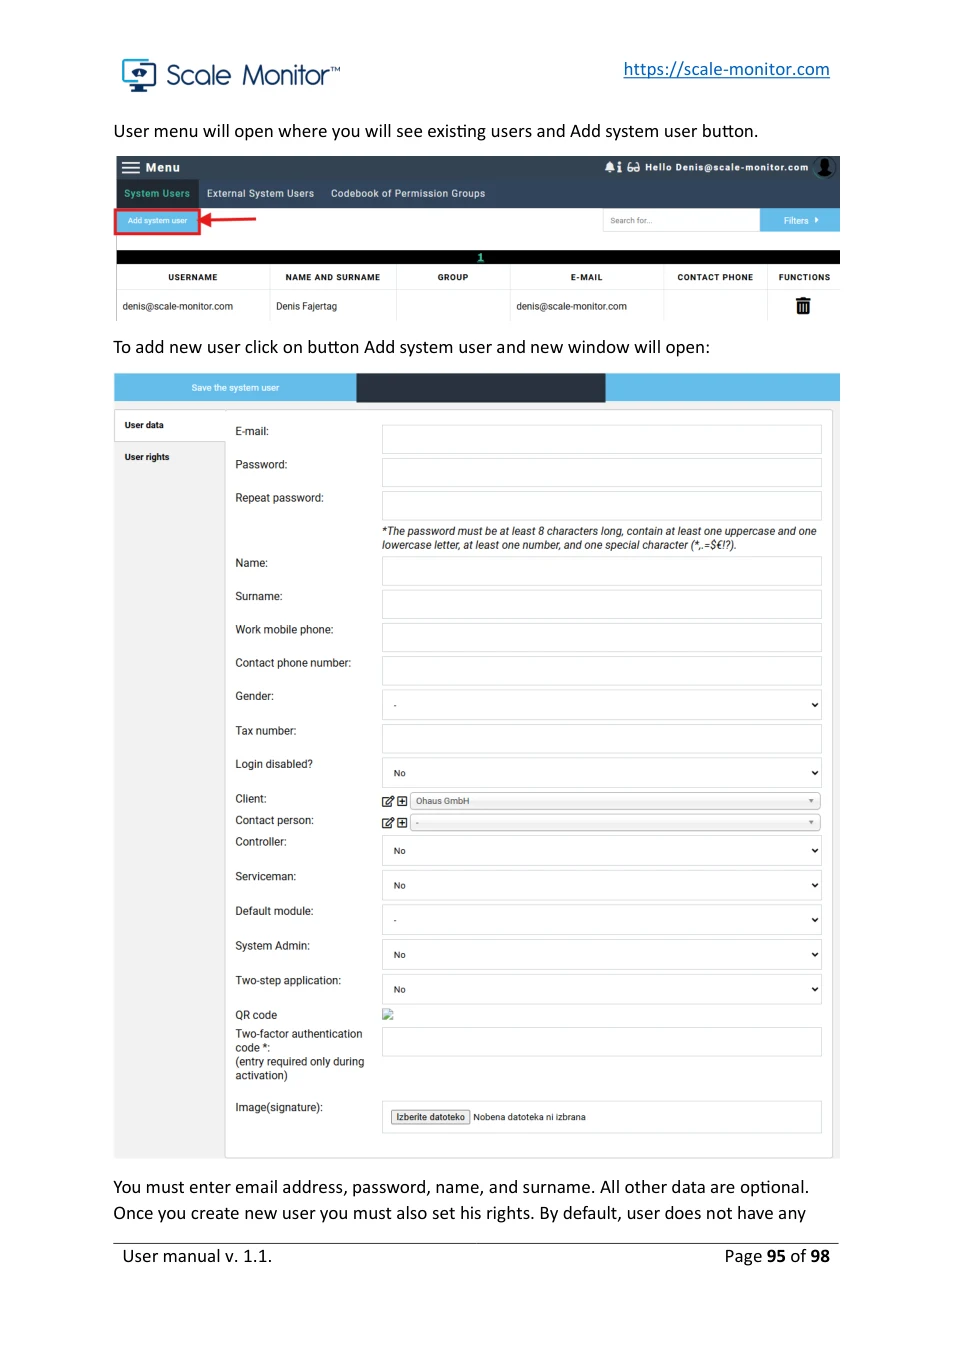
rights. To set user rights click on tab User rights which is located on the left side of the window.
In user rights window you will see modules and for each module you can set user rights. For instance, if you want that user can user Scale Monitor you must enable user rights for Scale Monitor. If you want to give user right to change for instance also display, you must check also right save layout display.
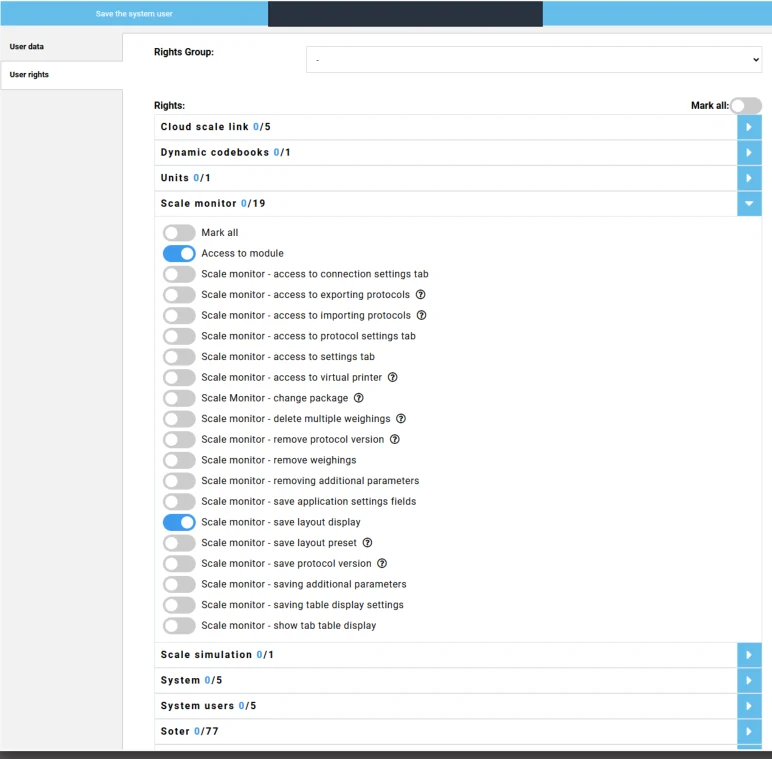
12.3. User groups
If you have many users and you want to specify for all of them the same rights, you can create group and specify group permissions. Every user that has this group set under user rights or is part of this group the group permissions will be applied.
View original page 96 — diagrams and layout
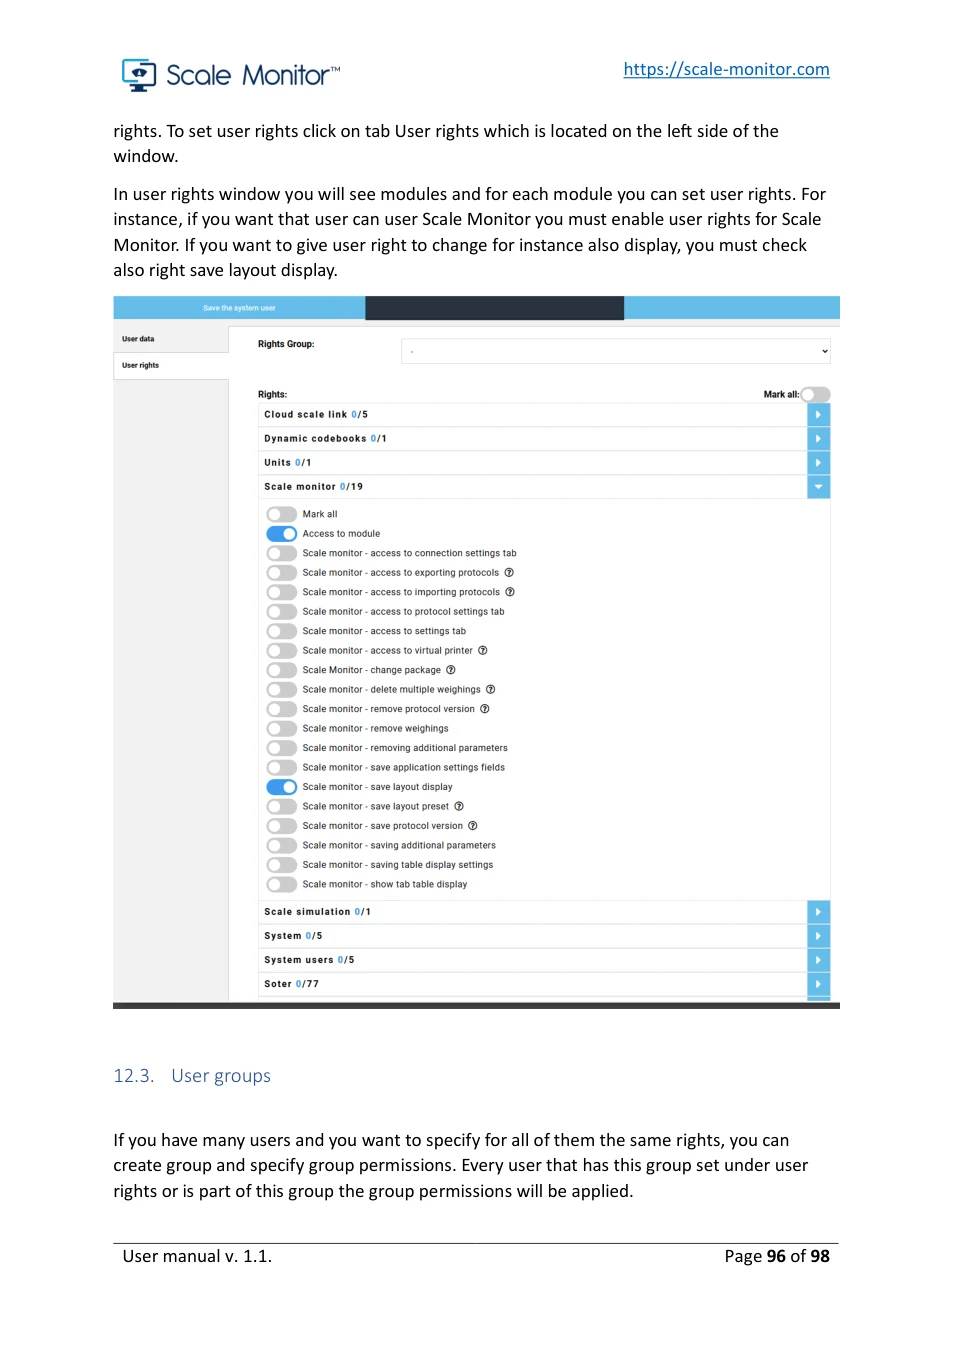
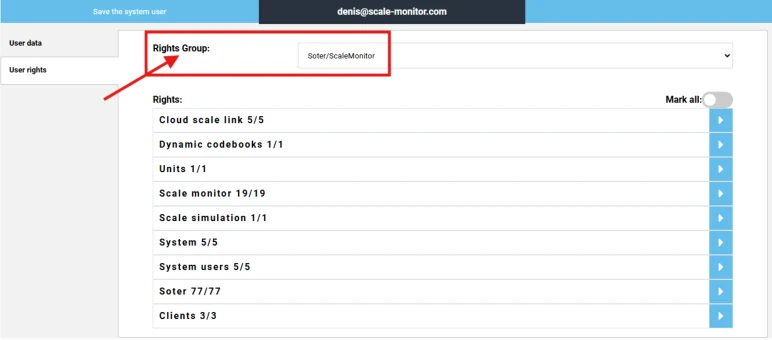
Group permissions window:
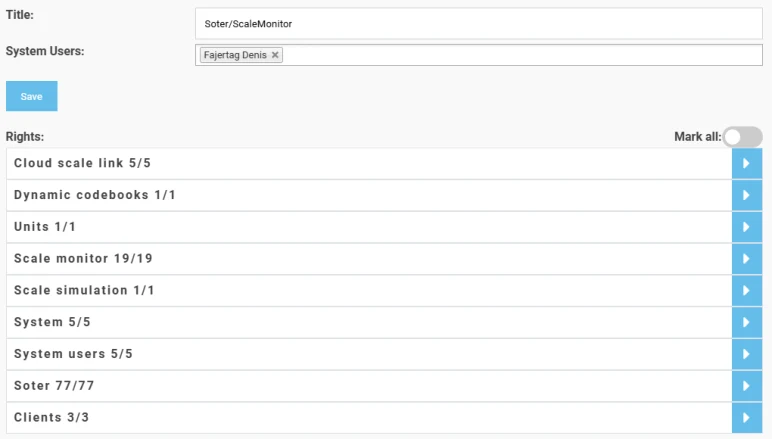
If you change group permissions this will be automatically applied to all group members.
13. System settings
Under system settings you will be able to setup the default language of Scale Monitor.
Under setting you can also setup additional security by locking down access to Scale Monitor only from specific countries or only from specific IP.
Under system settings you can also email settings to send you information using your own email.
View original page 97 — diagrams and layout
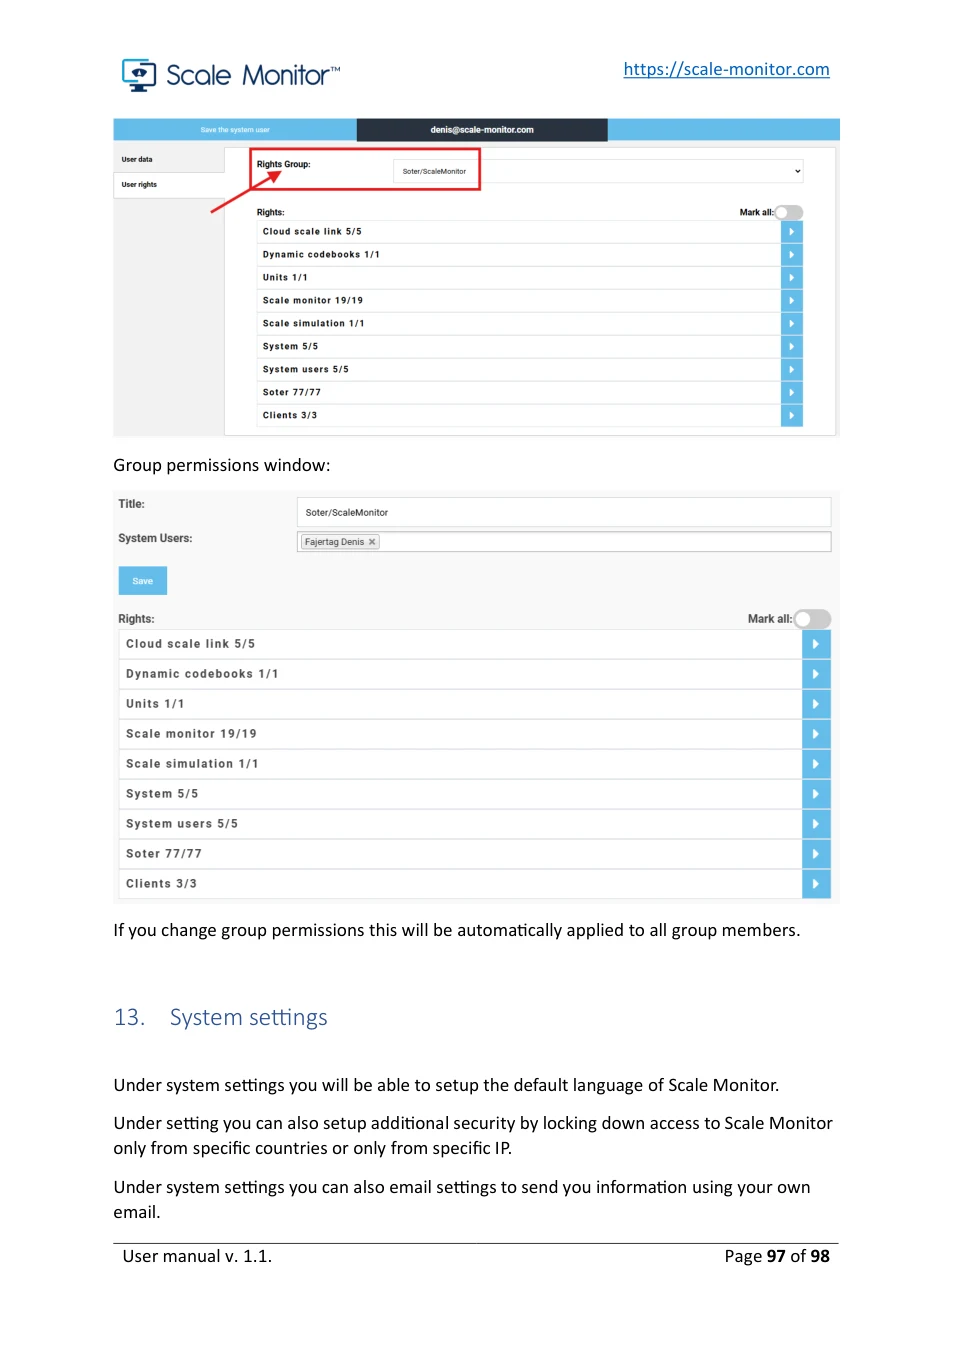
To enter System settings after login go to Menu → Settings → System.
View original page 98 — diagrams and layout